


React Native provides developers with a powerful layout system called Flexbox, which allows for creating dynamic and responsive user interfaces. Flexbox is a layout model in web development, and React Native has adopted it to make it easier for developers to build complex layouts. With Flexbox, developers can easily position and align elements within a container, control the flow of content, and adjust the size of components based on available space.
Flexbox in React Native works by assigning a flexible value to the container and the child components. The container is define as a parent element, while the child component is the nest within the container.
The Flexbox layout system consists of several properties that control the alignment and distribution of components within a container. These properties include flexDirection, justifyContent, and alignItems.
- flexDirection defines the direction in which the child components are laid out and can be set to either row or column.
- justifyContent controls the alignment of components along the main axis, and includes values such as flex-start, flex-end, center, space-between, and space-around.
- alignItems controls the alignment of components along the cross-axis and includes values such as flex-start, flex-end, center, and stretch.
In addition to these properties, Flexbox also includes other properties such as flexWrap, alignContent, and flexBasis that can be used to control the layout of components in more advanced ways.
In this guide, we’ll explore the basics of using Flexbox in React Native and provide examples of employing it to create beautiful and adaptive UI designs.
We will be covering:
- Fundamental Concepts of Flexbox Layout
- Various React Native layouts
- Flexible layout options
- Flexbox layout implementation in a React Native app
Intrigued? Us too! Let’s learn about the Fundamental concepts of Flexbox Layout in detail below!
Fundamental Concepts of Flexbox Layout
The Flexbox layout model is built around several fundamental concepts that control the behavior of elements within a container. These concepts are:
1. Flex container:
The container element in which child elements is place is known as the flex container. In the case of Flexbox layout, the container is set to display: flex to enable the Flexbox layout mode.
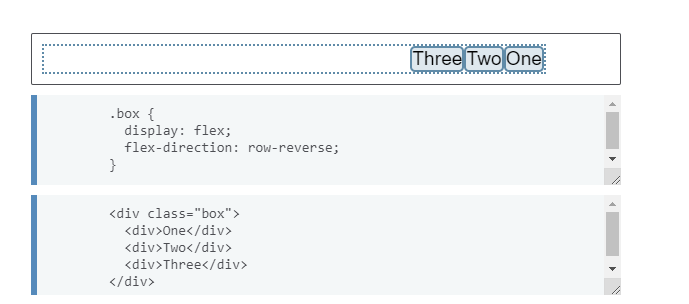
You can see in the live example below how this looks. Try editing the items or adding additional items in order to test the initial behavior of flexbox.
2. Flex items:
The child elements inside the flex container are called flex items. Each flex item assigns a flexible value to control how they stretch or shrink in relation to the other flex items within the container.
3. Main axis:
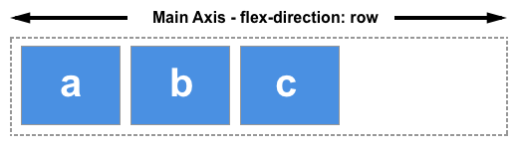
The main axis is the primary axis along which the flex items are laid out. It can be either horizontal (in a row) or vertical (in a column) depending on the value of the flexDirection property.
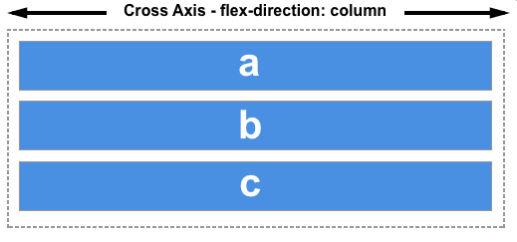
4. Cross axis:

The cross axis is perpendicular to the main axis and runs in the opposite direction. It can be either vertical (in a row) or horizontal (in a column) depending on the value of the flexDirection property.
5. Flex direction:
The flexDirection property determines the direction in which the main axis runs. It can be set to row to lay out flex items in a row, or column to lay out flex items in a column.
6. Justify content:
The justifyContent property controls the alignment of flex items along the main axis. It can be used to position flex items at the start, center, end, or space evenly between them.
7. Align items:
The alignItems property controls the alignment of flex items along the cross-axis. It can be used to position flex items at the start, center, end, or stretch them to fill the container height or width.
8. Flex wrap:
The flexWrap property controls whether flex items wrap to the next line when they overflow the container. It can be set to nowrap to prevent wrapping or wrap to allow wrapping.
9. Flex basis:
The flexBasis property sets the initial size of a flex item before it stretches or shrinks to fill the container. It can be set to a fixed size or a percentage of the available space.
10. Flex grow and flex shrink:
The flexGrow and flexShrink properties determine how much a flex item should grow or shrink in relation to the other flex items. A higher flexGrow value means a flex item will take up more space, while a higher flexShrink value means it will shrink more in response to a lack of space.
Understanding these fundamental concepts is essential for creating flexible and responsive layouts using the Flexbox layout model in React Native.
Various React Native Layouts
As already mentioned, React Native provides several built-in layouts to help developers create responsive and flexible interfaces. Here are some of the most commonly used layouts in React Native:
View
The View layout is the most basic layout in React Native. It is used to create a container for other elements. It is similar to an <div> element in HTML. You can add styling properties to it to adjust its appearance and layout.
Text
The Text layout is used to display text in a React Native app. It is similar to a <p> or <span> element in HTML. You can add styling properties to adjust the font size, color, and other text properties.
Know the best practices for styling in React Native to effectively understand the usage of React Native layouts.
Image
The Image layout uses display images in a React Native app. You can set the source, dimensions, and other properties to customize the appearance of the image.
ScrollView
The ScrollView layout uses a scrollable container in a React Native app. It allows users to scroll through a large list of items or a long block of content.
FlatList
The FlatList layout uses display a large list of items in a React Native app. It is optimized for the performance of a React Native app and can handle large data sets efficiently.
SectionList
The SectionList layout is similar to the FlatList layout, but it allows you to group items into sections. It is useful for displaying data to organize into categories or groups.
Flexbox
The Flexbox layout uses flexible and responsive layouts in a React Native app. It allows you to control the size, spacing, and positioning of elements within a container.
Grid
The Grid layout uses a grid of items in a React Native app. It is useful for displaying data organizes in rows and columns, such as a calendar or a list of products.
These are just a few of the many layouts available in React Native. By combining these layouts and customizing their properties, you can create complex and responsive interfaces for your app.
Flexible Layout Options
Flexbox Layout
Flexbox is a powerful layout tool that consists of a container and its child elements, which is place within the container. With Flexbox, you can easily control the size, spacing, and positioning of elements within a container, making it an ideal choice for creating flexible layouts.
Dimensions API
The Dimensions API allows you to get the dimensions of the screen or a specific element in your React Native app. By using this API, you can create responsive layouts that adjust to the size of the screen or the device’s orientation.
To enhance React Native’s app functionality, integrating APIs is important. Read everything in our previously written blog.
Percentage-based Units
React Native supports percentage-based units, which allow you to specify element sizes and positions as a percentage of the parent container. For example, you can set the width of an element to 50% of its parent container, which will adjust automatically based on the size of the screen or device orientation.
SafeAreaView
The SafeAreaView component ensures that your app’s content displays within a safe area that is not obscure by notches, camera overlays, or other system elements on the device. By using SafeAreaView, you can create flexible layouts that is optimize for different device sizes and orientations.
Responsive Design Principles
Finally, you can apply responsive design principles to your React Native app to create flexible and adaptive layouts. This involves using breakpoints to adjust the layout based on the size of the screen or device orientation. By using responsive design, you can create layouts that look great on all devices, from small mobile screens to large desktop monitors.
By combining these flexible layout options, you can create powerful and adaptive layouts that provide a great user experience on all devices.
How to Implement Flexbox in React Native?
Flexbox is a powerful layout system that is use in React Native for creating responsive and dynamic layouts. Here are the basic steps to implement Flexbox in React Native:
1. Set the container’s display property to flex:
|
1 2 3 4 5 |
<View style={{ display: 'flex' }}> // child components here </View> |
2. Define the flexDirection property to determine the direction in which the child components is layout. The default value is column, which lays out the child components vertically. You can set it to row to lay out the components horizontally:
|
1 2 3 4 5 |
<View style={{ display: 'flex', flexDirection: 'row' }}> // child components here </View> |
3. Use the flex property to specify how much space each child component should take up. You can set this property to a number to specify the flex ratio. For example, if one child component has a flex value of 2, and another has a flex value of 1, the first component will take up twice as much space as the second component:
|
1 2 3 4 5 6 7 8 9 10 11 12 13 14 15 |
<View style={{ display: 'flex', flexDirection: 'row' }}> <View style={{ flex: 1 }}> // first child component </View> <View style={{ flex: 2 }}> // second child component </View> </View> |
4. Use the alignItems property to specify how the child components is align along the cross axis. The cross axis is perpendicular to the main axis, which determines the flexDirection property. You can set this property to flex-start, flex-end, center, stretch, or baseline:
|
1 2 3 4 5 |
<View style={{ display: 'flex', flexDirection: 'row', alignItems: 'center' }}> // child components here </View> |
5. Use the justifyContent property to specify how the child components is align along the main axis. You can set this property to flex-start, flex-end, center, space-between, space-around, or space-evenly:
|
1 2 3 4 5 |
<View style={{ display: 'flex', flexDirection: 'row', alignItems: 'center', justifyContent: 'space-between' }}> // child components here </View> |
These are the basic steps for implementing Flexbox in React Native. By using these properties, you can create responsive and dynamic layouts that adjust to different screen sizes and orientations.
Role of DianApps in Implementing Flexbox in React Native Apps
DianApps is a mobile development company that specializes in creating custom mobile applications using React Native, among other technologies. When it comes to implementing Flexbox in React Native apps, DianApps can play a significant role in ensuring that the app’s layout is responsive, dynamic, and visually appealing.
DianApps’ team of experienced React Native developers can use their expertise to create smart custom layouts that meet the specific requirements of the app. Our team can help identify the appropriate Flexbox properties to use, such as flexDirection, flex, alignItems, and justifyContent, to achieve the desired layout.
DianApps’ developers also ensures to optimize the app’s layout for different screen sizes and orientations. We use media queries to adjust the layout for smaller or larger screens, ensuring that the app looks good and functions well on all devices.
Recap of What We Covered:
Flexbox is a powerful layout system that allows developers to create dynamic and responsive layouts in React Native. With the use of Flexbox properties such as display, flexDirection, flex, alignItems, and justifyContent, developers can easily layout their components in a way that adapts to different screen sizes and orientations.
By implementing Flexbox in React Native, developers can create layouts that are easy to maintain, read, and understand. Flexbox simplifies the process of creating complex layouts, making it easier for developers to focus on creating the functionality of their applications.
Overall, Flexbox is a powerful tool for creating flexible and adaptive layouts in React Native.
It allows React Native developers to create visually stunning and responsive interfaces that work across multiple devices and platforms. With Flexbox, developers can build beautiful and functional apps that provide an exceptional user experience.
With DianApps, businesses and individuals can trust that their React Native apps will have responsive and dynamic layouts that meet the specific needs of their users.
Also read: React Native 0.71: Flexbox gap, typescript, and its first-class support.


Leave a Comment
Your email address will not be published. Required fields are marked *