


React Native is the future of cross-platform app development because from scalability and efficiency to excellent performance, it provides all the features that are needed to make a reliable mobile application.
User experience is very important for any kind of application as it is the core component of that product. Even though React Native comes with so many functionalities, there are times when some performance issues might arise in the application. So, In order to overcome those issues you should have a proper understanding of the methods that you can integrate to improve the performance of your application.
In this blog, we will discuss some of those practices that you can use further in your app.
Now let’s get started with this blog to know more!
Best Practices To Improve The Performance of The Application
1. Cache Images
Images are considered the core components of React Native. These core components are used to display an image but it does not have many extraordinary solutions for issues like:
- For rendering a large number of images on a single screen.
- Inefficient performance in cache loading.
- Generally, overall deficient app performance
- Flickering of the images, etc.
However, there are many ways to deal with these types of issues by using third-party libraries like react-native-fast-image. This library works like a magic for both Android and iOS platforms.
FastImage also helps to add authorization headers and several other features as well.
If you want your image to be loaded first as your priority image then you should set its priority to FastImage.priority.high. You can use this feature according to your requirements and in the way how you want your image to be loaded.
Now for optimizing the React Native app, the cache property could be beneficial in many ways. Now let’s have a look at some of the more features of the cache property. It can be used in three different ways likewise:
- FastImage.cacheControl.immutable: This is the default value and the image will only get updated if its URL gets changed.
- FastImage.cacheControl.web: This can be used for normal caching procedures.
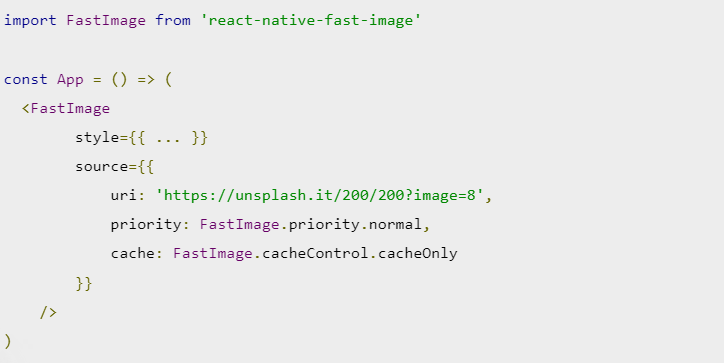
- FastImage.cacheControl.cacheOnly: It is one of the most restrictive options because only images from the cache are shown in this case.
Additionally, Image caching is also one of the prominent solutions to all image problems in a React Native app and improves the app performance to a great extent.
Below is an example of how you can cache an image.

2. Make Use of Hermes
Hermes is an open-source JavaScript engine that was launched by Facebook in 2019. It is optimized specifically for mobile devices and for the Android platform it is available for React Native version 0.70 and above. The iOS platform is available for version 0.64-rc.o and above.
Its main function is to reduce the download size of the APK, the time required for the app development, and the memory footprint and consumption. You can opt for professional React Native app development services to use this Hermes feature in your application.
To enable Hermes on Android, edit the android/app/build.gradle and add the following line.

You can also do this in the way shown below.

Now, to enable Hermes for iOS set hermes_enabled, open Podfile, and the following line in your PodFile
3. Scale And Resize Images
These image sizing issues are not a big concern in web apps because the browser can scale the image size accordingly.
But this is different when it comes to mobile applications. React Native has an image component that can adjust single images well but performs very poorly for large-size images.
That’s why it is very essential to optimize images to improve the performance of your React Native application. Rendering multiple images will lead to high memory usage if the images are not properly optimized in terms of resolution and size. In some cases, the app can also get crashed due to memory overload.
Some of the below-mentioned enhancements can be made to optimize images in a React Native application.
- Instead of JPG format use the PNG format
- Use images that have smaller resolutions
- Lastly, you can also use the WEBP format to reduce the binary size of images on iOS and Android by almost one-third of the original size.
In a nutshell, you should resize and scale down the image size before you load it into your application.
4. Avoiding Scroll View to Render Huge Lists
There are some ways to display items with scrollable lists in React Native app. Among two of the most commonly used are ScrollView and FlatList.
ScrollView is easy to implement and use. As shown below in the image, it is used to iterate through a list of a finite number of items. ScrollView is suitable to use when the number of items in the list is less. Despite this, if you will use this for a large amount of data then it will affect the performance of your application.

Instead, this uses the FlatList or SectionList to handle large amounts of data in React Native. The FlatList is responsible for rendering the items that will be displayed on the screen and it also removes them when they are no longer needed. This helps to save a lot of memory which makes the app performance much faster.

Similarly, SectionList can be also used to improve the app performance like the FlatList. However, it is more preferably used for rendering sections.
One thing you should keep in mind is that you do not render lists with maps because it is not appropriate and advisable to do it in the React Native app.
5. Remove All Console Elements
Console statements are most commonly used for debugging JavaScript codes. If they are not removed before bundling and left in the source code then these statements can create some serious performance problems.
You can install plugins such as babel-plugin-transform-remove-console to automatically track these statements and remove them.
You can install this third-party dependency by running the below command in a terminal window.

Once the installation process is complete, modify the .babelrc file to remove the console statements as shown below in the image.

6. By Using Suitable Navigation Strategies
The React Native app development team Is continuously working to fix all the navigation-related problems to provide a smooth user experience.
Although, React Native offers four different types of navigation strategies to build the navigation.
- iOS Navigator: It can only be used for iOS devices and is not suitable for Android Navigation development.
- Navigator: It is not suitable for high-performance applications and can only be used for small applications and prototype development.
- Navigation experiment: It can be used for complex applications.
- React Navigation: This Is one of the most used strategies because it can be used for both small and complex applications.
7. Avoid Excessive Use of Higher-Order Components
Your application will start using high-order components when it becomes complex.
High-order components can be a good practice but sometimes it increases the complexity and indirection of the code.
You should not instantiate a high-order component, especially during a render method because if you will do so then it might create new components on its own.
8. Use The RAM Format
If you will use the RAM format on iOS then it will create a single indexed file that will load one module at a time in React Native app. But in Android, it will create a different set of files for each module. You can also use Android to build a single file but if you will use multiple files then it can be more performant and use less memory.
You can use the below commands if you want to build a single indexed file in Android.

9. Optimize Android App Size
Developers usually don’t care about the app size at the beginning of the project. After all, It is not that easy to make such predictions so early. Although it uses few functional dependencies to enlarge the application size according to the codebase.
By default, a React Native application on the Android platform consists of
- Four different sets of binaries that are compiled for distinct CPU architecture.
- JavaScript bundle with React components.
- Directory with the necessary resources such as images, fonts, etc.
- Some other files.
10. Faster Debugging With Flipper
Although the whole development process is a very challenging task and in that debugging is one of the most challenging and stimulating tasks for all developers out there.
It is a very time-consuming process and the issues you are trying to solve can occur on different levels. Mainly it is caused by the below-mentioned reasons:
- JavaScript: React Native code
- Native code: third-party libraries
So you can use Flipper which is a debugging platform used for mobile apps. Additionally, it also offers great support for React Native applications.
Conclusion
Above are some of the factors that you should be considered to improve the performance of your React Native application as performance is a very essential concept. Though React Native is a very popular framework if it is used precisely keeping the importance of performance in mind you will get to see more prominent results.
So, what are you waiting for? Get In Touch with us today to get the best React Native app development services for your next project.


Leave a Comment
Your email address will not be published. Required fields are marked *