
Two years back, JetBrains discontinued one of its IDE “AppCode” and officially announced a whole new Integrated Development Environment, named Fleet! Built from scratch, with insights from two decades of IDE development, Fleet runs on the powerful IntelliJ code engine. It features a distributed IDE setup and has a redesigned user interface for enhanced usability.
But that’s not the whole story! There’s a lot more to know about this not-so-popular yet effective tool of Jetbrainns. Through this blog, you will be able to understand Fleet, its benefits, features, architecture, prerequisites, and the development overview.
So, without any second thought, let’s get started
Meet Fleet: The New JetBrains IDE
JetBrains Fleet is a new software tool designed for developers to write and manage code across different programming languages. Unlike other JetBrains IDEs like IntelliJ IDEA, Fleet is built completely from scratch with a focus on modernizing its user interface and user experience.
When you first open Fleet, it acts like a lightweight code editor. Once you load a project, you can activate its “smart” mode. This mode analyzes your code, allowing Fleet to offer helpful features like automatic code completion, navigation to where functions and variables are defined and used, real-time checks for code quality, and quick fixes for any issues it finds.
Fleet is also a fully functional IDE that offers smart completion, navigation, refactorings, debugging, and all the other features you expect from an IDE – all activated with a single button click. Whether you’re a solo developer or part of a marketing agency handling web and app projects, Fleet’s flexible architecture ensures a seamless coding experience across multiple platforms.
Fleet uses a flexible architecture. Java, it uses the powerful IntelliJ code engine, while for other languages, it employs a language server approach similar to how Visual Studio Code works. This architecture makes it versatile for different coding environments.
Overall, JetBrains Fleet aims to provide a streamlined and efficient coding experience with advanced features, catering to both individual developers and collaborative teams working on diverse software projects.
Fleet Architecture Overview
Fleet uses a distributed setup designed for easy use on individual computers, while also supporting the following scenarios:
- Remote/cloud editors: A development environment hosted on a remote computer or in the cloud, allowing you to code from anywhere.
- Collaborative development: Multiple people can work together in the same coding environment and interact with each other in real-time.
- Multiple target file systems: Working on and running a project that uses several different computers or containers, such as in a microservices-based application.
Fleet’s flexibility comes from separating components that handle specific tasks, like managing files and providing smart code features. This approach makes Fleet different from traditional tools like IntelliJ IDEA. However, Fleet is also designed to work well with existing tools if needed.
Components of Fleet Architecture
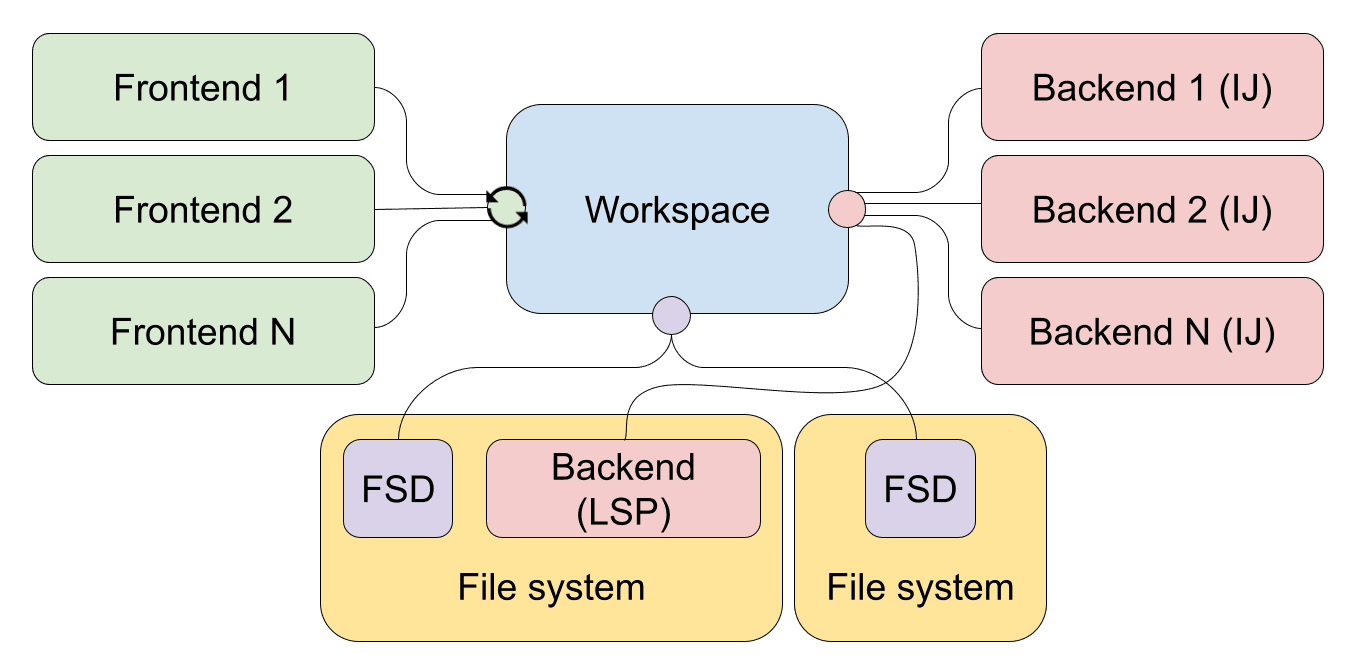
Fleet’s architecture includes the following main parts:
Wherein,
- Frontend is responsible for displaying the user interface, reading the files, and offering basic syntax highlighting for supported file types. Multiple frontends can be connected to the same project, enabling team members to collaborate.
- Backend is a service that runs in the background and handles complex tasks like indexing files, analyzing code, performing advanced searches, and navigation. These tasks are started by requests from the workspace, which then processes the results and sends the data to the necessary parts of the system.
- Workspace is a central component having the main purpose is maintaining the frontends’ shared state when there are several of them. It also registers other components to provide information on the available services and APIs.
- FSD or Fleet System Daemon is a helper program connected to the computer where your source code and SDKs are located. Its job is to handle tasks such as building your project, running your code, executing commands in the terminal, and carrying out other actions in the environment where your project runs. Basically, it acts as a bridge between Fleet and your local development setup, making sure everything works smoothly together.
Built-in features offered by JetBrains Fleet
Integrated Terminal
JetBrains Fleet has a built-in terminal emulator that lets you use your command-line shell directly within the code editor. It’s handy for running Git commands, adjusting file permissions, and other command-line tasks without leaving your coding environment. You can choose from various shells like PowerShell, Command Prompt, Bash, and more to suit your preferences and needs.
Version Control System (Git)
In JetBrains Fleet, Git is the primary version control system supported. You can use it to see differences between versions of your code, manage different branches of your project, and save your changes. The Git tool allows you to save your changes on your computer and update them on the central server where your team can see and use them.
Run and Debug Tools
In JetBrains Fleet, you use run configurations to start and debug your code. You can set up one configuration for your whole application or create multiple configurations to launch different parts of your code with specific settings. Fleet automatically detects settings for .NET projects, but you can customize them as needed.
Easy Navigation
JetBrains Fleet offers powerful tools for searching and navigating your workspace. You can easily locate files, specific places within files, code symbols, and actions within Fleet using the Goto popup. Access it quickly with a shortcut or by clicking the Search icon in the top-right corner of the Fleet window.
Kotlin Multiplatform Support
JetBrains Fleet supports Kotlin Multiplatform Projects, offering integrated features like code intelligence, navigation, debugging, and refactoring across multiple languages. It also provides robust Swift support for iOS development, helping in creating and managing native app components seamlessly. DianApps is also featured on a leading iOS app development directory, which lists top-performing mobile development companies.
Ecosystem of Plugins
You can currently manage bundled plugins available in Fleet, and soon you’ll be able to expand Fleet’s capabilities by adding support for more languages and technologies.
Port Forwarding
Fleet has built-in support for remote development, allowing you to forward ports from a remote development environment or machine. This means you can test your application directly within the Fleet editor, even if the code and resources are located on a different computer or server elsewhere.
AI-Powered Assistance
In JetBrains Fleet, you have access to an AI Assistant that helps with coding tasks, Git commits, and documentation. It’s integrated into the editor, terminal, and Git tool, powered by JetBrains AI Service. During the preview phase, these AI features are free to use once you log in with your JetBrains Account. You can chat with the AI, get code suggestions, and generate commits and documentation, all supported by advanced language models.
Benefits of JetBrains Fleet IDE
Language Switching Efficiency
With Fleet, you can work comfortably with multiple programming languages in a single project. It automatically detects your project’s setup directly from the code you’re working on. This means you can start coding right away without spending a lot of time configuring the environment, thanks to Fleet’s intelligent code-processing engine.
Editor Performance
Fleet is designed for developers who like coding in a straightforward and flexible environment. It’s a speedy and efficient code editor that covers essential tasks like browsing and editing code. Fleet’s user-friendly interface and easy-to-understand experience make it simple to begin coding right away.
High Functionality
Fleet is versatile because it can switch effortlessly between a simple text editor and a robust development tool. Whether you’re working on a small project or a big one, Fleet can handle it. With just one click, Fleet offers features like finishing your code, jumping to where functions are used, spotting mistakes as you type, quickly solving problems, improving code structure, and more.
Designed for flexibility
Fleet helps developers work faster and exceed the limits of their own computer by supporting remote development. You can connect to a remote machine and use Fleet running there, or run Fleet inside Docker containers that have the exact setup your project needs. This lets you work on projects needing more resources or different configurations than your local machine can handle.
Maximum Collaboration
With Fleet, you can collaborate on code in real time and do more than just work together in the same editor. You can share terminals, debug together, review code, explore projects, and more, all without needing any setup. Others can join a collaboration session you start on your computer, or everyone can connect to a shared remote development environment.
Prerequisites for the development environment with Fleet
-
Download JetBrains Toolbox App
Use the JetBrains Toolbox app for easy updates and managing multiple JetBrains products.
-
Login to JetBrains Toolbox
Sign in with your JetBrains account to access the Toolbox features.
-
Install Fleet
Find the Fleet icon in Toolbox and click “Install” to set it up on your system.
-
Check JDK Version
Ensure you have JDK 17.0 or later installed for Kotlin Multiplatform development. Check your JDK version using:
java -version
-
Install Android Studio and Xcode
Set up Android Studio and Xcode to run your app on Android and iOS simulators.
These steps simplify the process of setting up JetBrains Fleet and preparing your development environment for Android and iOS app development services.
Other Requirements:
- Ensure the installation is complete by opening both Android Studio and Xcode at least once. You may need to reopen them after updates.
- To run and debug Android applications, set up a virtual device in Android Studio.
- If you encounter problems running an iOS project, check if you can run the project in the iosApp folder from Xcode. If successful, restart Fleet.
When using Fleet, you can create a Multiplatform project by either:
- Using the Kotlin Multiplatform wizard.
- Cloning an existing Git repository via the “Clone from Git” option on the Fleet welcome screen.
How to Develop A Multi-platform App with Fleet?
Creating a Project with the Web Wizard
Here’s how to create a new project using the Kotlin Multiplatform wizard:
- Open the Kotlin Multiplatform wizard.
- Go to the New project tab. Change the project name to “SampleProject”. Then use “com.example.project” as the project’s ID.
- Select Platforms: Choose Android, iOS, and Desktop as your platforms.
- Make sure the Share UI option is selected for iOS app development.
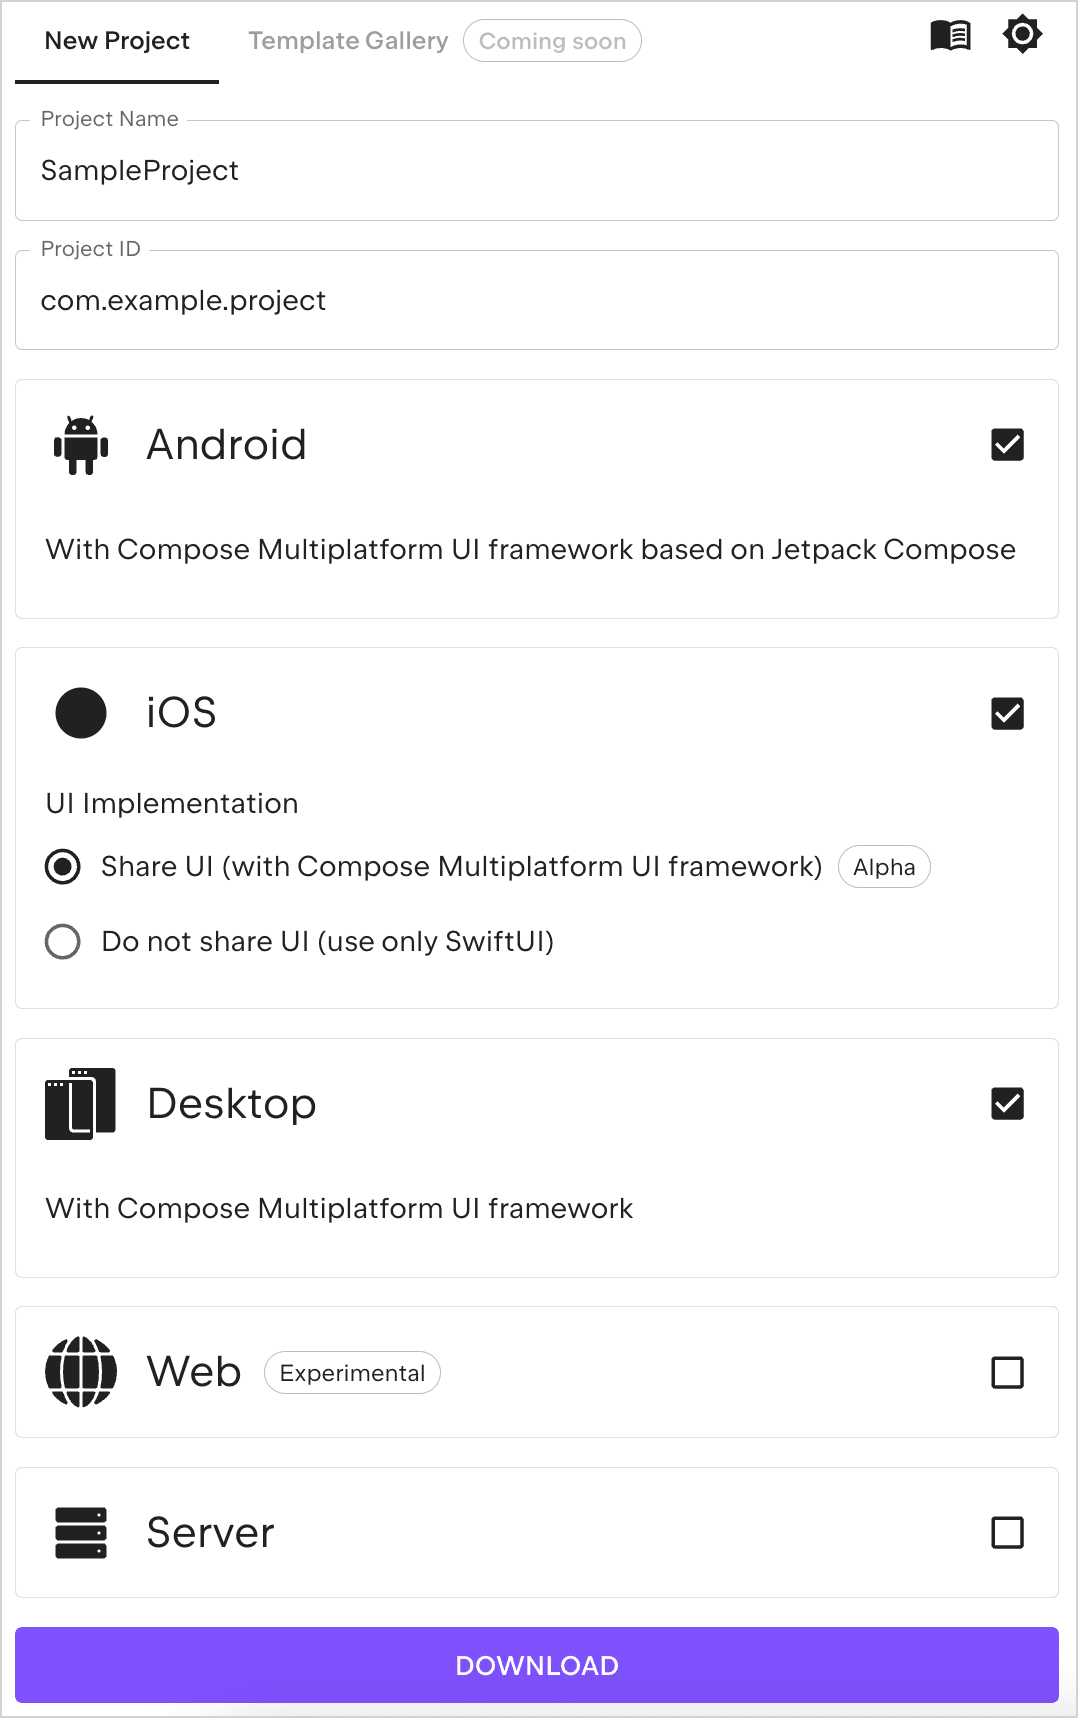
- Click Download and unpack the resulting archive to get your new project.
How to Enable Smart Mode:
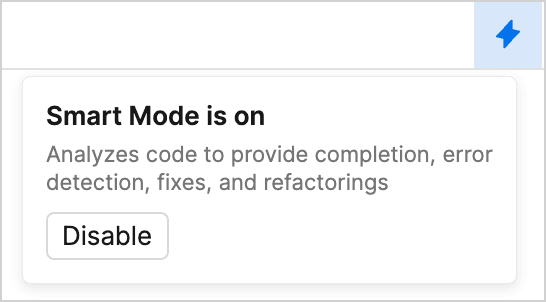
When Smart Mode is on, Fleet provides advanced features like code completion, navigation, debugging, and refactoring. With Smart Mode off, Fleet functions as a basic code editor where you can open files and make changes but won’t have the advanced features.
In the background, Fleet uses different backends to process code. With Smart Mode on, it uses the same engine as IntelliJ IDEA for Kotlin, keeping familiar functionalities.
- Launch Fleet: Open the Fleet application.
- Open a Project: On the welcome screen, click “Open File or Folder” or go to File > Open in the menu.
- Select Project Folder: Find and select the “SampleProject” folder you unpacked earlier, then click “Open.”
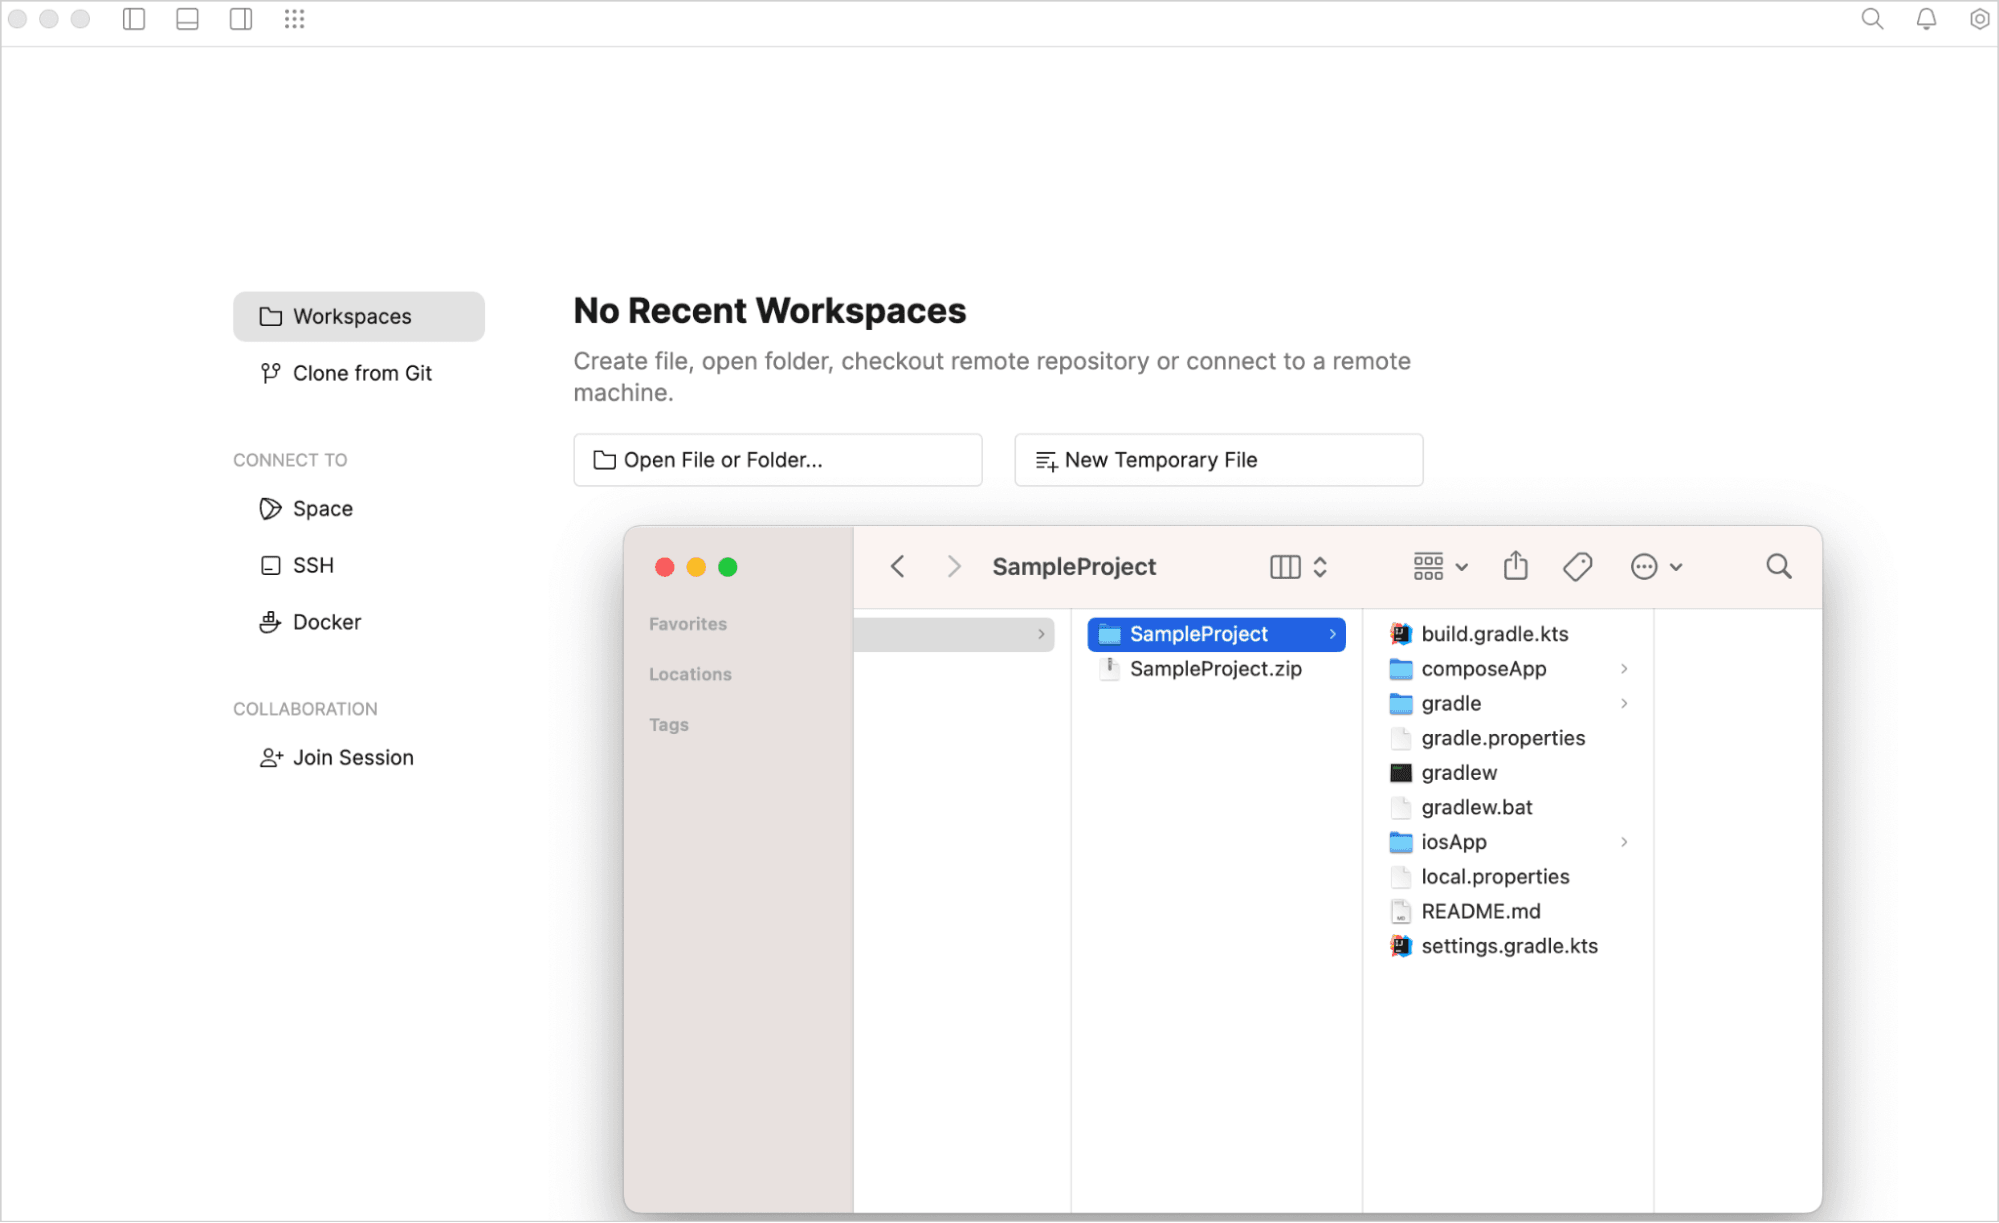
Fleet will automatically detect the project type and open it for you.
Enable Smart Mode: If prompted, click “Trust and Open” to enable Smart Mode.
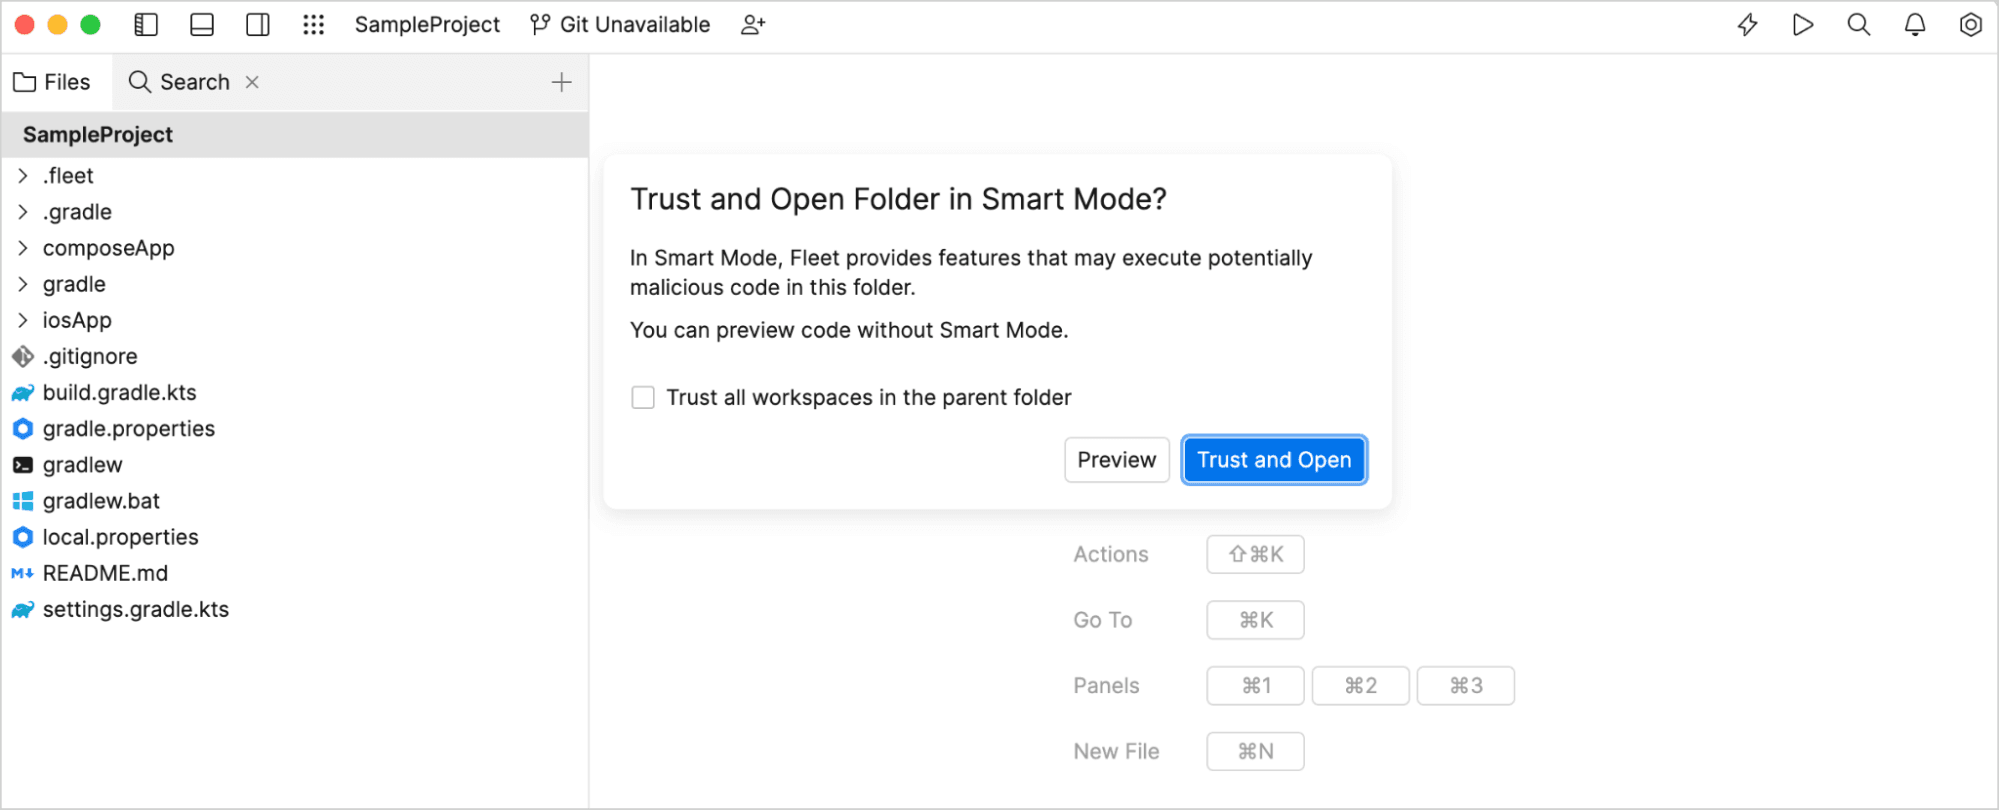
Watch for messages at the top of the window as Fleet imports and indexes the project.
To check if Smart Mode is on, click the lightning bolt icon at the top of your screen.
How to Run Your Project on Fleet?
When you open a project in Fleet, it automatically creates run configurations for the targets in the build file. You can access these run configurations by:
- Pressing the ⌘ R shortcut.
- Selecting Run | Run & Debug in the main menu.
- Clicking the Run Configurations icon at the top of the window.
The “Run Configurations” icon in Fleet allows you to manage and customize how your project runs and debugs. You can set up different configurations for running your code, specifying parameters, environment variables, and more, ensuring your applications behave as intended during development and testing.
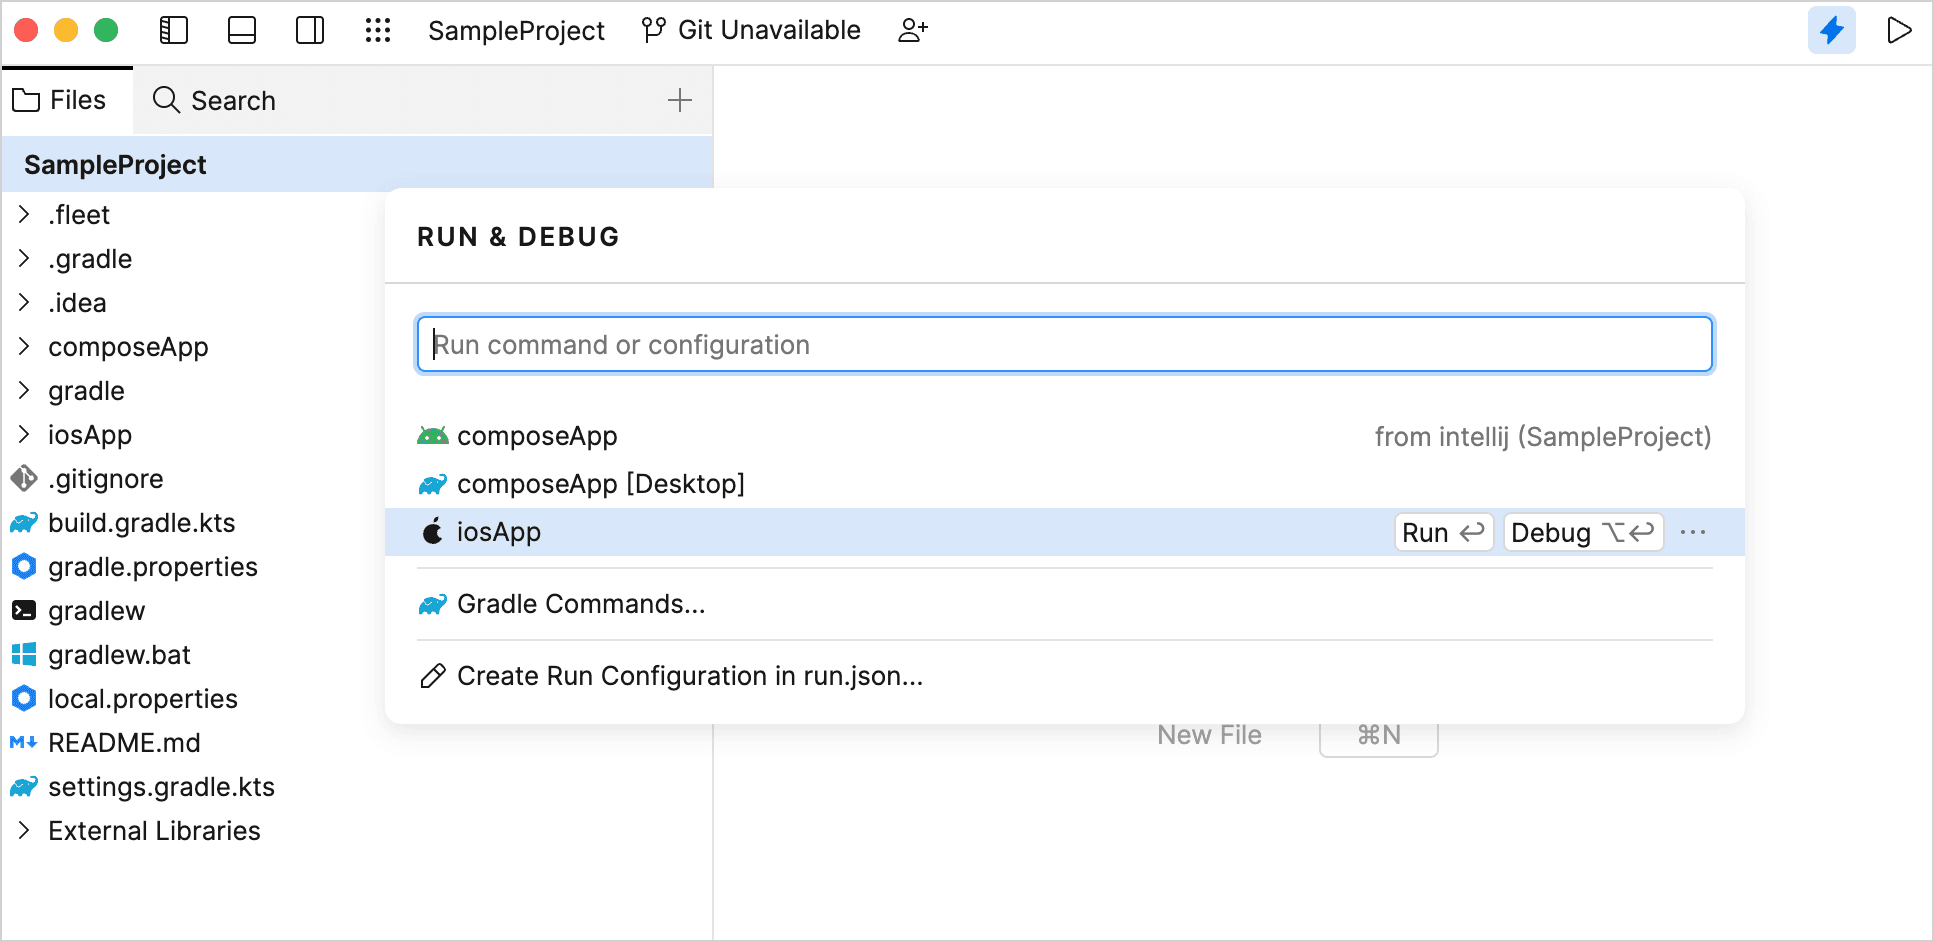
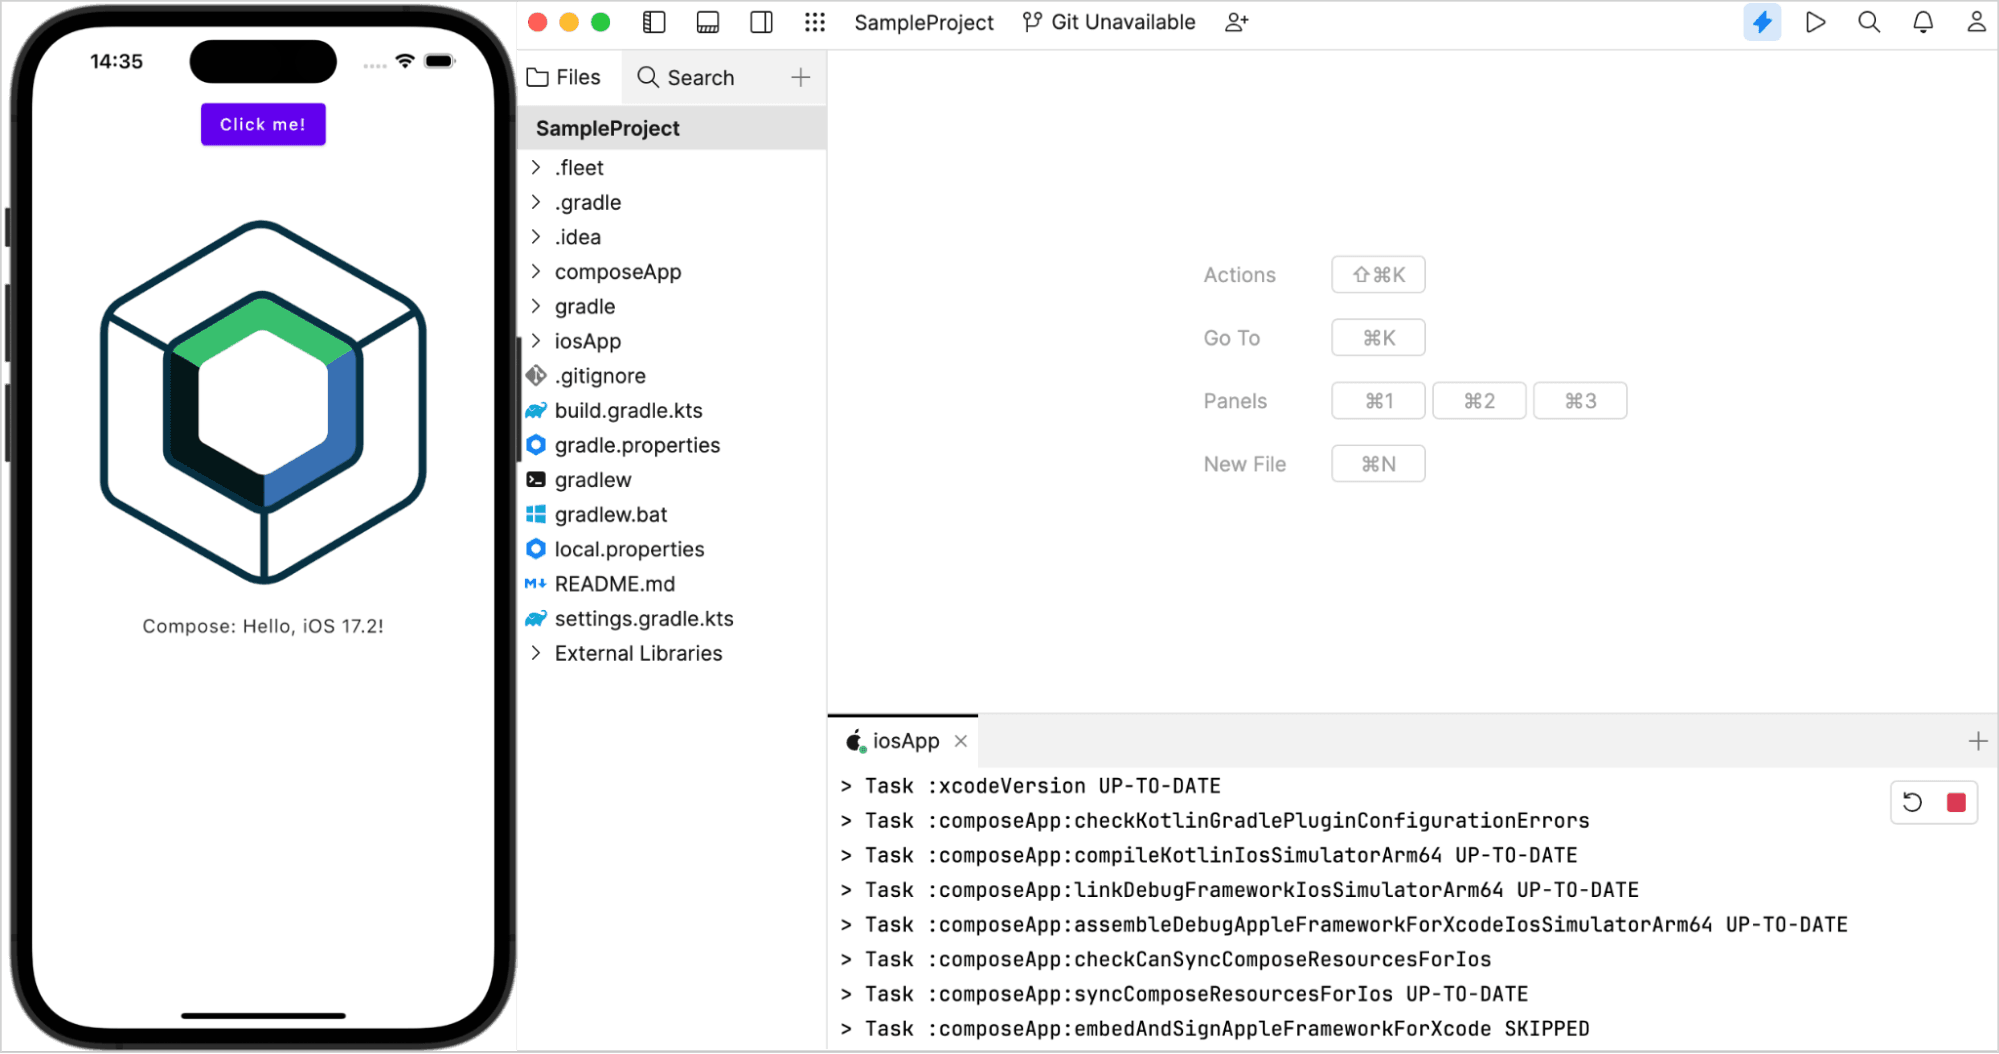
Select the “iosApp” configuration from the list and click to run it. This will start the application automatically on the iPhone simulator.
In the build window, you’ll be able to track how the application is being compiled and launched.
How to work with Multiplatform Code?
The code generated by the web wizard gives you a good starting point to explore Fleet’s features: you can navigate through code, make edits, refactor, and debug your multiplatform projects effectively.
Let’s look at how all these features work!
-
Navigating code
To navigate code in Fleet, let’s explore how you can move between Kotlin and Swift:
- Open the App.kt file located in composeApp/src/commonMain/kotlin/. This file contains the main code for the app.
- Select the App() function in App.kt and use the Usages action (⌘ U shortcut). This shows where this function is used across different files.
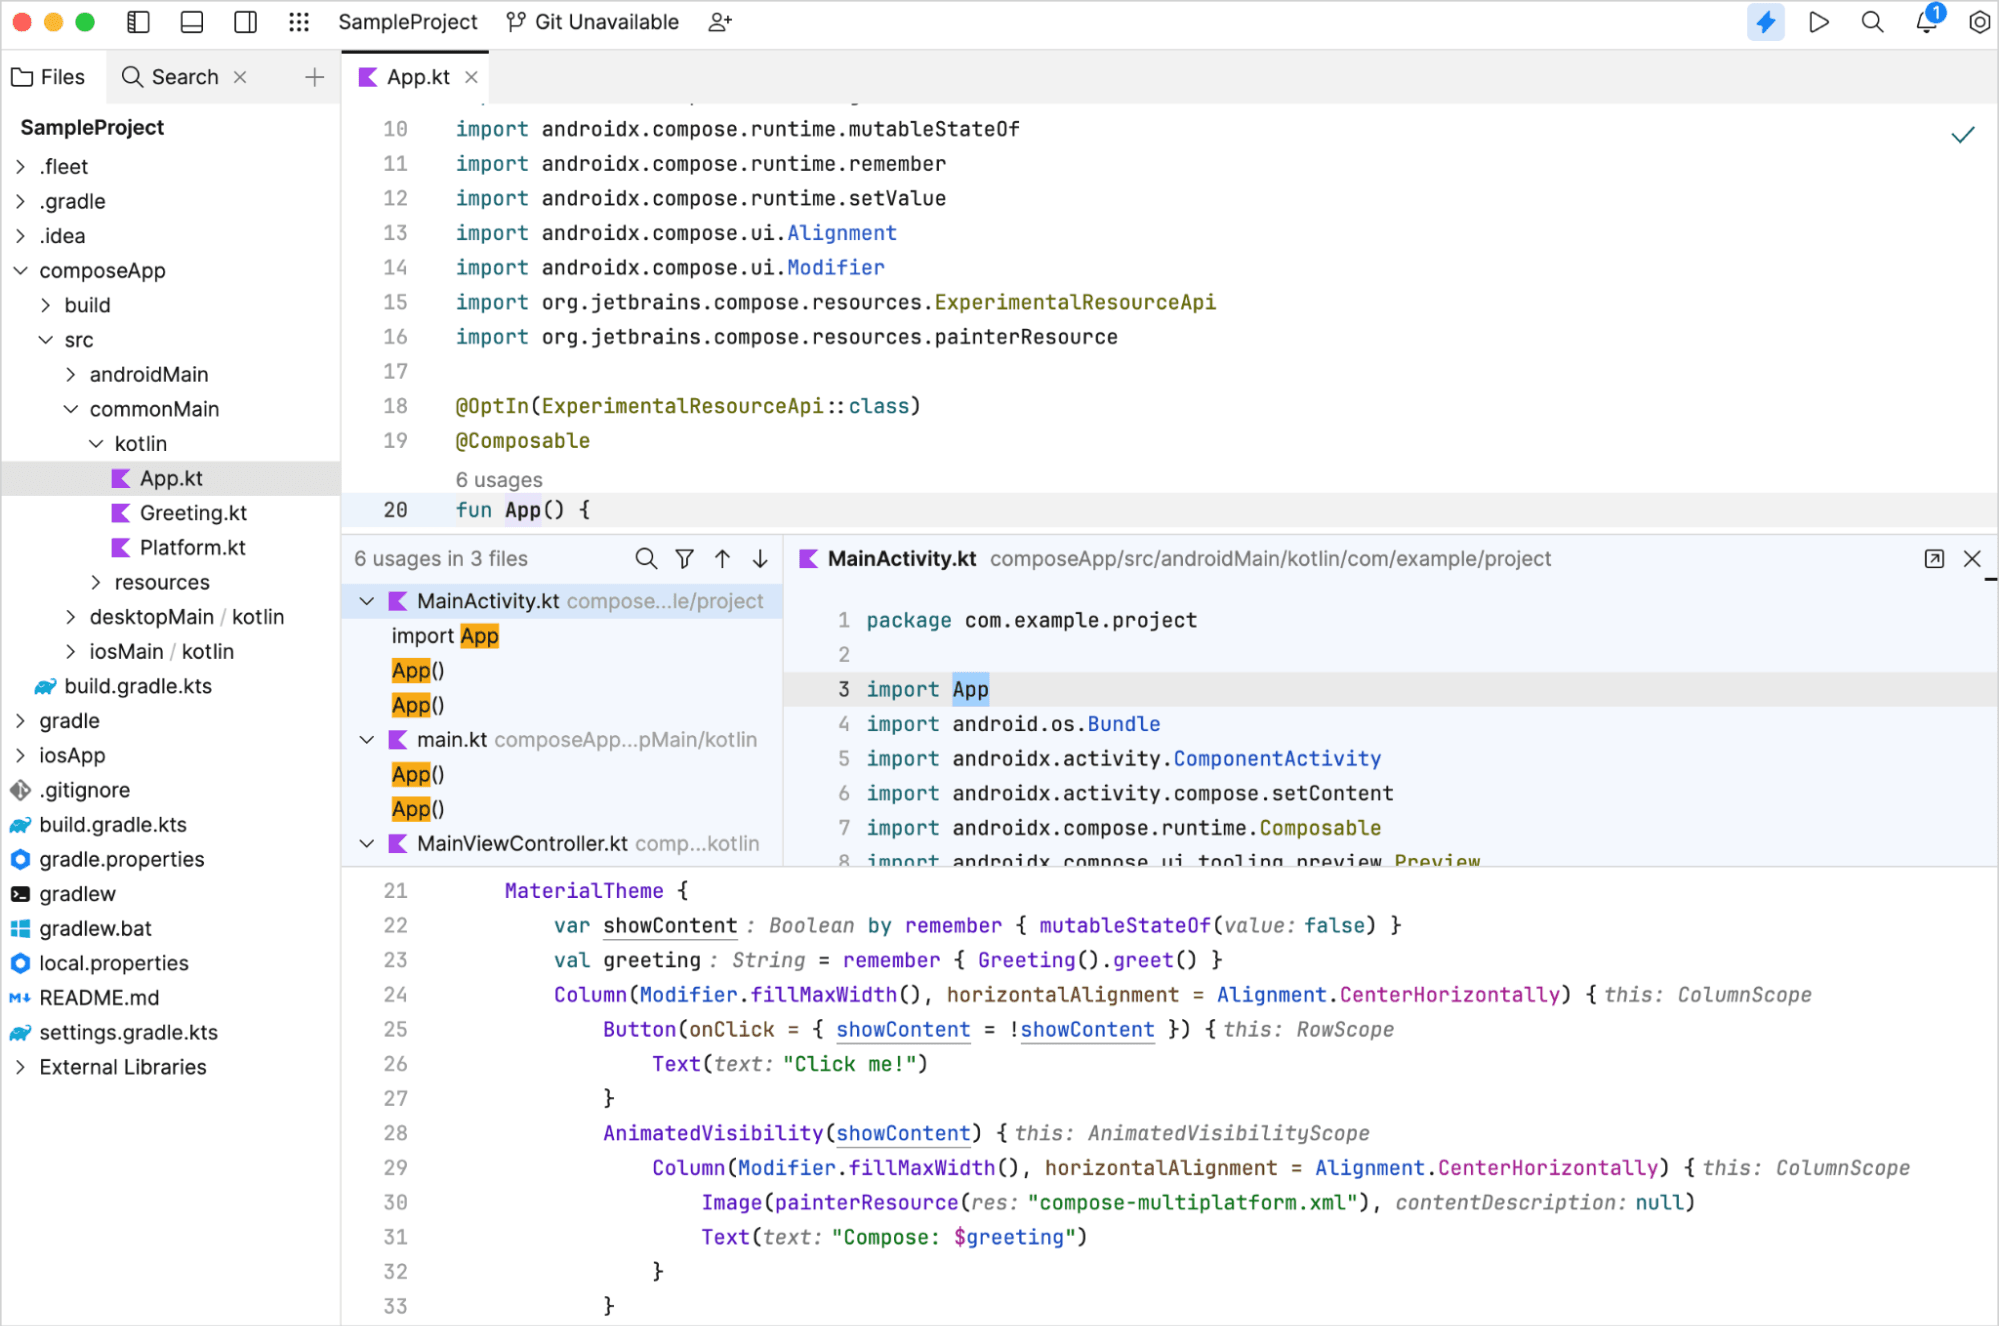
- You’ll find that App() is used to launch the Android, iOS, and desktop versions of the app.
- Now, open MainViewController.kt. Here, you’ll see references to MainViewController from Swift code.
- Instead of manually searching for the Swift file that uses MainViewController, use the Usages action again.
Fleet will automatically open the Swift file where MainViewController is implemented because there’s only one place it’s used.
This way, Fleet helps you quickly navigate between different parts of your codebase, whether it’s Kotlin or Swift, enhancing your development efficiency.
-
Editing in Multiple Languages
Since you’re already in the ContentView.swift file, you can see how Fleet supports editing Swift code:
Add a new function to the ComposeView type. Fleet will assist you with coding suggestions and completion
| 1 3 5 7 9 11 13 15 17 19 | struct ComposeView: UIViewControllerRepresentable { // … func sumArray(input: [Int]) -> String { var total = 0 for item in input { total += item } return "Total value is \(total)" } } |
Fleet provides helpful hints and completion options as you type. For instance, if you forget to add the return keyword or return a value of the incorrect type, Fleet will highlight these errors for you to correct. This helps ensure your Swift code is accurate and functional as you develop your app.
Modify the makeUIViewController() function to call the new function:
func makeUIViewController(context: Context) -> UIViewController {
MainViewControllerKt.MainViewController(text: sumArray(input: [10,20,30,40]))
}
Switch back to the Kotlin code. Update the MainViewController.kt file to integrate this modification:
fun MainViewController(text: String) = ComposeUIViewController { App(text) }
Update the App composable function as needed.
@OptIn(ExperimentalResourceApi::class)
@Composable
fun App(text: String? = null) {
MaterialTheme {
var showContent by remember { mutableStateOf(false) }
val greeting = remember { Greeting().greet() }
Column(Modifier.fillMaxWidth(), horizontalAlignment = Alignment.CenterHorizontally) {
Button(onClick = { showContent = !showContent }) {
Text(text ?: greeting)
}
AnimatedVisibility(showContent) {
Column(Modifier.fillMaxWidth(), horizontalAlignment = Alignment.CenterHorizontally) {
Image(painterResource(Res.drawable.compose_multiplatform), null)
Text(“Compose: $greeting”)
}
}
}
}
}
Run the application again on iOS to see your changes in action.
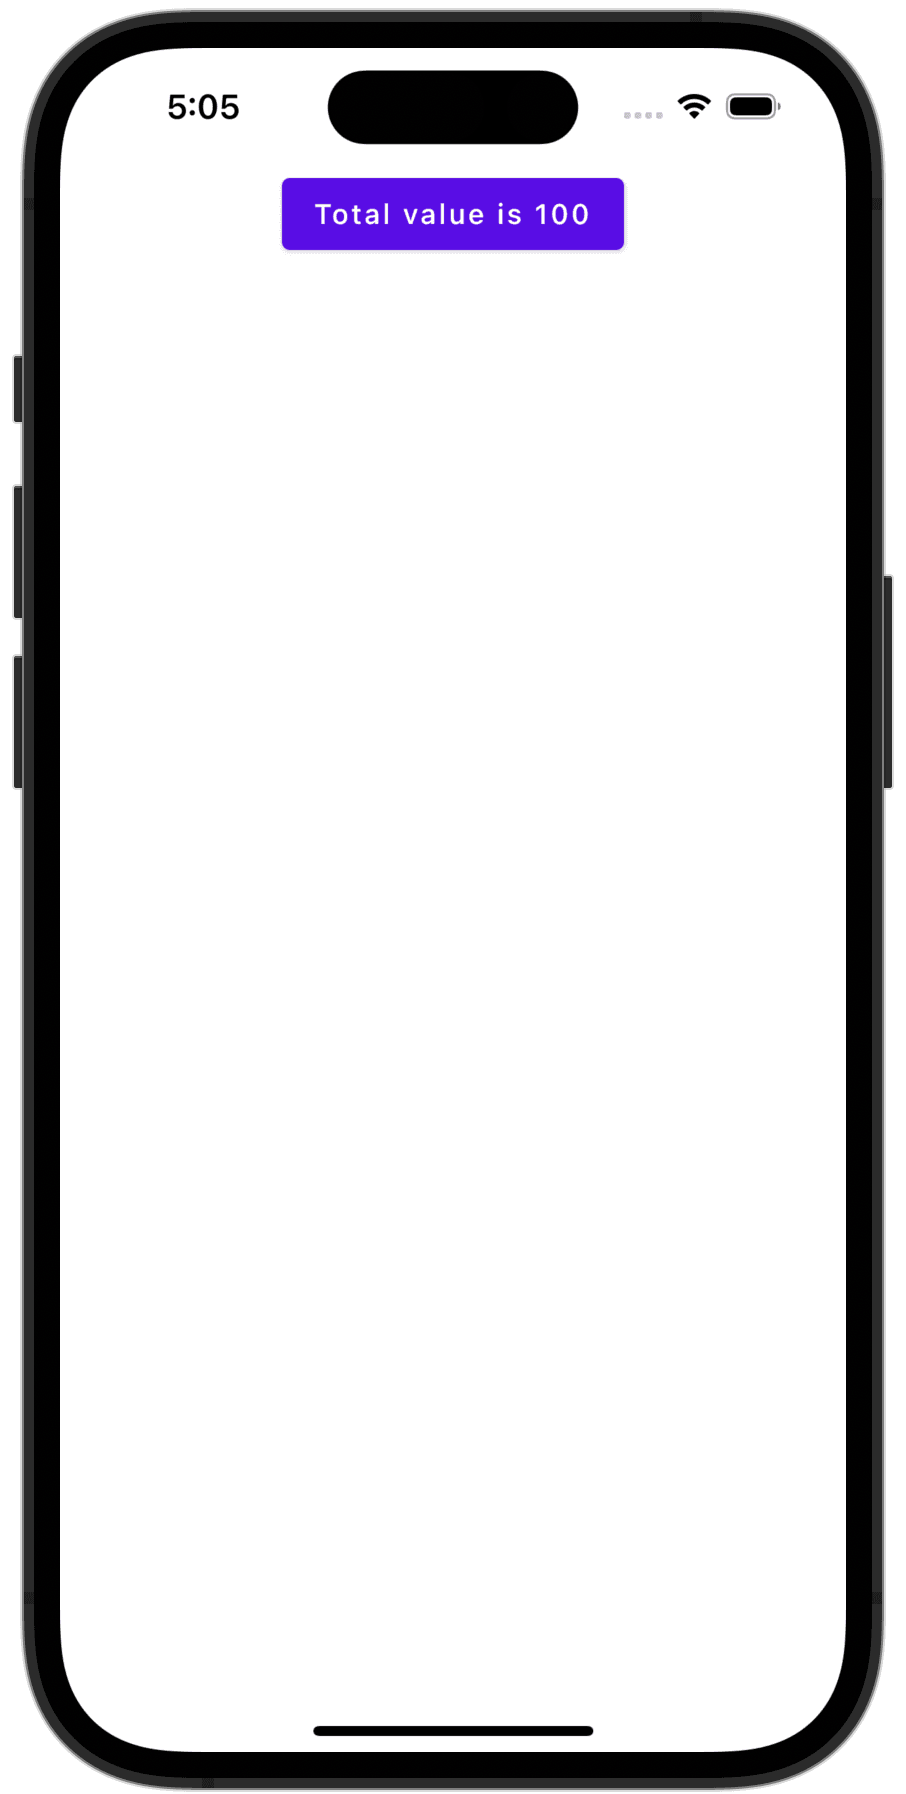
The simulator now shows the message from the new function instead of the original greeting.
-
Refactoring across multiple languages
In Fleet, cross-language features like refactoring also apply. For instance, you can rename functions across Kotlin and Swift seamlessly.
Select the MainViewController() function, then use Rename | Refactoring to change its name to MainSwiftUIViewController.
This update will reflect in both Kotlin and Swift files.
-
Debugging
In Fleet, debugging across Swift and Kotlin code is seamless. Here’s how it works:
- Open ContentView.swift and set a breakpoint on line 17 within the sumArray() function.
- Switch to App.kt and set another breakpoint in the App composable on line 23.
- Navigate to Run & Debug and choose Debug next to the iosApp configuration.
- When the debugger hits the breakpoint in ContentView.swift (line 17), use Step Out in the Debug menu to move to line 7.
- Use Step Into to enter the MainSwiftUIViewController() Kotlin function.
- Click Resume to continue to the breakpoint on line 23 in App.kt.
This process allows you to debug smoothly between Swift and Kotlin code in Fleet.
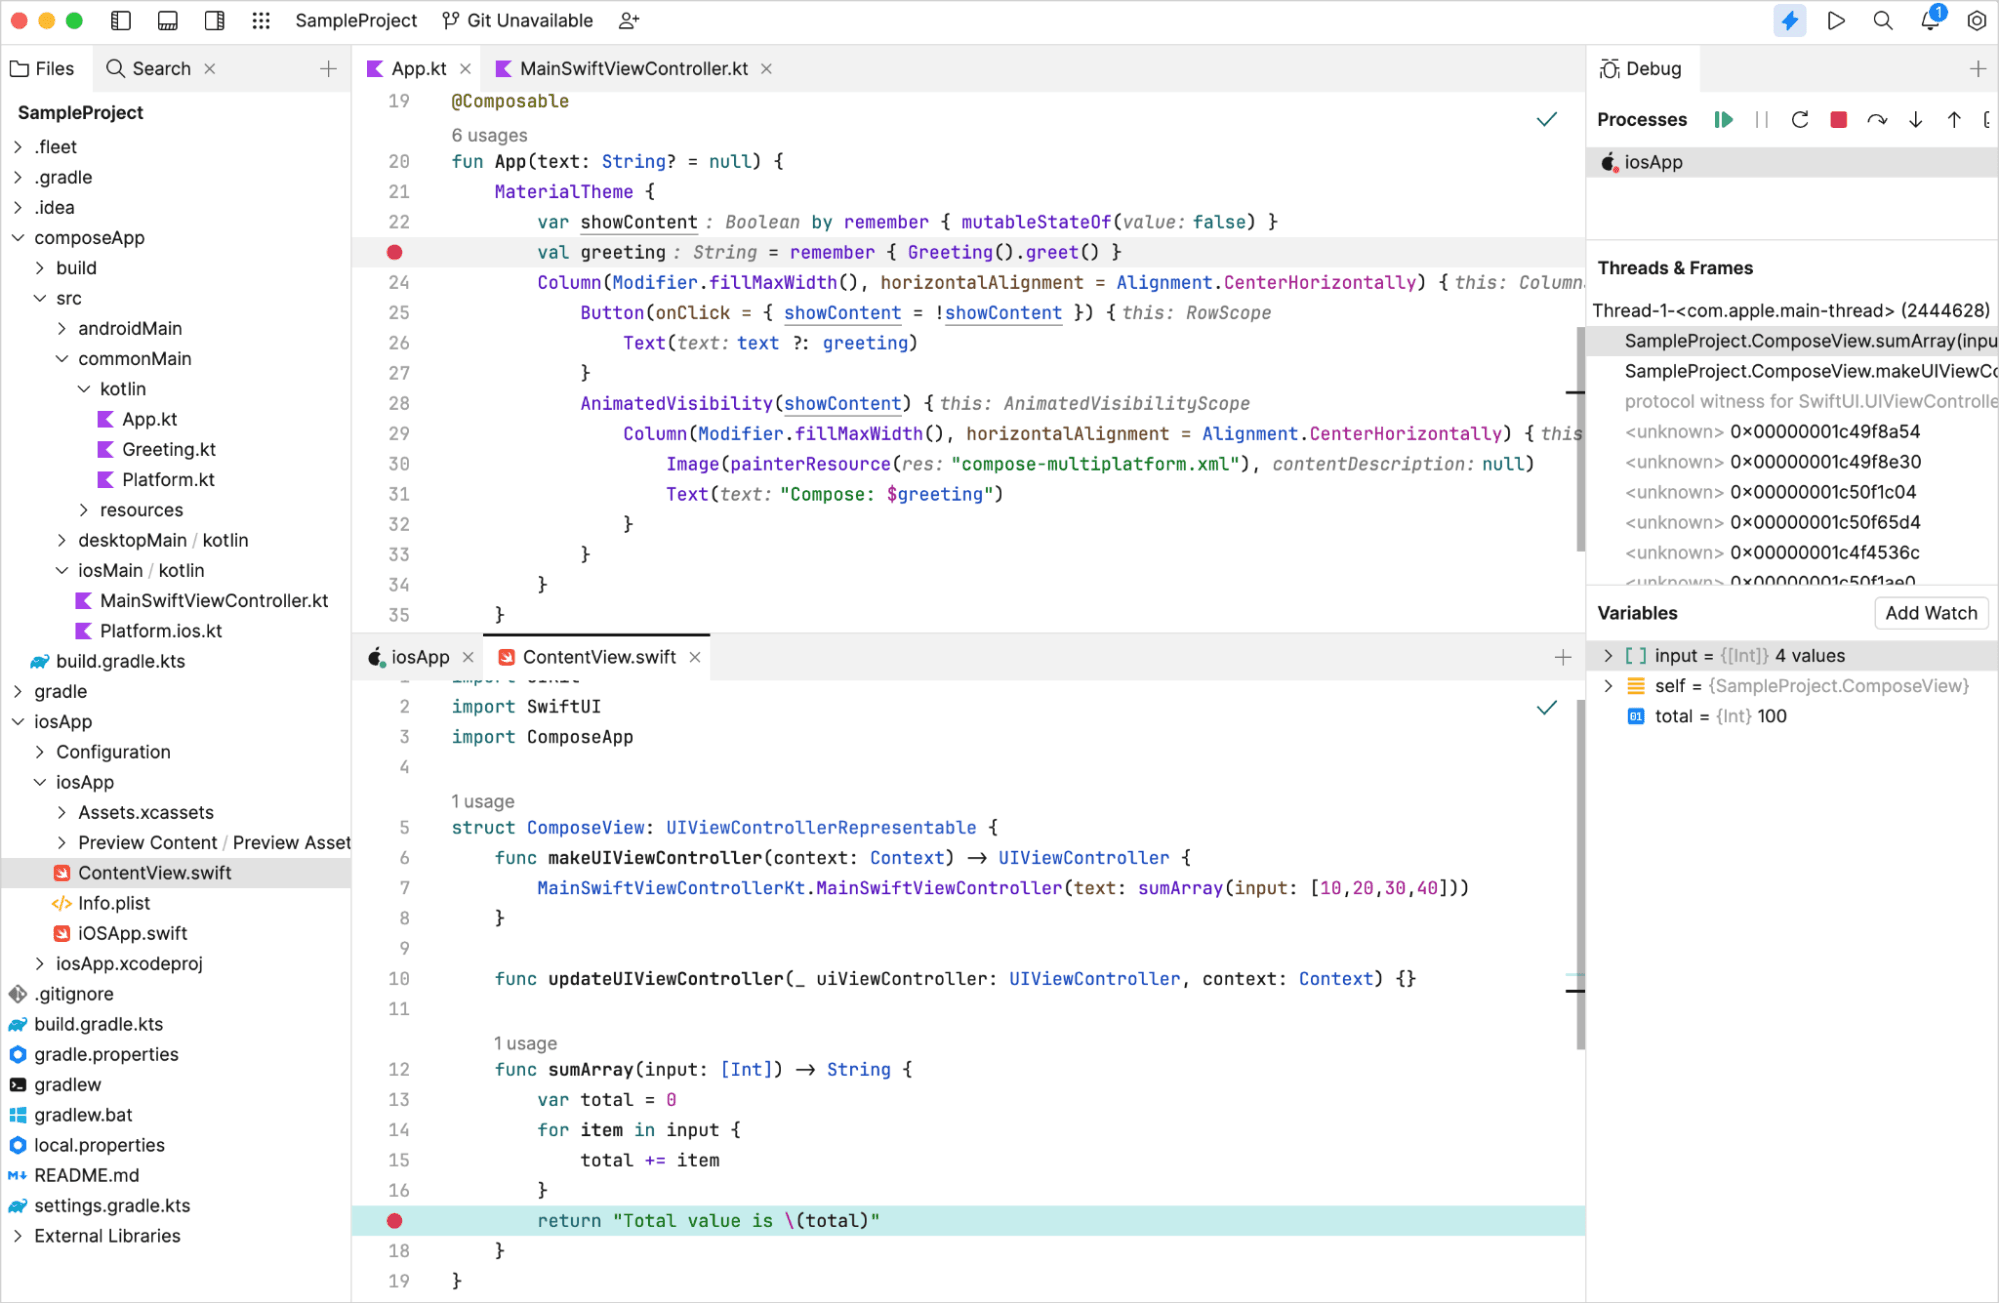
The above debugger shows no error in the code.
Wrapping Up
JetBrains Fleet represents a promising new entry into the IDE market, leveraging JetBrains’ extensive experience and the robust IntelliJ code engine. While Fleet competes with established tools like Visual Studio Code, which benefits from being free, mature, and widely adopted, Fleet distinguishes itself with ambitious features and a redesigned user interface. As Fleet continues to develop, it aims to carve out its niche with innovation and functionality, setting itself up as a valid choice for mobile app development services with advanced IDE solutions.
The planned plugin architecture demonstrated JetBrains’ commitment to evolving Fleet’s capabilities, ensuring it meets the evolving needs of top mobile app developers in a changing market in the USA.


Leave a Comment
Your email address will not be published. Required fields are marked *