Google Analytics, which was first introduced in 2005, has evolved into an essential business tool for millions of eCommerce software development solutions. While the majority of marketers have used the version known as Universal Analytics throughout their careers, the latest generation – Google Analytics 4 aka GA4 – has now replaced it.
As announced by Google in March 2022, all standard Universal Analytics property events would stop launching new hits as of July 1, 2023. In other words, it is now compulsory for all users to switch from tracking their existing universal analytics and setting it up to a new Google Analytics account with GA4.
If you own an eCommerce website, you might know the power of Google Analytics for tracking website traffic and user behavior. Businesses, on the other hand, will benefit greatly from the introduction of Google Analytics 4 and eCommerce.
You know what’s the best part?
It is now even simpler to migrate your WordPress website to GA4. You only need the Google Analytics tracking code, an active WordPress account, and a few minutes of your precious time.
You must be excited to learn more! So, we have collected all of the necessary information in the following article. It will include the following items
- Understanding Google Analytics 4
- Importance of GA4 for eCommerce websites
- Process to integrate GA4 to WordPress
What is Google Analytics 4?
Google Analytics 4 (GA4) is the future of analytics. It’s a new method of tracking and measuring website and app traffic. Furthermore, it includes powerful features that can assist you in growing your business.
Quick facts about Google Analytics 4
- GA4 is the most latest version of Google’s popular web analytics tool.
- It offers a more advanced and adaptable approach to data tracking and analysis.
- It enables eCommerce businesses to gain deeper insights into their customers’ activity across multiple channels and devices.
- GA4 is also used to identify your most valuable customers and understand how they interact with your content.
- What really sets it apart is its focus on privacy. It is designed to collect data in such a way that respects user privacy, so you can be confident that your users’ data is secure.
Why is Google Analytics important for eCommerce websites?
1. Integration with Google Ads and Shopify store
The next advantage is integration. If you use Google Ads for your eCommerce store, GA4 provides a more seamless integration. You can create audiences based on your GA4 data and use these insights to create more targeted and effective ad campaigns, including Google Discovery ads. Furthermore, GA4 easily integrates with your Shopify store, making it easier to implement and track the effectiveness of your ad campaigns directly within your eCommerce app development platform.
2. User-Centric data model
The user-centric data model comes first. An event-based tracking model in GA4 that provides you with a detailed picture of how visitors interact with your eCommerce store. This information will assist you in optimizing your store layout, pricing strategies, and product descriptions in order to maximize conversions and increase your ROI.
3. More Custom Dimensions
Custom dimensions are necessary for understanding and describing user behavior on your website. Unlike universal analytics, GA4’s greater flexibility allows you to have up to 50 event-related metrics, 50 custom metrics, and 25 user-related custom dimensions per property. With a better understanding of what is happening on your website, you are able to improve user experience and encourage conversions.
4. Machine Learning and Predictive Analytics
Machine learning models are one of GA4’s potential features. These models can automatically alert you about significant trends in your data. For example, if one product is receiving more attention than others, you can use this information to boost its views or run a promotional campaign.
5. Free to use
The cherry on the cake, Google Analytics 4 is free to use. This feature doesn’t count the size of your business, whether you’re just starting out or have an established presence. GA4 provides an effective yet affordable solution for understanding your users’ journeys and making data-driven decisions to improve their experience and increase conversions.
6. Export Raw Collection Data to BigQuery
You can now export your data to BigQuery using GA4. A strong data analysis platform. This enables advanced data and analysis, giving you a better understanding of your website’s users and their behavior. You can take your eCommerce analytics to the next level with GA4, finding valuable insights and improving your strategies for better platform performance. Top SEO Company can help you in the process.
Why add GA4 to WordPress?
As previously stated, the significance of Google Analytics and the data it can provide you cannot be overstated. As a result, when Google releases major updates or versions of Analytics, it is essential to upgrade and ensure that your website receives all of the latest benefits.
For example, the Google Analytics 4 update included four really useful features that everyone can use. They are:
- Deeper Integration with Google Ads or Adwords
- More Data Controls
- Smarter Insights
- Customer-Centric Data Measurement
Let’s look at the integration process of Google Analytics in WordPress.
Add GA4 to WordPress
1. Visit the Google Analytics website and log in to your Account
Start the process by visiting the Google Analytics homepage and logging in with your Google account. This provides you access to your dashboard, and the rest of the process follows from there.
2. Creating a New Google Analytics 4 Property
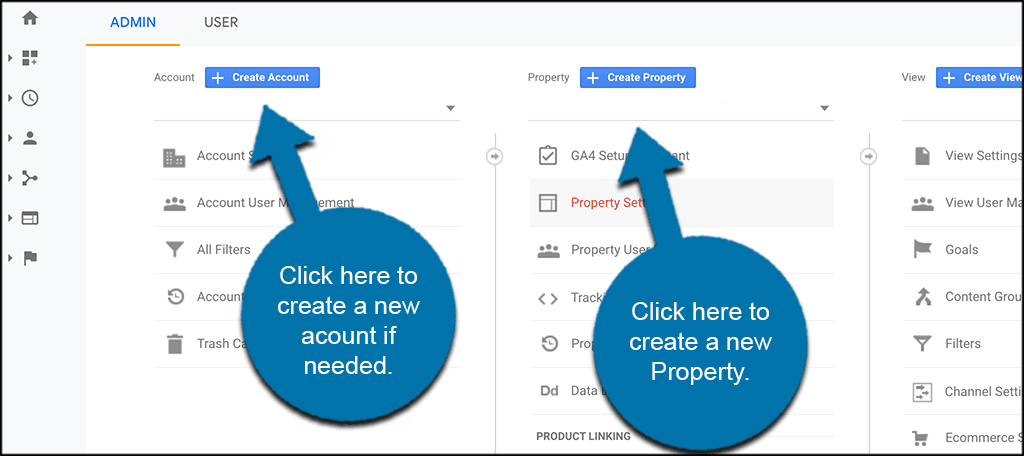
Now that you’ve entered the analytics dashboard, you want to create a new GA4 property. You can either choose Admin > Create Account or choose an existing account to which you want to add your new property.
3. Add All Property Details
Assuming that you have an existing account on Google Analytics, we are going to simply click on the “Create Property” on an existing account. Doing so will take you to the property details page where you can add all the relevant property information required.
Proceed further and name your property, select a time zone, and any other relevant details that are needed. You can fill that in the way that it fits.
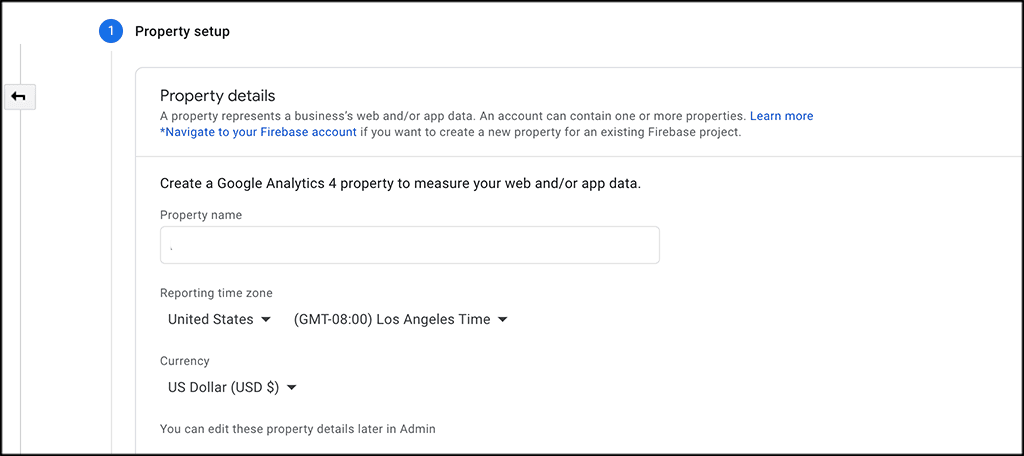
After finishing this, click on the “Next” button to move forward. This takes you to additional details you may want to add. It includes business size and a couple of other questions. You can fill this out as you see fit.
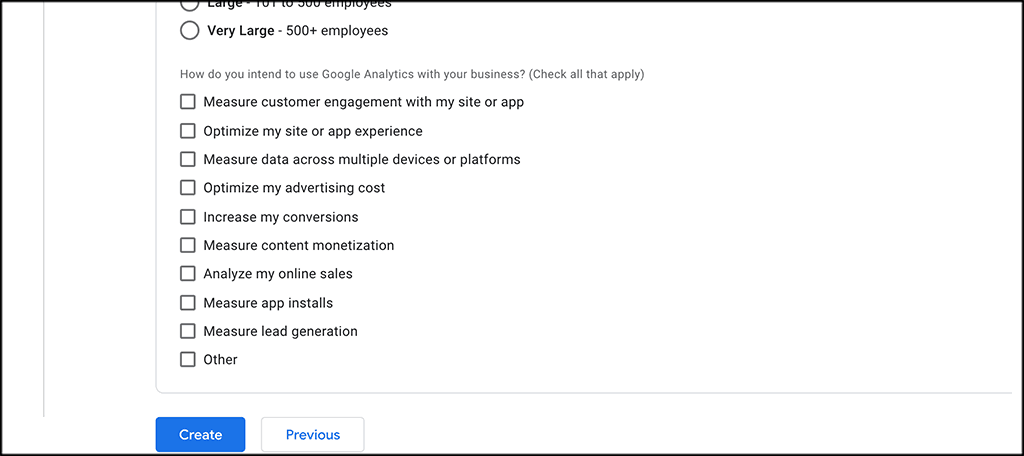
When you have finished with filling all the details, click on the “Create” button at the bottom.
4. Select the “Web” Option
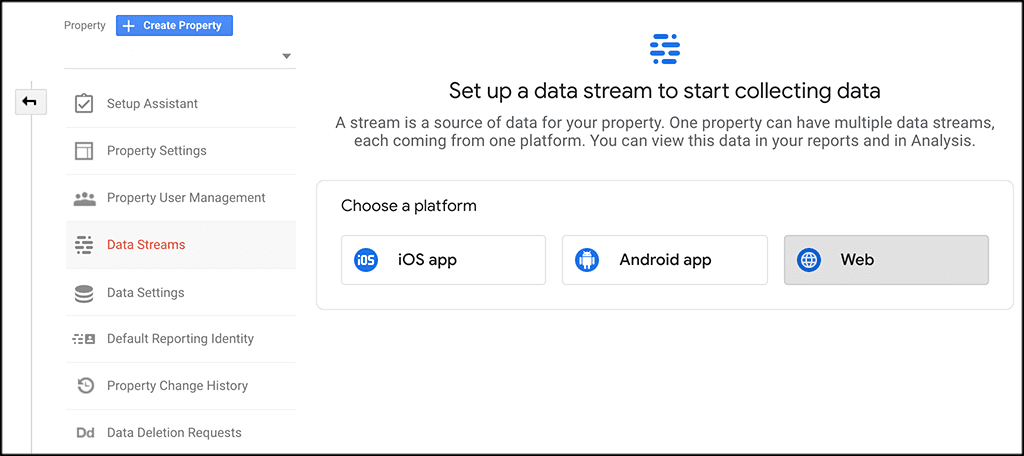
In this step, when you arrive on the “Data Streams” page, you’ll notice that there are three options available – Apps for Android, iOS, and the web. Choose “Web”.
5. Set Up Web Stream
As you click the ‘Web’ option, a screen shows up that lets your set up Web stream. Proceed further and fill the required fields to generate the stream. This involves
- Adding your URL
- Giving a name to your stream
- Calculating any enhanced measurements you wish to have
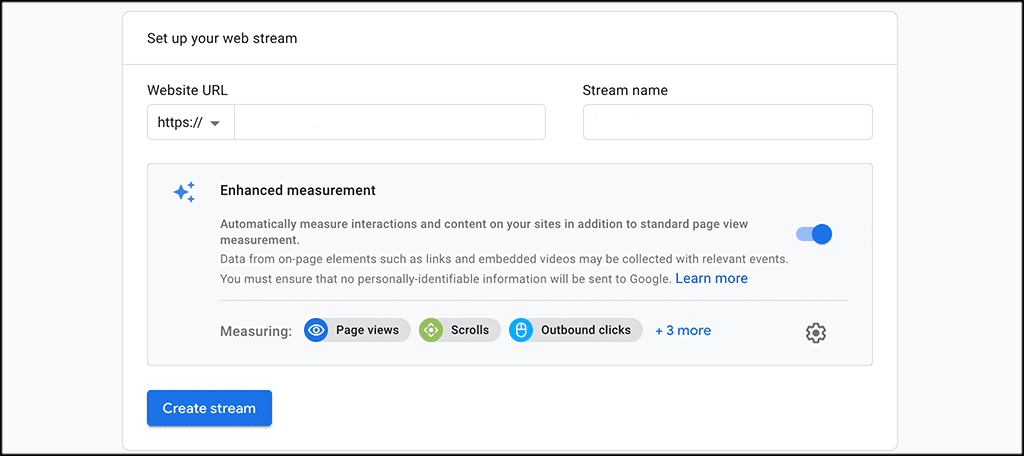
Click on the “Create Stream” button whenever you have filled the details.
6. Link Your Existing Analytics Property to GA4
Go back to your existing UA property by clicking on the “Admin” button and then select your UA property from the drop-down.
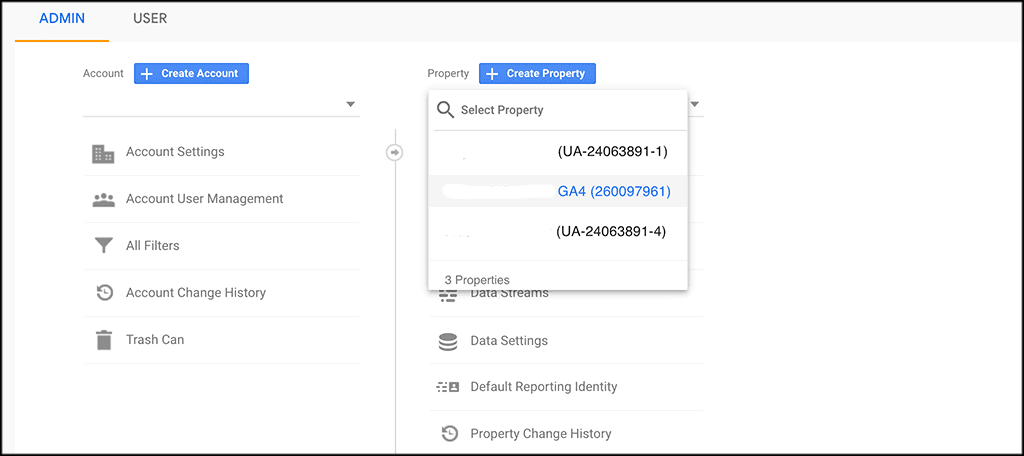
Now, when you click on the “Tracking Info” option, the dropdown menu will open. Select “Tracking” code from the menu.
![]()
Copy your tracking code so that you can have it on the screen that pops out!
![]()
Eventually, you can select the new GA4 Property from the drop-down. Doing so will allow you to switch back to your new GA4 Property. Then click on the stream you created above, and search for “Connected Site Tags” and click on it.
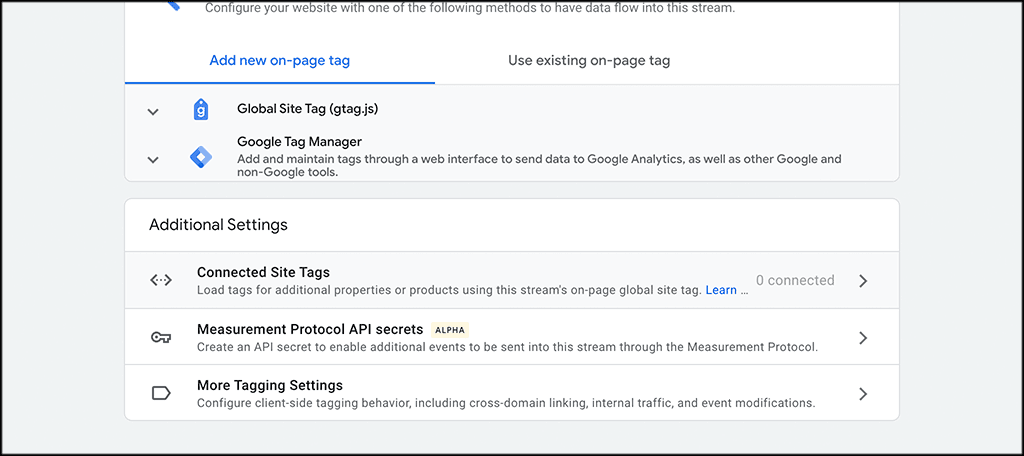
Enter or paste the tracking ID that you copied above, give it a nickname, and then click on “Connect.”
7. Install Tracking Code on Your WordPress Website
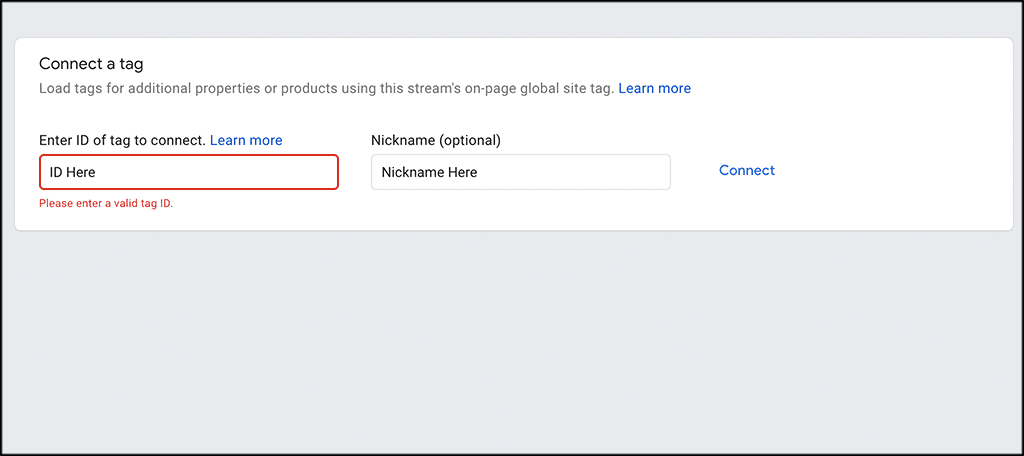
The final step of the process! Here, you must install the tracking code on your WordPress site before you can begin receiving all of the data and analytics that come with Google Analytics 4. Click on the “Add new on-page Tag” option in your web stream and select Global Tag (gtag.js).
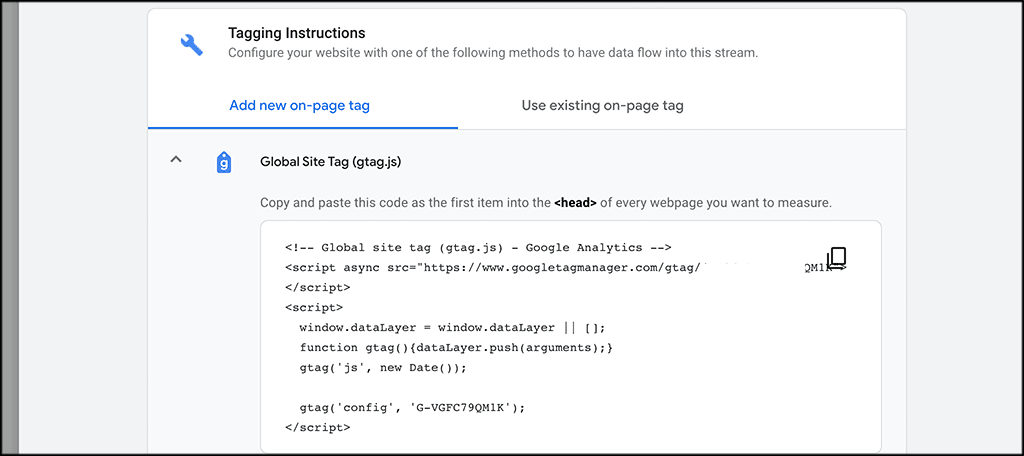
Copy the tracking code. Now head to your site and add the code.
Note: Keep in mind that we are using a WordPress website in this instance. You can add the code into your website’s “head” section.
There are two acceptable ways to do this:
- You can add the code directly into the theme options
- You can use a plugin that lets you add code to the head with ease.
Log in to your WordPress admin dashboard and paste the code described above into the head of your site. Click the “Save” button to save your code.
You can do such by using a plugin such as Insert Header and Footer. This allows you to insert code directly into those WordPress sections. Alternatively, you can manually insert the code into your website files.
That’s all. You should now have Google Analytics 4 running on your site, and you should start seeing data in your Analytics dashboard shortly.
There are also plugins available to add Google Analytics 4 tracking options to WordPress.
Among these are
- Google Analytics
- Google Analyticator
- Better Google Analytics
- Google Analytics WD
- Google Analytics by MonsterInsights
- TechGasp Google Analytics Master
Key Takeaways
You can gain valuable insights into your website’s performance, user behavior, and engagement by integrating Google Analytics 4 into your WordPress site.
You can easily add GA4 to WordPress and take advantage of its advanced features with the help of the information provided above. To simplify further data collection, we recommend using integration within GTM. However, if you are having difficulty configuring or utilizing GA4 to its full potential, our team of marketing experts is here to assist you. For individualized help and direction in interpreting and utilizing GA4 data to optimize your website and accomplish your business objectives, take advantage of our digital marketing services.
Don’t waste valuable insights; contact our team today to get started.


Leave a Comment
Your email address will not be published. Required fields are marked *