


Winter is coming and so is Salesforce platform’s latest release. We are talking about Salesforce Release Winter 24.
What is the purpose of this release? Well, Salesforce being a top-rated and highly advanced customer relationship management company, aims to keep businesses workflow organized in a safe and effective way. This also includes streamlining data, tech stack operations, and data connectivity automation.
Salesforce Winter 24 Release took place recently, to be precise the dates were:
- 1st September 2023
- 6th October 2023
- 13th October 2023
Missed the chance to experience the updates live? Don’t worry because this blog gives you a complete walkthrough of what Salesforce Winter 24 is all about alongside its innovative features.
So let’s roll out the experience once again for you!
What is the main agenda of Salesforce Seasonal Releases?
Salesforce delivers hundreds of unique features for businesses in need and has its releases set to three seasonal categories:
- Spring
- Summer
- Winter
Their end goal is to help you and your staff, stay on top of changes so you can take complete benefit of the changing scenarios and functionalities evolving with time.
Furthermore, Salesforce prepares you to keep learning and exploring its diverse CRM development system so that you can earn magnificent strategies that draw you towards greater success. Isn’t it generous?
Let’s find out more about what they have to offer with Winter 24 (AI + Data + CRM) this year.
Highlights of Salesforce Winter 24 Release
1. Implement dynamic forms for standard objects to enhance user experience with tailored page layouts
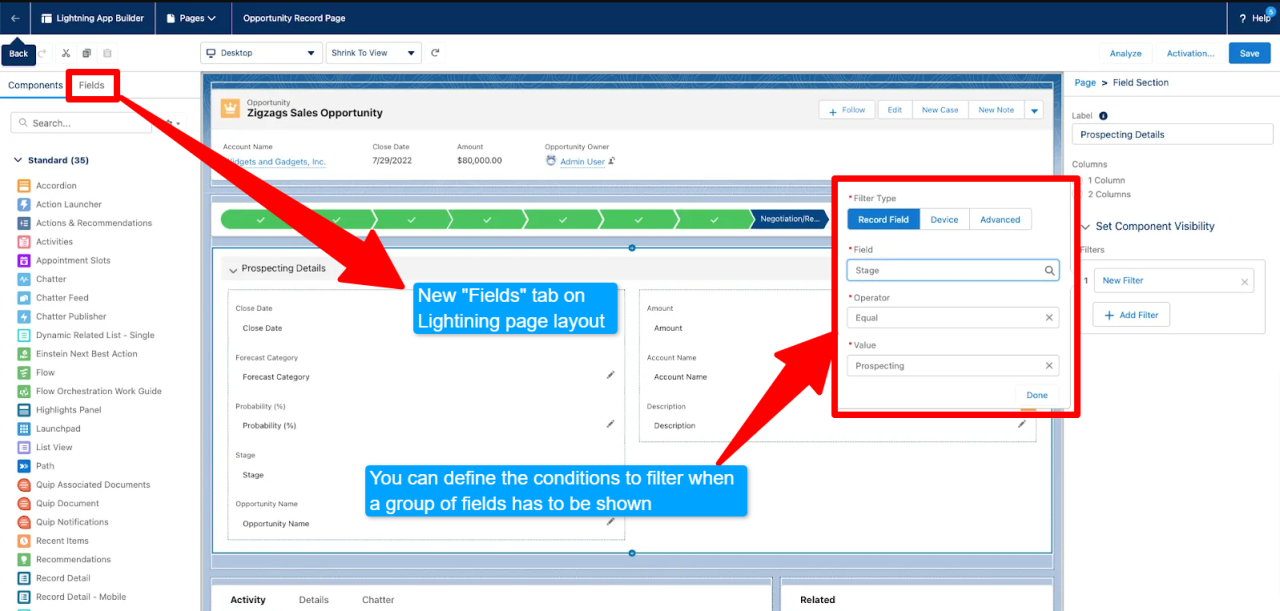
Want to create a more user-friendly experience for your end-users? Use dynamic forms that comes with personalized page layouts helping businesses adjust their data parallel to what their customers want by managing field visibility, and layout.
Previously the use of dynamic forms were only accessible to custom objects and selected standard objects. In the recent Salesforce Winter 24 release, the functionality supports hundreds of LWC-enabled standard objects.
However, one should note that Salesforce’ dynamic forms do not support the objects which has no support to the Lighting Web Componets such as:
- Campaigns
- Tasks
- Products
Users can also operate these dynamic forms via their cellphones. Simply search “Dynamic Forms on Mobile” to enable the functionality. Look below for the example:

2. Save time and energy by transferring ownership with Salesforce streamlined dashboard management
Salesforce experts call this release as “Small changes, but Big time saver” for admins.
![]()
A dashboard used to be unavailable when a user left your organization because there was no simple way to transfer ownership of it. Clone and replicate the dashboard to the exact specifications was the only solution.
With the latest update, it is now possible to give a dashboard to a new owner. Anywhere the dashboard is located, assign ownership with the “View All Data” or “View My Team Dashboard” rights as well as edit access to the folder.
3. Record creation and mass updates easily with Salesforce “quick actions on related lists”
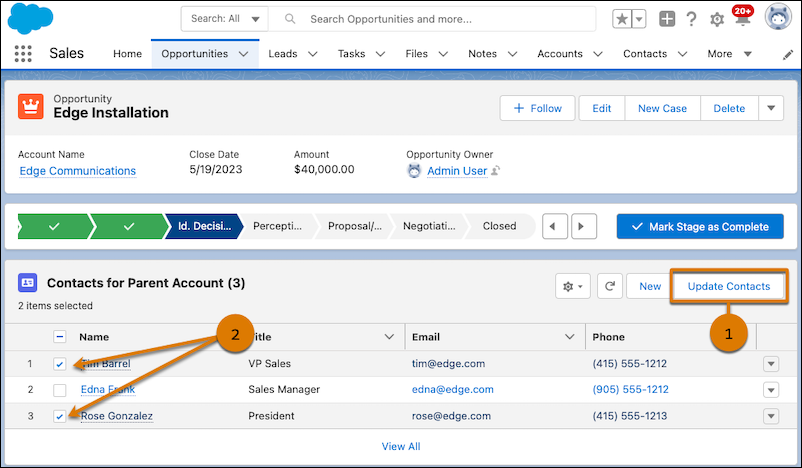
Another simple admin upgrade that will increase user productivity!
By introducing quick actions straight to linked lists, users may now create and mass update (up to 100) related records without leaving the page.
Quick actions can be added in one of two ways:
- The Lightning App Builder states: On the properties pane, choose “Show list view action bar” after selecting the Dynamic Related List. Next, select Add action.
- Using the page layout editor’s object management settings: Expand the buttons section in the linked list properties after opening it, then choose the necessary quick actions. The linked list type should then be adjusted to Enhanced List from the parent record page in Lightning App Builder.
Use the quick actions (1) after they are enabled and apply them to the chosen records (2).
4. Prepare and promote best practices with permission sets
Numerous upgrades and improvements for permissions have now been made available as a result of Salesforce’s decision to phase out profile-based permissions in the next Spring ’26 release, and we anticipate that there will be additional updates and improvements published in the future.
Feel free to contact DianApps, a certified Salesforce consulting partner if you have any questions or would want to discuss transition planning techniques.
a. Describe the Custom Permission Set and Group Assignment Permission Sets.
Now, a custom report type with Permission Set Assignment as the main object can be created.
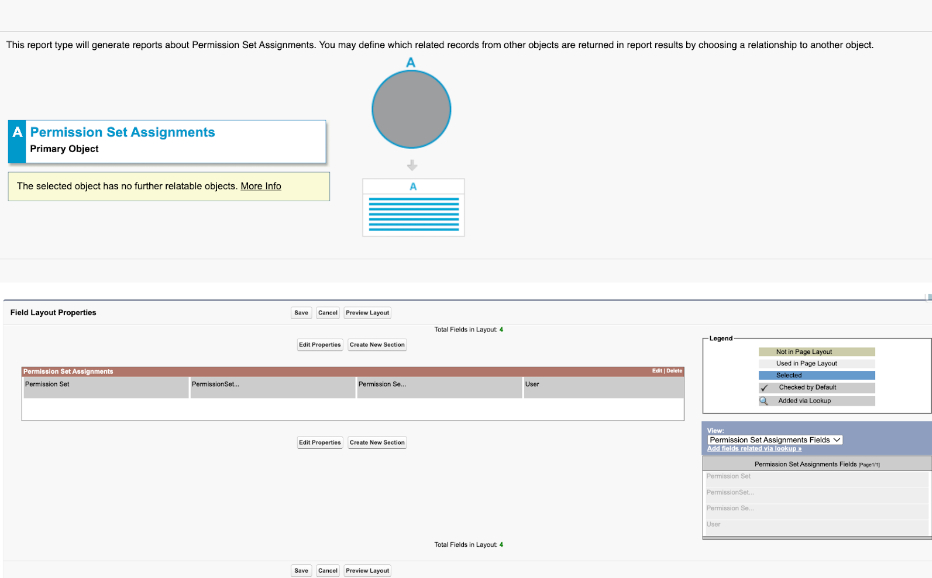
Administrators may now quickly view a list of all users who are a part of a custom Permission Set or Permission Set Group thanks to this report.
b. Repair Permission Set Group Issues
Displaying the most recent error messages on the details page can help you keep track of errors while testing. To save time when debugging Permission Set groups, show the clear error indicator.
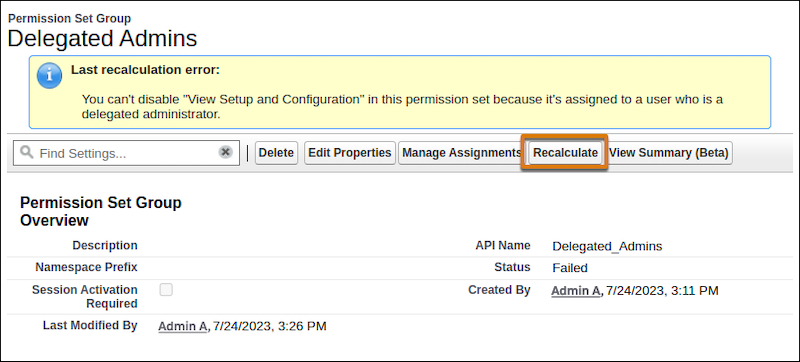
Additionally, it is no longer necessary to update the group to manually initiate the recalculation of Permission Set Groups.
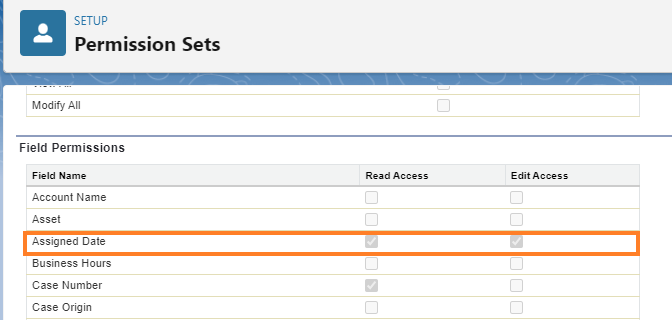
c. For details on object and field permissions in permission sets, see API Names.
To eliminate any ambiguity while establishing object and field rights in permission sets, the Object API Name and Field API Name in addition to the object and field label are now presented.
d. View the Number of Permission Set Groups to Which a Permission Set Has Been Added
You may now view the number of permission set groups to which a given permission set has been added.
Before making a modification to the permission set, utilize this count to determine the impact on your users.
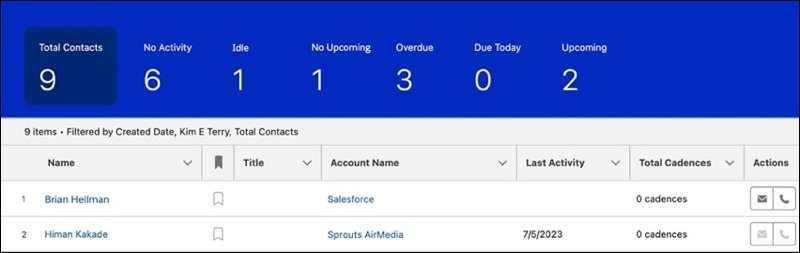
5. Generate leads and manage contents better with intelligence view
This improvement to lead and contact management is really exciting and simple to use.
A streamlined interface for displaying activity metrics and enticing user behaviors is offered by the Lead Intelligence View and Contact Intelligence View, both of which are easily accessible on a single page.
Users just need to select “Intelligence View” from the lead or contact home page after it has been configured during setup.
The following lead metrics are part of the new intelligence view:
- Total Leads: The overall number of leads that satisfy your filtering requirements.
- Leads with no completed activity are considered inactive.
- Idle: Leads with past activity, but no recent tasks have been finished.
- No Upcoming: Leads without any upcoming activities are those with recently completed activities.
- Leading with activities that are past due.
- Leads with tasks that are due today.
- Leads with activities due in the upcoming 30 days.
The new intelligence view’s contact metrics include:
- The total number of contacts who match your filter parameters.
- No Activity: Relationships with no finished tasks.
- Idle: Contacts with historical activity but no recent accomplishments.
- No Upcoming: Contacts without any upcoming plans but with recently finished activities.
- Contacts with delayed activity are referred to as overdue.
- Contacts with activities are required today.
- Contacts with tasks due in the upcoming thirty days.
6. Enhanced management of visibility settings with salesforce account sharing
View an account’s access from Manual Shares and Account Teams with Reports
To see an overview of the shared account records in your organization and which people or groups have access to them, create a custom report.
To simplify maintaining the security of your accounts, create these reports using a custom report type on the Account Share object.
In the quick find box of options, enable these reports under the report types heading. Then, while creating the reports, choose “Account Share” as the main object consumers would view.
a. View Reports from Public Group Members
To manage memberships in Public Groups quickly, use a Group Member report. With this dynamic custom report type, you may view users, roles, and other groups that have been added to public groups.
Create the custom report by selecting “Group Member” as the primary object under “report type” in the settings. Users can choose it once it has been launched when creating their reports.
b. Improve Account Sharing Recalculation Speed
To encourage quicker account-sharing recalculation, two upgrades have been made available:
- Implicit child share records between accounts and their child case and contact records are no longer kept.
- When attempting to access the cases and records, the system will allow access to them.
- No longer stored between accounts and their child opportunity data are implicit child share records.
- When attempting to access a child, access will be allowed to the youngster.
Enable faster account sharing recalculation by entering “Release Updates” in Setup, then go through the testing processes and click Apply Updates to finish.
7. Refine forecast accuracy with a new user-friendly interface
a. New Forecast Page
A redesign of the forecast page has been made to make it easier to read and navigate.
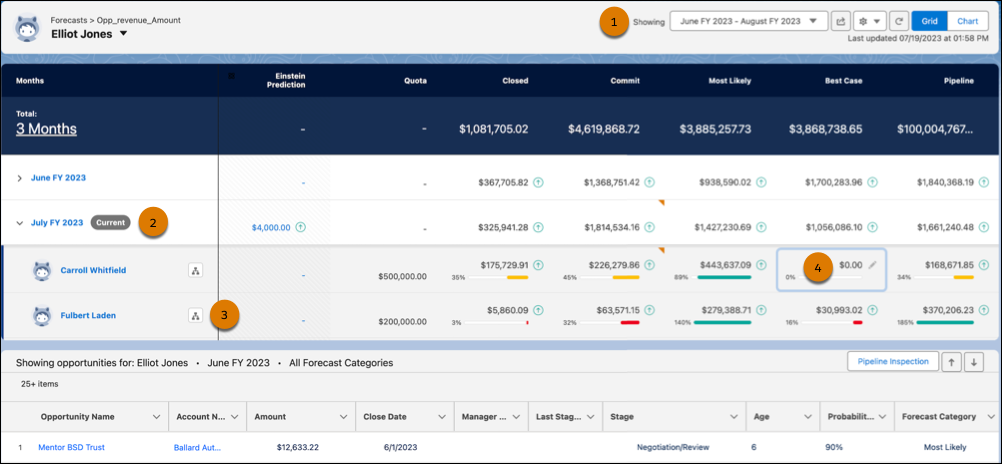
Updated icons for simpler page navigation (1) Current period indicator is shown in the summary view (2) Highlighting indicates which fields are clickable for additional detail (3) Updated label for the forecast range setting to describe what you are viewing (4)
There are no longer any duplicates in the predicted totals for the period because the view has been made simpler when focusing on a particular month or quarter.
b. Using manager discretion, increase the accuracy of sales forecasts
Apply judgments to a chance to improve forecast modifications in a more accurate and informed manner. Managers can gain more visibility into the deals they are most confident in closing by doing this.
This enhances the capability of the earlier version, when managers could simply modify the committed forecast figures to see how their decisions affected the modified forecast.
Forecast types based on Opportunity, Opportunity Product, or Line Item Schedule can include the Manager Judgement column. Managers can choose whether an opportunity is in or out of the forecast using this additional column.
However, forecast managers are limited in that they can only use the forecasts of their team when applying judgment to prospects that they themselves own.

The total number of opportunities included in the comments area of their committed forecast can then be viewed by forecast managers to get a clear picture of which prospects are likely to close.
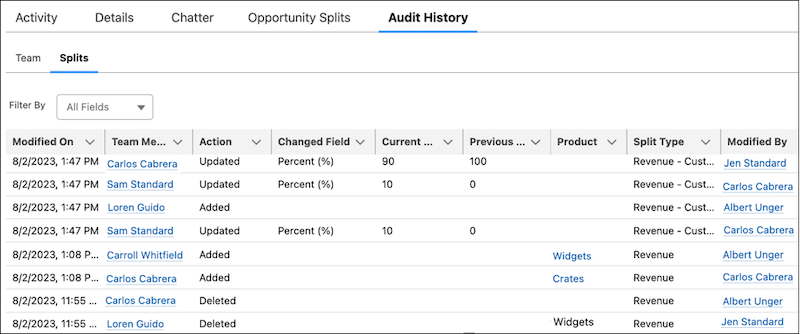
8. Opportunity teams may quickly identify opportunity involvement using audit history.
Splitting teams apart over opportunities might occasionally happen.
Through the Audit History tab, you will have access to information on the changes made to an opportunity thanks to this new feature. Using the Audit History tool, you can quickly determine who changed something, which field was altered, and check both the present and past values for opportunity splits.
Utilizing this new page view will allow you to efficiently track all contributions to opportunities and manage your operations and resources more effectively.
9. Boost Productivity with Frequently Used Email Features
Enterprise and professional sales cloud clients can now access new email productivity tools that were previously only accessible as add-on licenses.
The following email functionalities are now available to users:
- Shortcuts for Text
- Send Later
- Email Tracking
- Email Interaction
If you already have these functionalities as a part of a license add-on, we advise getting in touch with us so we can run a system assessment and provide you recommendations for what to do next.
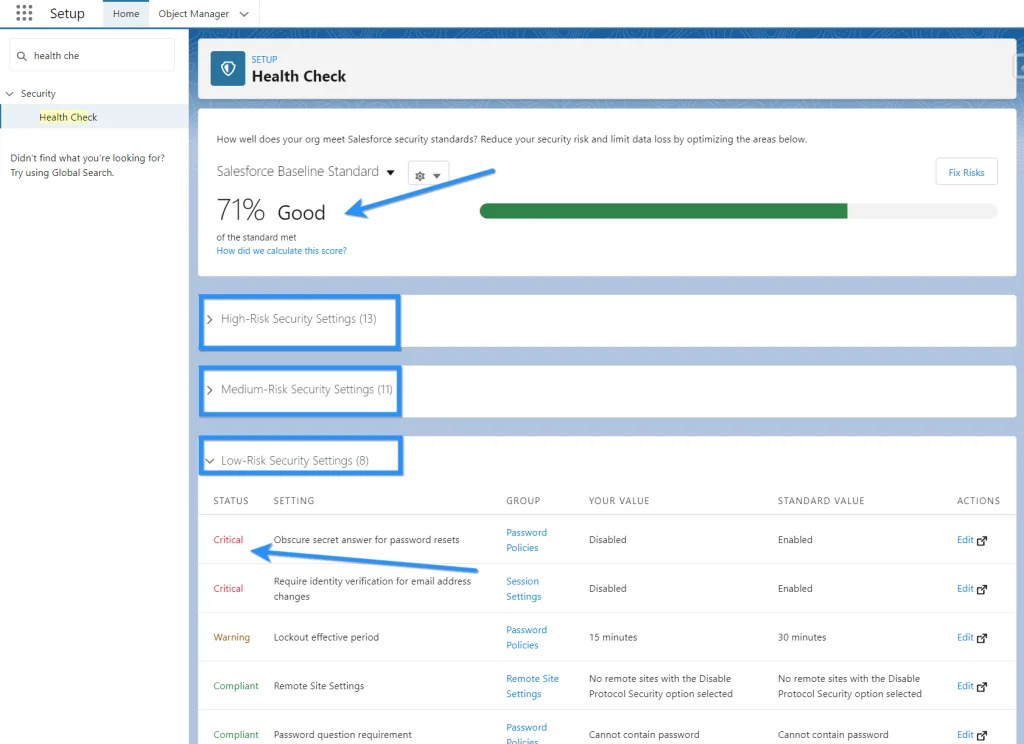
10. Bonus: Examine Cloud Site Security Experience with Health Check Settings
Users may now monitor the amount of objects that guest user profiles have read-only and modify access to in Health Check settings. To create the proper visibility settings, first determine each user’s visibility allocations.
To begin analyzing your user’s visibility allocations, type “Health Check” into the Quick Find box and scroll to the “Informational Security Settings” object.
Wrapping Up
And that’s all you need to know about the Salesforce Winter 24 Release. See you in the next cycle of Salesforce seasonal release.
Follow the guide through thic and thin to streamline your business as Salesforce wants you to. Need any assistance in setting up the new features or re-establishing the existing one? Reach out to DianApps!
We will give you the best consultation, customization, and top Salesforce development services that matches your needs and growth strategies on the go.
Images source: https://fullcrm.com/


Leave a Comment
Your email address will not be published. Required fields are marked *