Have you ever come across notifications that vanish from the screen after a certain time? Did you ever find it astonishing and wonder what’s it called? Well, those notifications are nifty tools commonly named Toast Notifications that can be used to display information without using enough screen space.
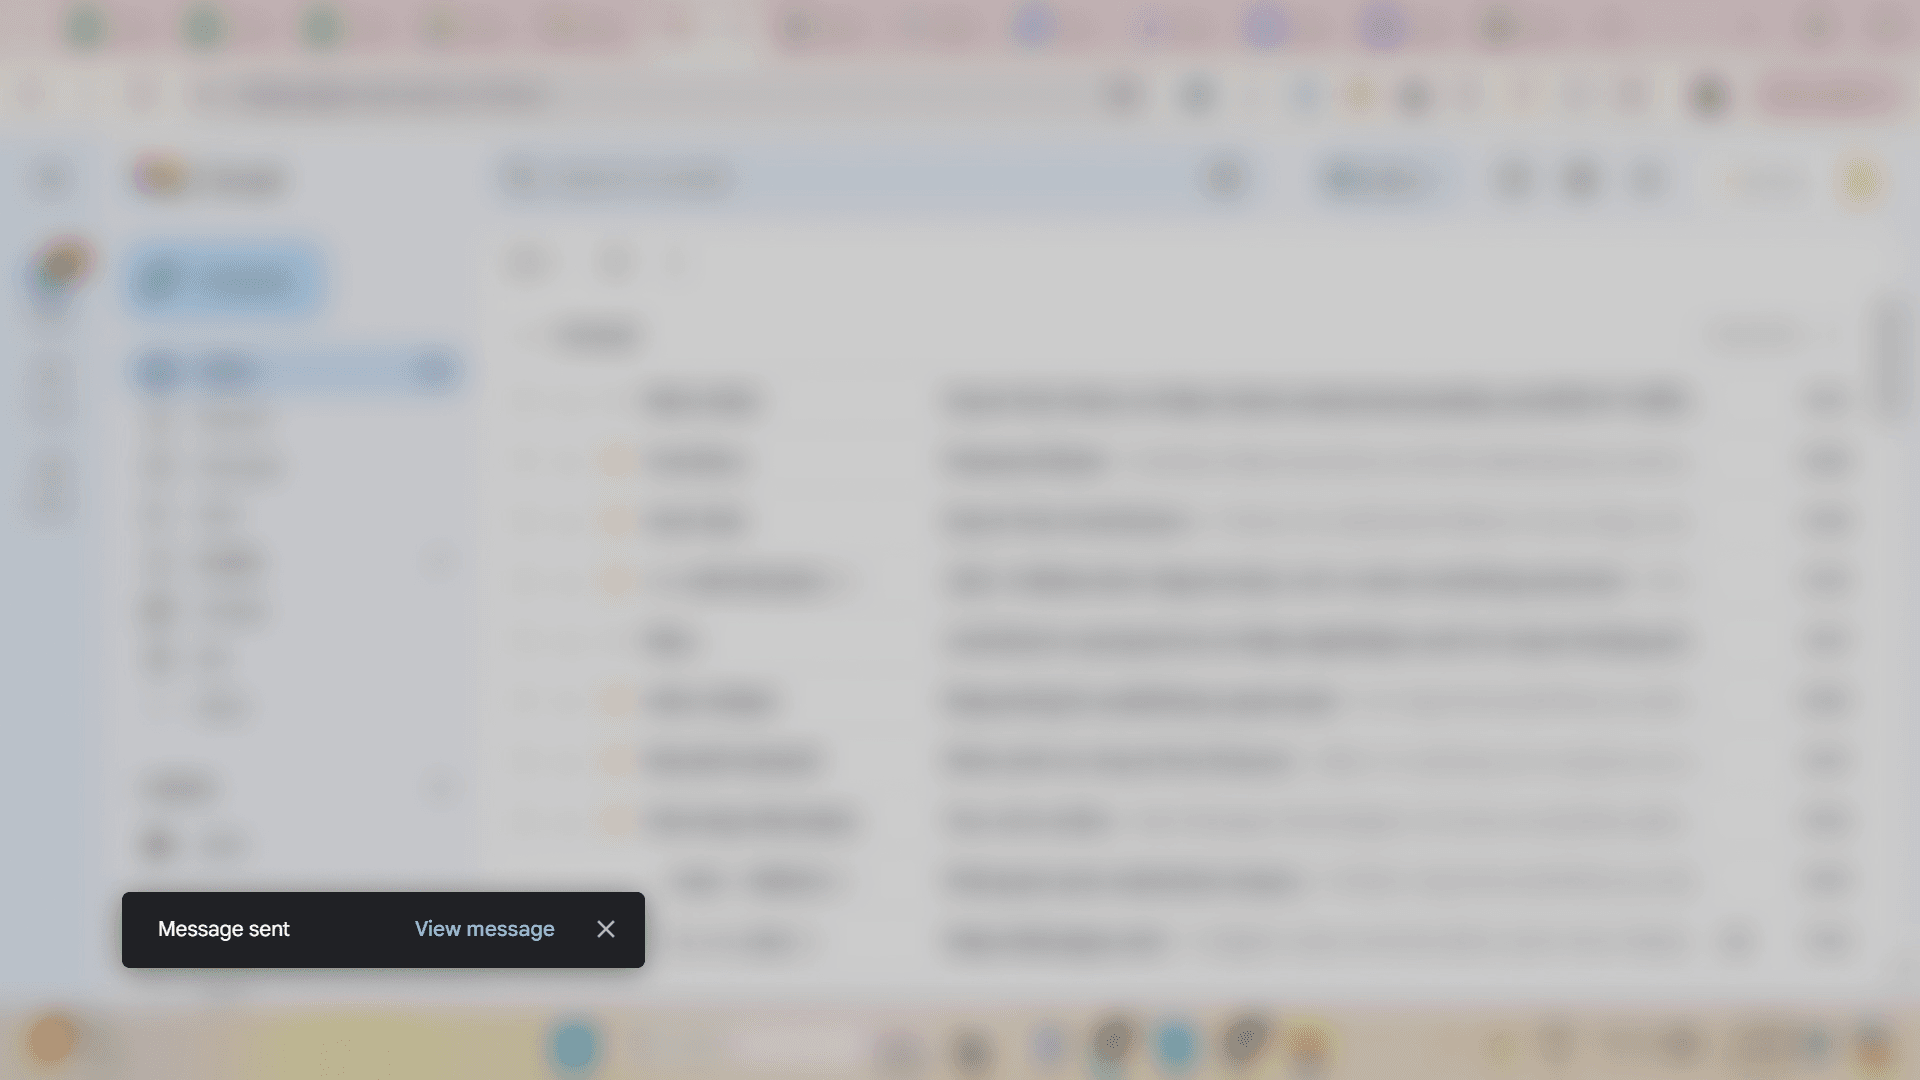
In a nutshell, they are used to display non-critical pieces of information that are supplementary in nature and require zero to minimum user action. For instance, when you open your Gmail application and write a mail to XYZ person you must notice that when you hit the Send button, a notification appears on the bottom left corner of the screen that says “Sending message..” or “Message Sent” as shown in the below screenshot:
A few of the other examples can be:
- Opening an eCommerce app and seeing a pop-up message that disappears after you scroll the screen.
- When you are watching a YouTube video a suggested message appears on the screen.
All-in-all, anything that is a success, error, action, warning, etc notification that pops on the screen but disappears automatically can be termed a toast message. Here in this blog, we will follow a step-by-step guide to adding an automatic toast message in the React Native app in 2024. Let’s get started!
Prerequisites Needed When Adding Toast Messages in React Native App
To display toast notifications in a React Native app, you need to have certain prerequisites in place. Here’s a step-by-step guide to set up and display toast notifications in your React Native application:
1. React Native Environment Setup:
- Node.js installed
- npm (or yarn) installed
- React Native CLI installed
- A working React Native project
2. Install a Toast Library:
- React Native does not have a built-in toast component, so you need to install a third-party library. A popular choice is react-native-toast-message.
3. Basic Knowledge of React Native:
- Understanding of React Native components, state management, and lifecycle methods.
These prerequisites ensure you have the necessary setup and tools to implement toast notifications in your React Native application.
Step-By-Step Guide To Displaying Toast Messages In React Native Apps
1. Create or Navigate To Your React Native Project
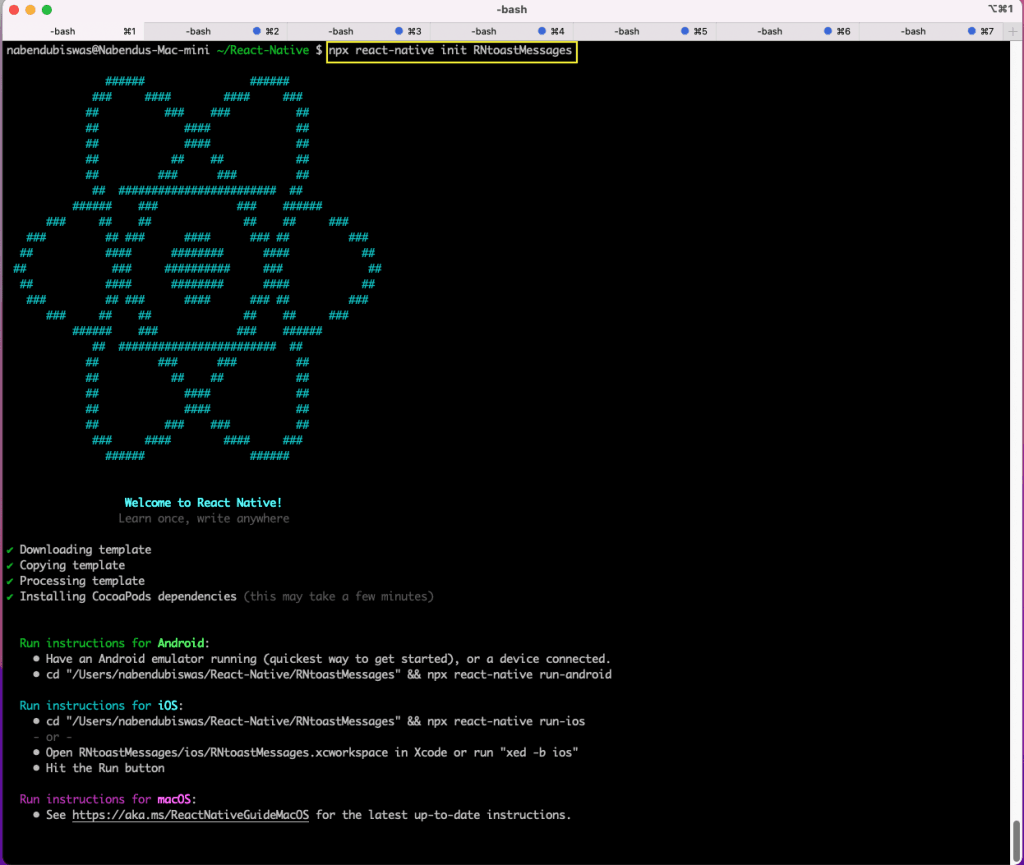
First, create a new React Native project or navigate to your existing project directory. You can create a new project using the following commands:
npx react-native init MyToastApp
cd MyToastApp
If you already have a project, simply navigate to its directory. After installation is done, a screen will appear like shown below:
2. Starting The Project
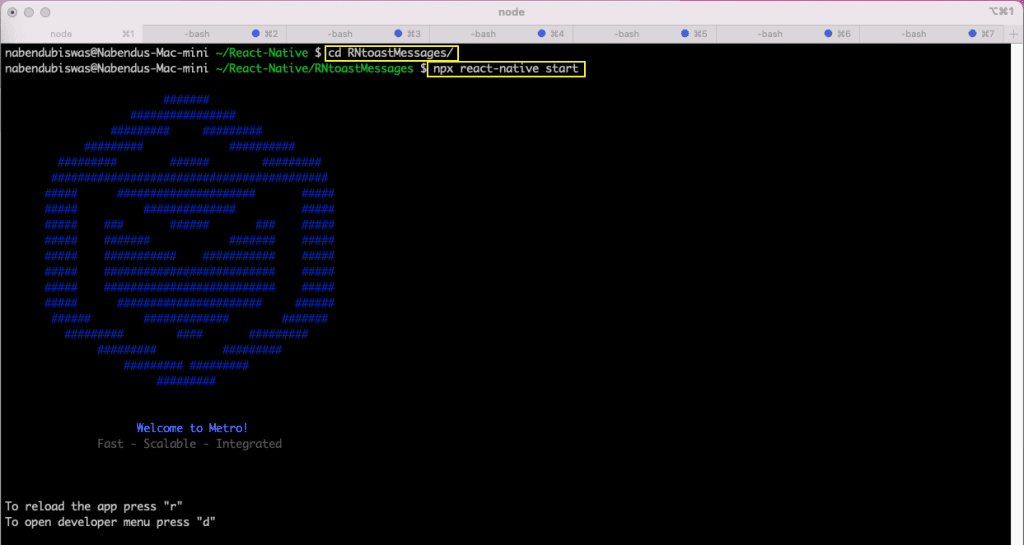
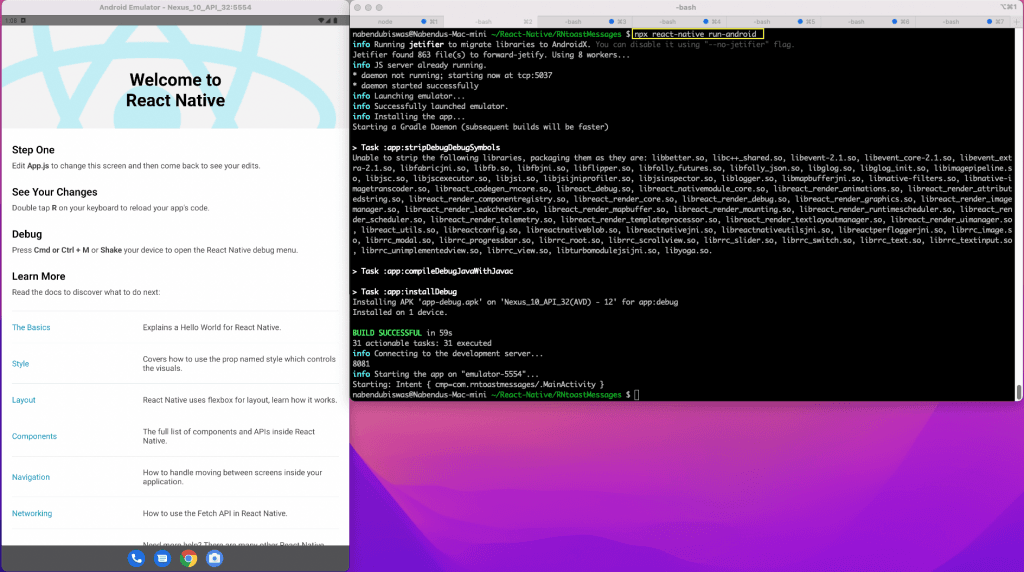
Change to the directory initially to begin our project. Run the npx react-native start command after that.
Next, launch the project on the iOS simulator by running the npx react-native run-ios command from a different terminal.
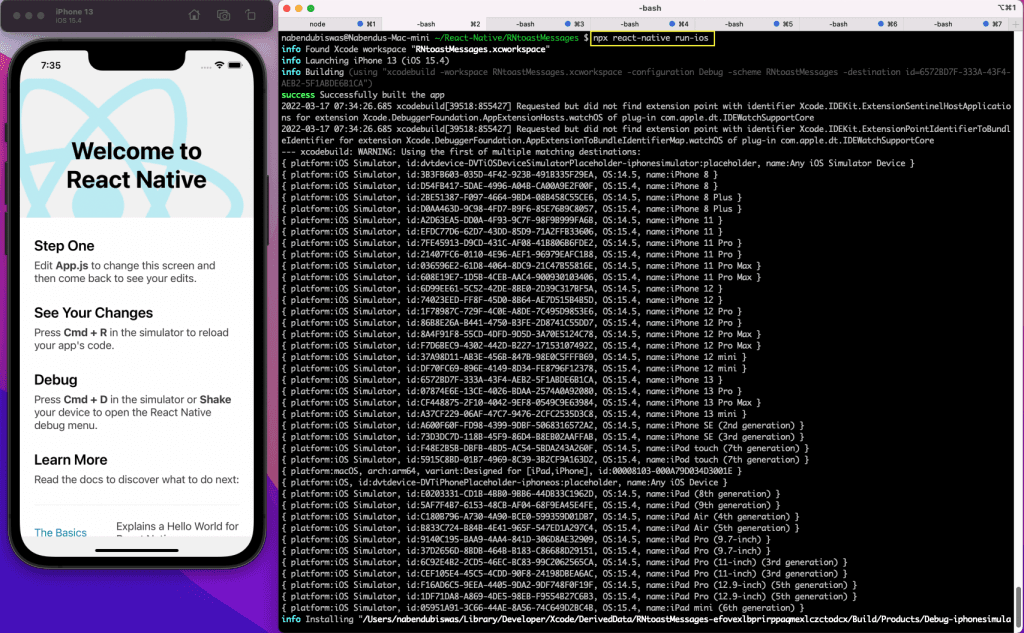
To launch the project on an Android emulator, use the npx react-native run-android command.
3. First Configuration
To use toast notifications, configure the Toast provider in your main entry file, typically App.js or index.js. Wrap your app component with the Toast provider to make toast notifications available throughout your app.
|
1 2 3 4 5 6 7 8 9 10 11 12 13 14 15 16 17 18 19 20 21 22 23 24 25 26 27 28 29 30 31 32 33 34 35 36 37 38 39 |
// App.js import React from 'react'; import { SafeAreaView, Button } from 'react-native'; import Toast from 'react-native-toast-message'; const App = () => { const showToast = () => { Toast.show({ type: 'success', text1: 'Hello', text2: 'This is a toast notification!', }); }; return ( <SafeAreaView style={{ flex: 1, justifyContent: 'center', alignItems: 'center' }}> <Button title="Show Toast" onPress={showToast} /> <Toast ref={(ref) => Toast.setRef(ref)} /> </SafeAreaView> ); }; export default App; |
Next, make a ToastMessages.js file and place it within the components folder that you just created in the root directory. Add the text that follows thereto. Here, four buttons made with the Button component and styled text are displayed.
Next, we’ll build the Button component. We’re simply giving it kudos here. Also take note that we have a unique button reserved for the Android operating system. We’ll develop a native Android toast in it later.
|
1 2 3 4 5 6 7 8 9 10 11 12 13 14 15 16 17 18 19 20 21 22 23 24 25 26 27 28 29 30 31 32 33 34 35 36 37 38 39 40 41 |
import { StyleSheet, Text, Platform } from 'react-native' import React from 'react' import Button from './Button' const ToastMessages = () => { return ( <> <Text style={styles.titleText}>Toast Messages</Text> <Button title="success" onPress={() => { }} /> <Button title="error" onPress={() => { }} /> <Button title="info" onPress={() => { }} /> {Platform.OS === 'android' && ( <Button title="android toast" onPress={() => { }} /> )} </> ) } const styles = StyleSheet.create({ titleText: { fontSize: 22, fontWeight: 'bold', textAlign: 'center', paddingVertical: 20, color: 'darkblue' }, }) export default ToastMessages |
Next, add the following content to a Button.js file that you create in the components folder. Here, we’re making a button using the title and onPress props that we received.
|
1 2 3 4 5 6 7 8 9 10 11 12 13 14 15 16 17 18 19 20 21 22 23 24 25 26 27 28 29 30 31 |
import React from 'react'; import { Text, TouchableOpacity } from 'react-native'; const Button = ({ onPress, title }) => { return ( <TouchableOpacity style={[ { margin: 12, padding: 12, backgroundColor: 'darkmagenta', borderRadius: 4 }, ]} onPress={onPress}> <Text style={{ textAlign: 'center', color: 'white' }}> {title.toUpperCase()} </Text> </TouchableOpacity> ); }; export default Button; |
Now, the iOS simulator and Android emulator should display the screen below. Observe that the iOS simulator does not have the Android Toast button.
4. Making Toast Notifications
Let’s start by building a helper function that displays toast messages. Make a helpers folder in the root directory to do this. Include the content below in a file called toast.js.
The info, success, and danger functions come next, and they use the React Native DeviceEventEmitter to emit events. In this instance, we’re also emitting an alternative type and choices in addition to the string SHOW_TOAST.
|
1 2 3 4 5 6 7 8 9 10 11 12 13 14 15 16 17 18 19 20 21 22 23 24 25 |
import { DeviceEventEmitter } from 'react-native'; const toast = { info: options => { DeviceEventEmitter.emit('SHOW_TOAST', {...options, type: 'info'}); }, success: options => { DeviceEventEmitter.emit('SHOW_TOAST', {...options, type: 'success'}); }, danger: options => { DeviceEventEmitter.emit('SHOW_TOAST', {...options, type: 'danger'}); }, }; export default toast; |
Next, add the following information to a file named Toast.js that is created within the components folder. Here, the useEffect hook’s listener is being added. Here, we are watching for the Toast.js file’s event to be emitted. Also, when the component is unmounted, the event has been eliminated.
Upon receiving an event, we invoke the onNewToast method and log the incoming data in the console. Later on, we’ll add additional reasoning to it.
|
1 2 3 4 5 6 7 8 9 10 11 12 13 14 15 16 17 18 19 20 21 22 23 24 25 26 27 28 29 30 31 32 33 34 35 36 37 38 39 |
import { StyleSheet, Text, View, DeviceEventEmitter } from 'react-native' import React, { useEffect } from 'react' const Toast = () => { useEffect(() => { DeviceEventEmitter.addListener('SHOW_TOAST', onNewToast); return () => { DeviceEventEmitter.removeAllListeners(); }; }, []); const onNewToast = data => { console.log(data) } return ( <View> <Text>Toast</Text> </View> ) } const styles = StyleSheet.create({}) export default Toast |
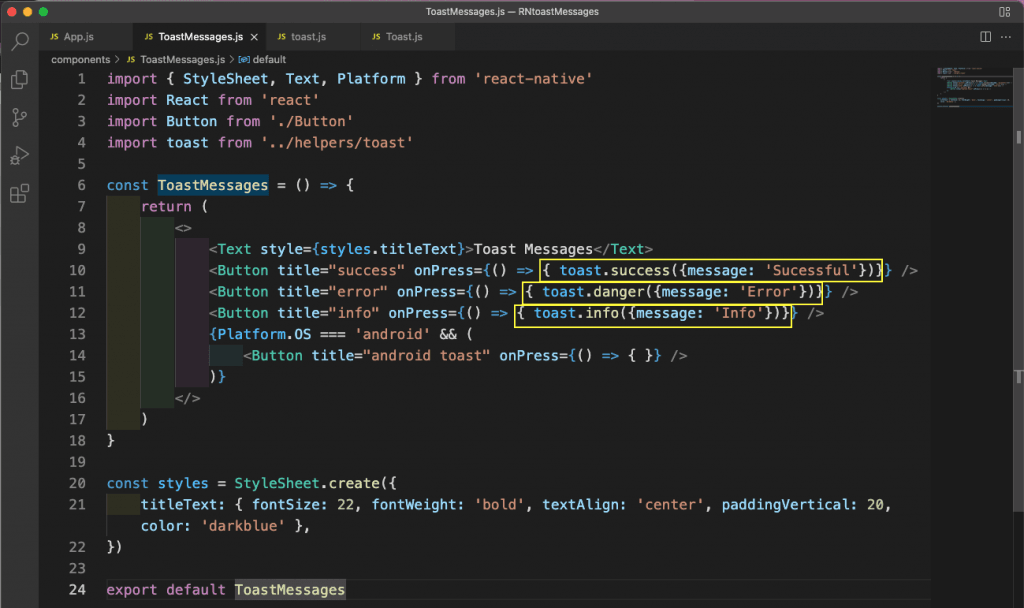
In order to leverage the Toast.js function and transmit various messages on various press events, we will now alter the ToastMessages.js file.
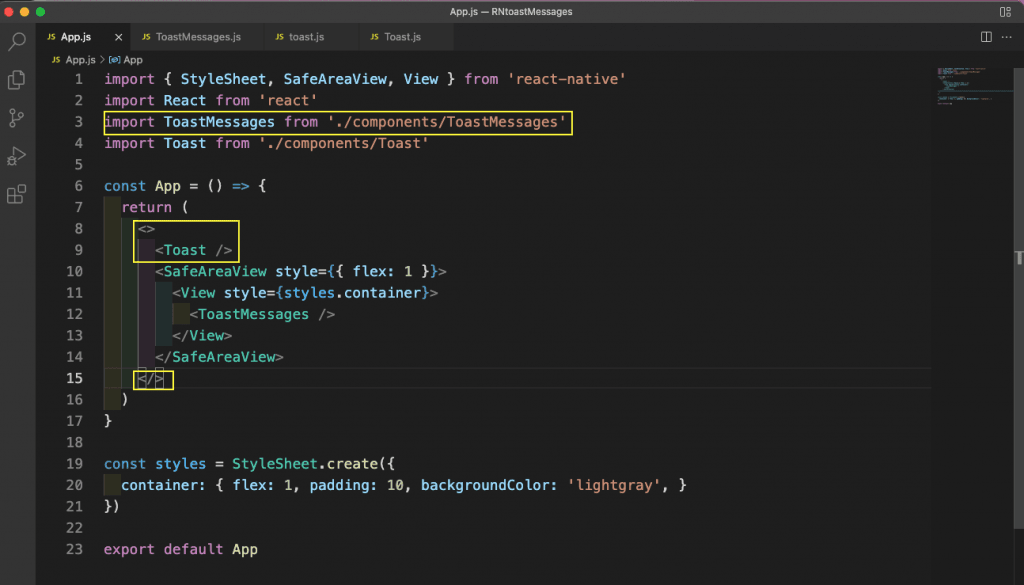
Additionally, we’ll add the Toast component outside of each App.js file component.
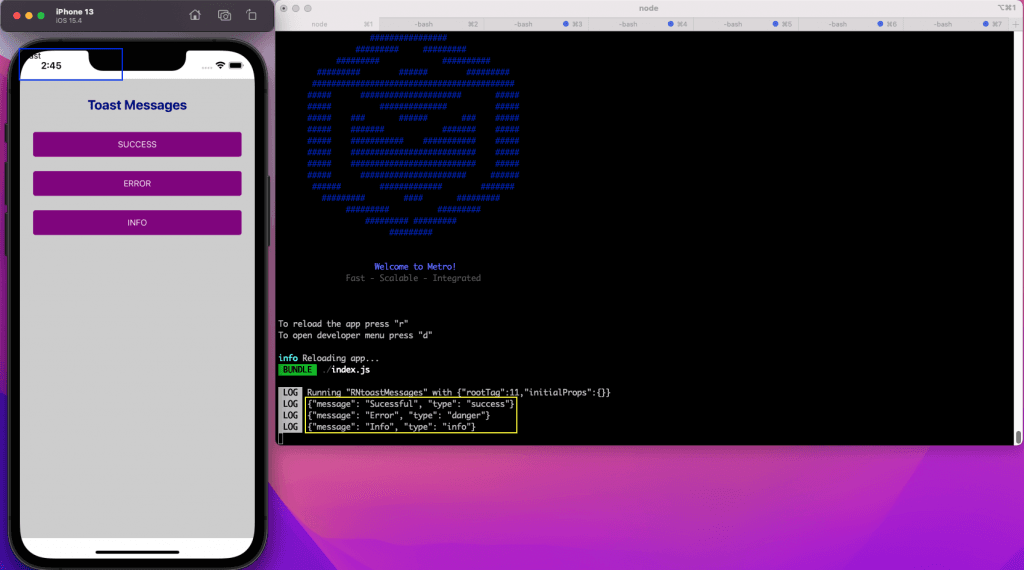
The console logs for that may then be seen by pressing any button on the iOS simulator or Android emulator. Also, see the toast component is not shown at the correct place.
5. Displaying Toast Messages
We were able to enter different data into the Toast.js component by pressing any button. Let’s now display a toast message where it belongs. Additionally, every toast message with a distinct text message will have a different hue.
First, add the two state variables, message and messageType, to the Toast.js file. We will then set these state variables with the message and type when we receive the toast message.
Here, we are determining if the return statement contains any messages. Next, we’re displaying a View that has a TouchableOpacity button on it. Different styles are being used for the text and container.
To precisely position the box at the bottom, use the position “absolute”. Additionally, line 4 has a color variable that allows us to change the container’s backdrop color based on the message.
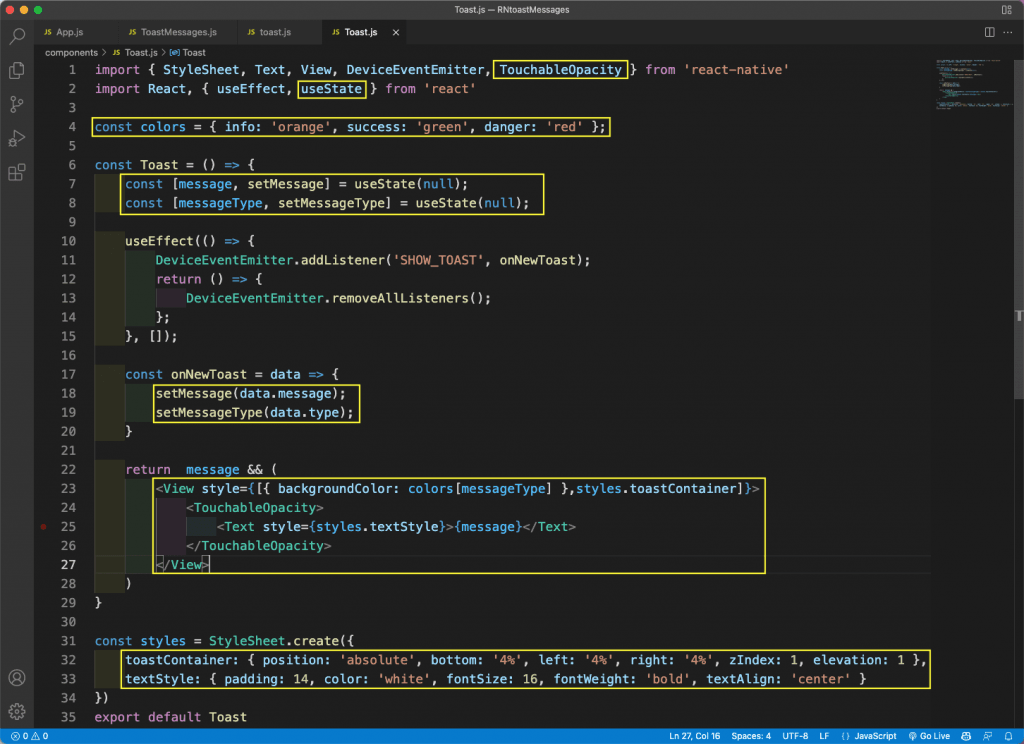
We will now see different colored messages at the bottom when we hit different buttons.
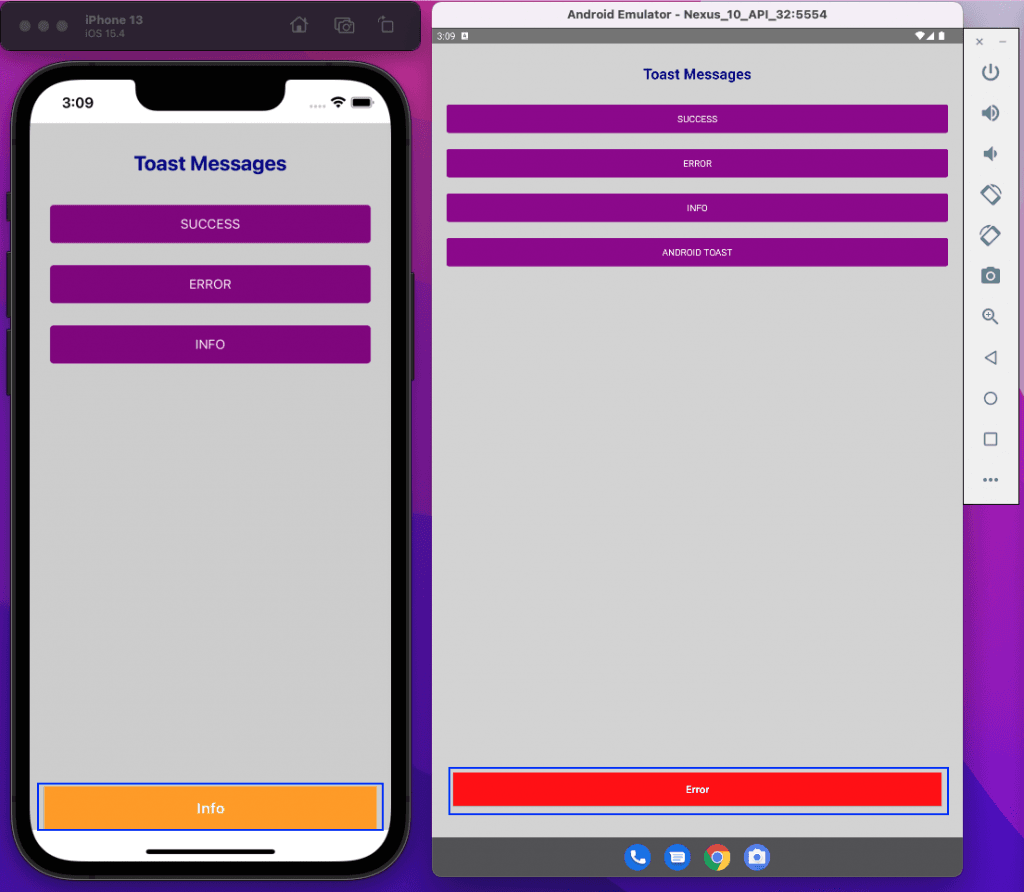
6. Toast Messages That Disappear
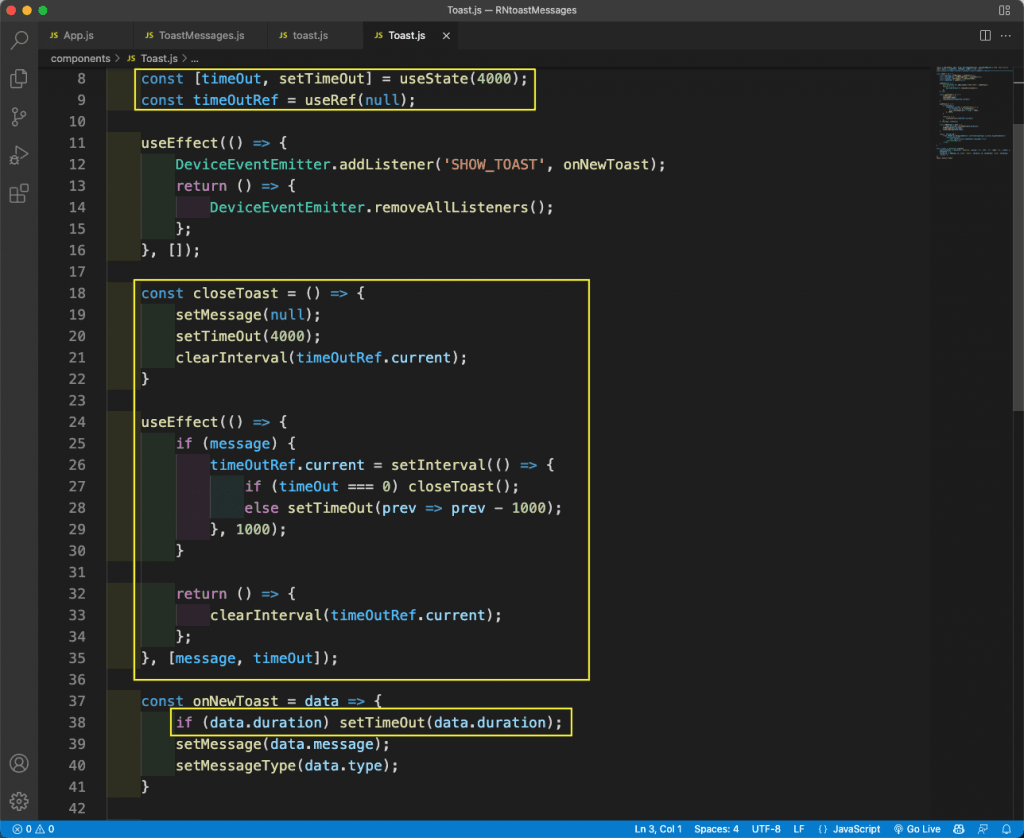
Our toast message will be displayed constantly; nevertheless, it must eventually go. Let’s now include this functionality in the Toast.js file.
The timeOut state variable, which has a starting value of 4,000 milliseconds, will be used in this instance. Additionally, we generated a ref called timeOutRef. The creation of a reference is necessary as our code will utilize it in several locations.
After that, a new useEffect hook will exist. The set interval method will be used in this case to run every 1,000 milliseconds. Additionally, we’ve reduced the timeOut state variable by 1,000 milliseconds each time, making it equal to the timeOutRef variable that was previously stated. We are invoking the closeToast function if it becomes 0, which indicates that it ran four times.
Set the timeOut variable to 4,000 milliseconds once more and set the message to null in the closeToast() function. Next, use clearInterval to make the interval clear.
Lastly, determine if the duration has passed and set it to the timeOut variable in the onNewToast() function.
Next, pass the duration variable, which is set at 2,000 milliseconds, in the TextMessages.js code.
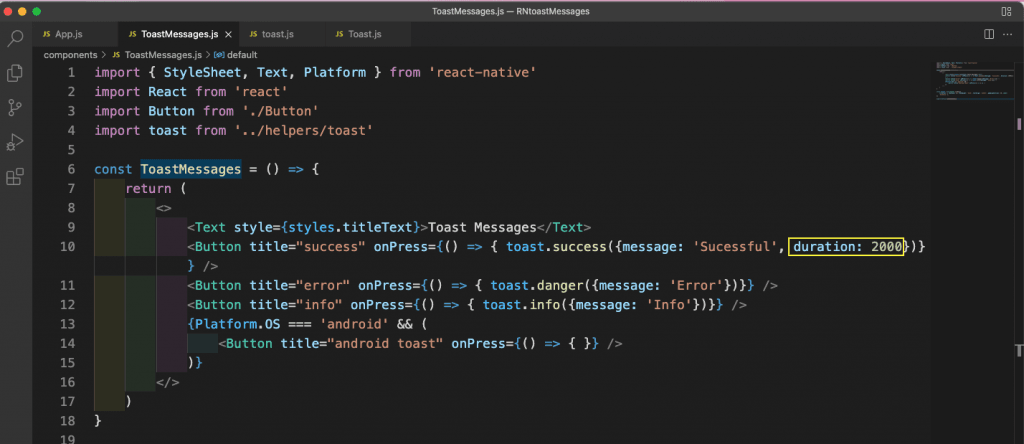
The toast message will now close after 2,000 milliseconds when we click on SUCCESS. After 4,000 milliseconds, the ERROR and INFO toast messages will close.
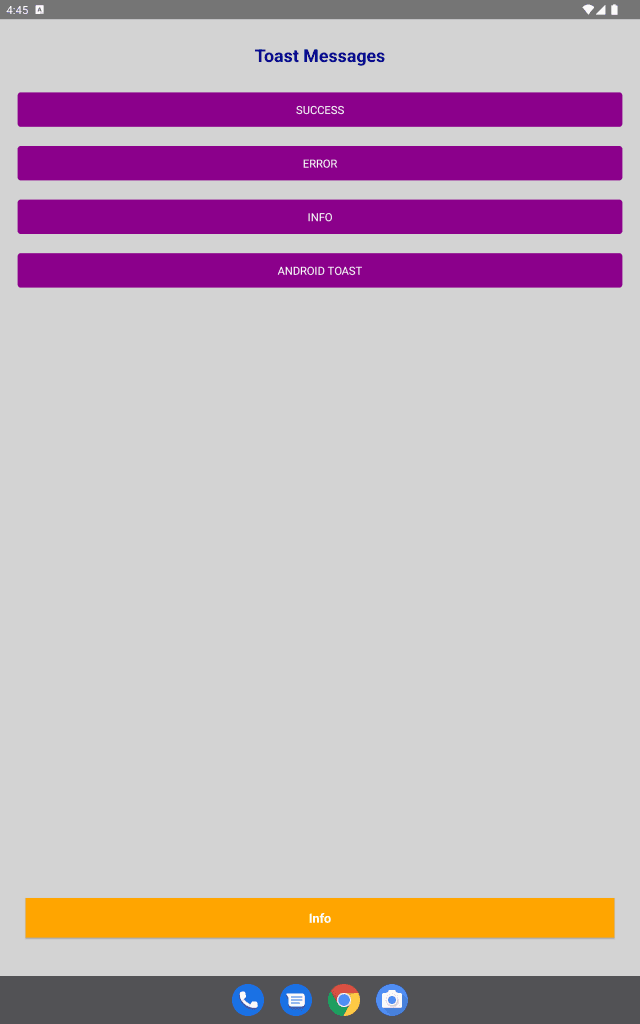
7. Toast Messages on Android
Toast messages that are native to Android are supported. It doesn’t require any unique logic to be written.
First, determine if the platform is Android in the Toast.js code located inside the onNewToast() function.
If so, show the message using ToastAndroid. Additionally, give it a LONG parameter. This indicates that the message will be shown for a longer period of time.
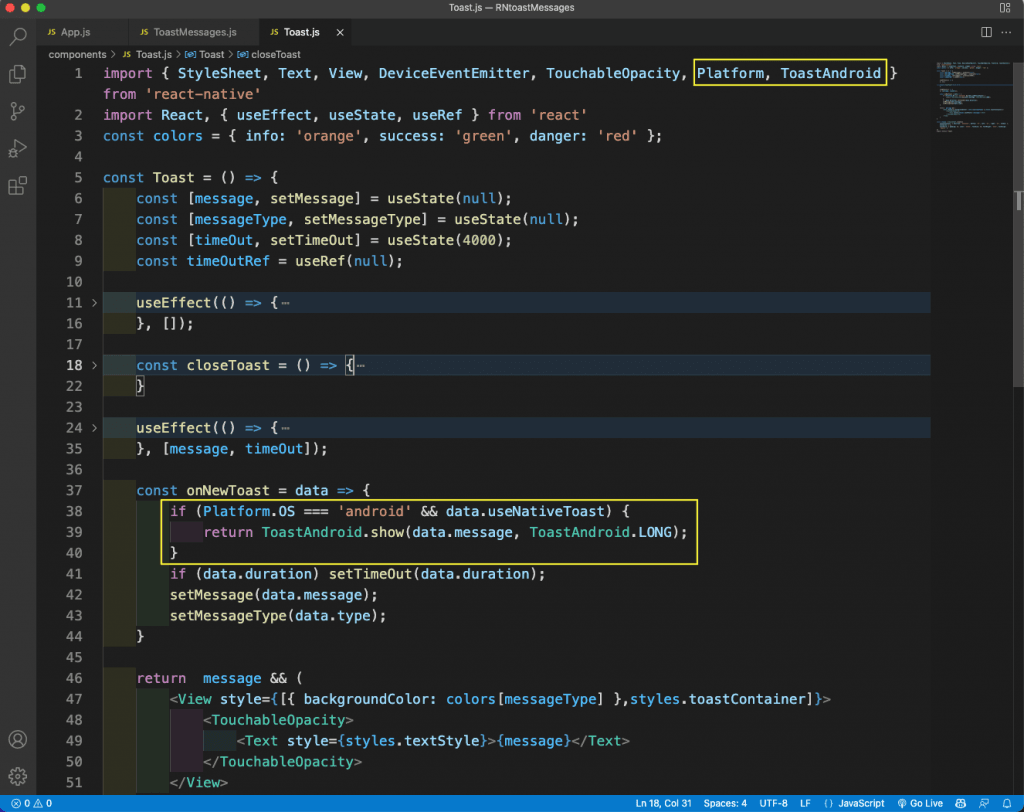
Now, in the ToastMessage.js file, update the onPress handler.
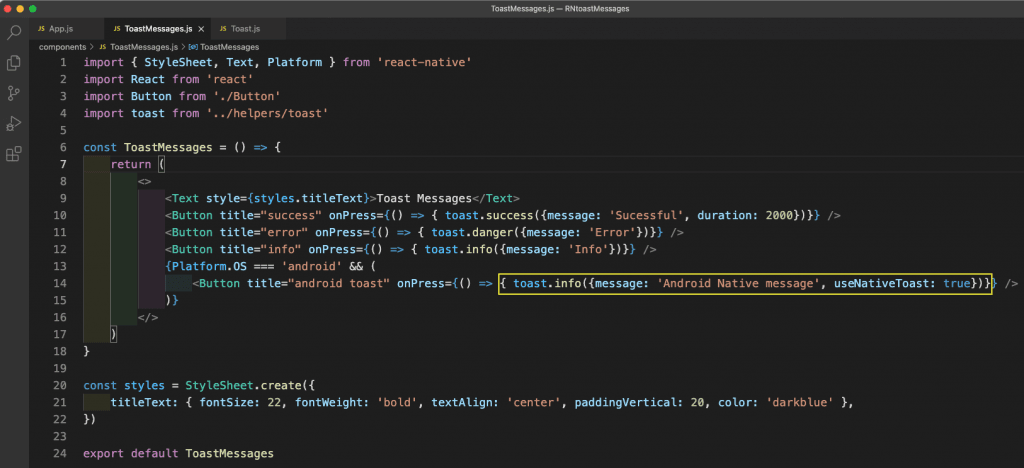
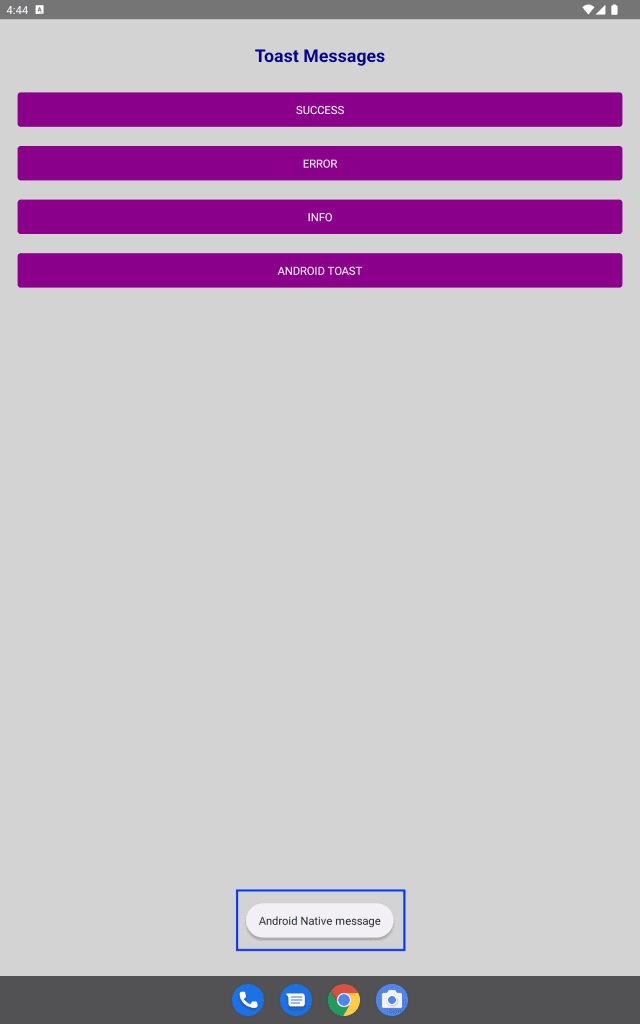
When we click the ANDROID TOAST button on an Android emulator, a native message will appear.
8. App Testing
We will utilize the built-in Jest testing techniques to test the application. Delete the previous file, app-test.js, from the __tests__ folder. Include a file named ToastMessages-test.js.
Now add the following text to the ToastMessages-test.js file. This is a straightforward snapshot test that verifies that the app matches every tag.
To view the test’s outcome, use the npm run test command from the terminal.
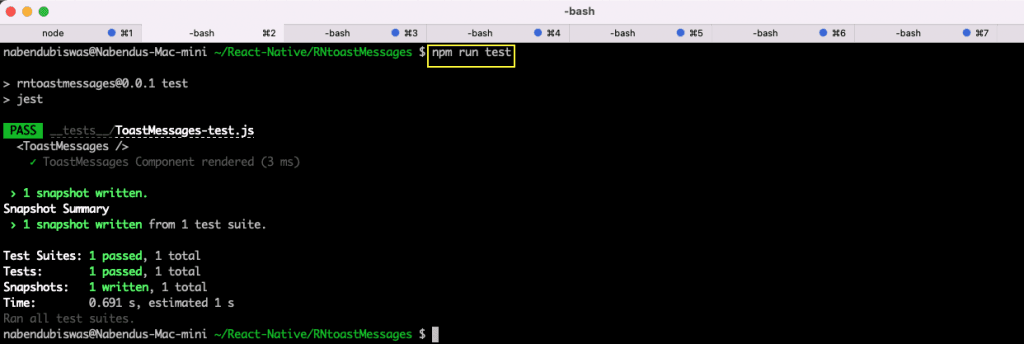
The lone test scenario we had worked well. But to include the Toast.js component in the testing would mean creating a pretty intricate test case. Rather than writing every test case by hand, we may do this by using Waldo, a no-code testing platform.
We only need to upload the IPA or APK file to use this platform. After that, we may click on the button to do user iteration. After that, our testing and the creation of the test cases will both happen automatically.
Thus, register for a free Waldo account to explore its functionalities.
Tips To Keep in Mind When Integrating Toast Messages In React Native App
As a leading React Native app development company, we ask our viewers and developers to also keep in mind a few things when integrating and displaying toast messages in a react native app such as:
- Ensure you select a well-maintained and popular library like react-native-toast-message. This helps ensure better support, documentation, and fewer bugs.
- Toast messages should be concise and to the point. Long messages can overwhelm users and defeat the purpose of quick feedback.
- Use different types of toasts (success, error, info, warning) to convey the nature of the message clearly. This helps users understand the context at a glance.
- Position toast notifications where they are most likely to be noticed without obstructing important content. Common positions are at the bottom or top of the screen.
- Ensure that toast messages do not stack up indefinitely if multiple actions are performed quickly. Implement logic to limit the number of concurrent toasts.
- Match the toast message styles with your app’s theme for a consistent user experience. Customize colors, fonts, and animations as needed.
- Set an appropriate duration for toast visibility. Success messages might need shorter durations, while error messages might need a bit longer for users to read and understand.
Bonus Points
- Ensure your toast notifications are accessible. Use proper ARIA roles and ensure that screen readers can read the toast messages.
- Test toast notifications on various devices and screen sizes to ensure they look good and function properly across all possible user environments.
- Use toast messages sparingly. Overuse can annoy users and reduce the effectiveness of the notifications.
- Ensure that the toast messages are contextually relevant and triggered by meaningful user actions or system events.
- Provide clear and actionable information in error messages to help users understand what went wrong and how they can fix it.
- Use smooth animations to show and hide toasts to make the experience seamless and less jarring for users.
- Make sure the toast library you choose is compatible with the latest version of React Native and any other libraries you’re using.
- Decide whether you need global toasts that can be triggered from anywhere in the app, or local toasts that are specific to certain components.
Conclusion
That’s a wrap on providing step-by-step instructions on displaying toast messages in React Native apps if you are someone who needs assistance in the integration and implementation of toast messages in your mobile app development services you can hire DianApps. One of the growing and responsive React native app development company that build the best-in-class mobile apps personalized as per business needs and expectations.
Get in touch with us today!




Leave a Comment
Your email address will not be published. Required fields are marked *