There must be times when you encountered a large number of components to manage the state internally in your React Native application.
Components that internally handle state are used to create React Native apps. The built-in state management of React Native app development is effective for apps with few components and no plans to grow in the future. Sharing state among components becomes complicated for applications with many components or for those with the potential to grow in the future.
To address this problem, state management frameworks like Redux exist. Redux gives an application’s state a central location where any component may access the values kept there. In Redux language, the “central location” is referred to as a store.
In this post, we’ll look at leveraging Redux to handle the state in a React Native application. This piece addresses:
- Asynchronous activities and action kinds
- Establishing a reducer
- Setting up a Redux store
- Dispatching actions inside a React Native component using React Hooks
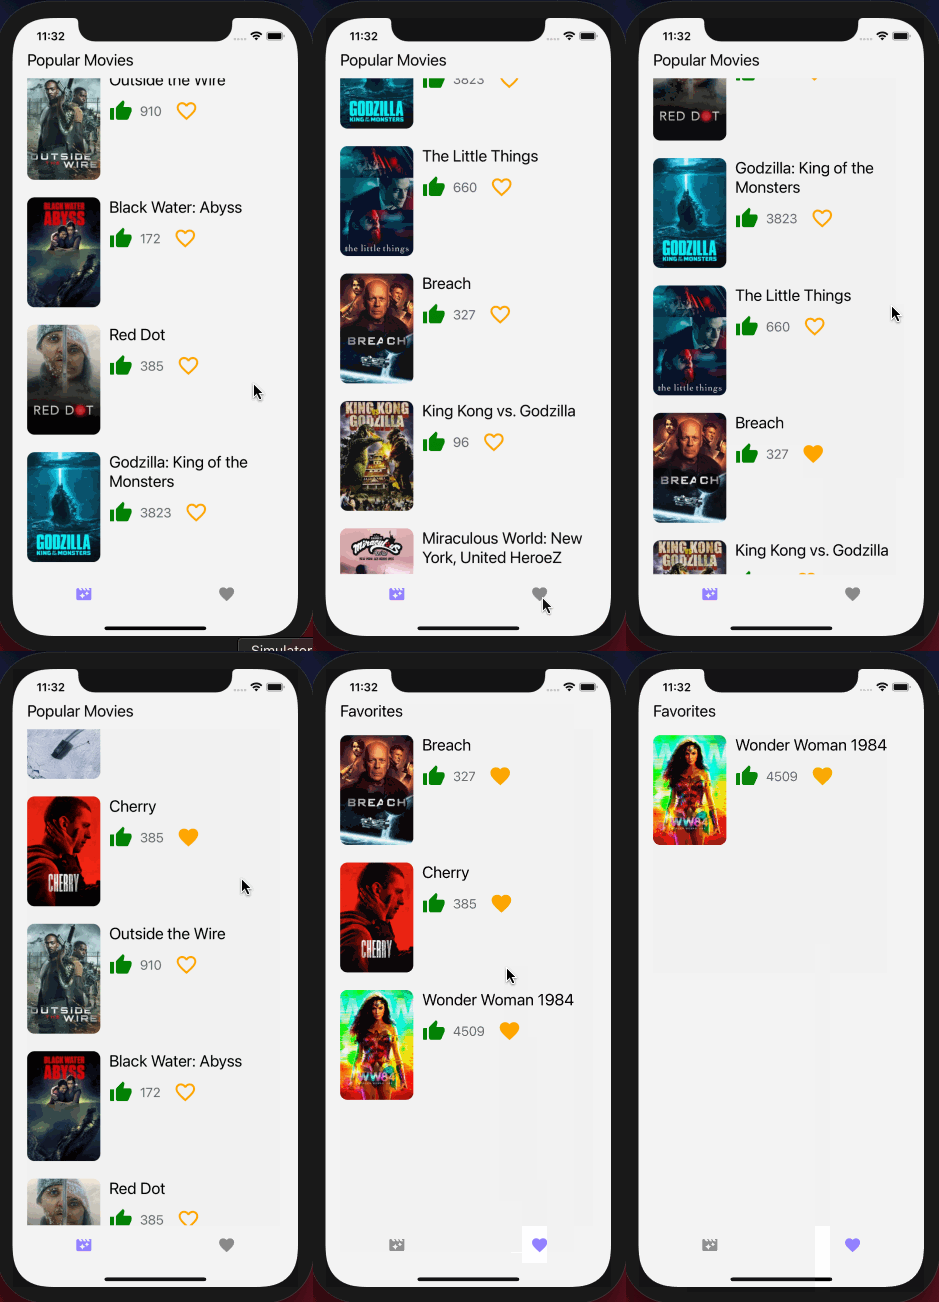
Let’s build an example app that retrieves a list of movie items from The Movie Database in order to better comprehend these ideas (TMDB API). This project’s source code is accessible at this GitHub repository. Each movie in the list can be marked as a favorite by the app user, who can then view it from a different screen by storing it in the application’s state.
Prerequisites
Make sure you have the following installed on a local environment before you start:
- Installed Node.js version >= 14.x.x
- TMDB account, access to API key,
- A package manager such as npm, yarn, or npx
- react-native-cli installed (or use npx)
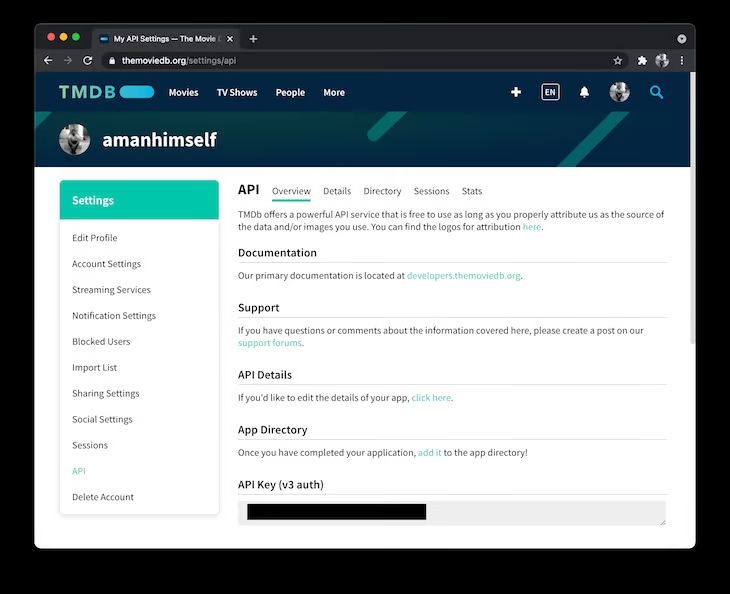
Get the API key by navigating to Settings > API section after logging into your TMDB account and looking for it under the section API Key (v3 auth).

We’ll use an iOS simulator to show this. The code snippets presented in this post will function the same on an Android device or an emulator.
Using Redux with React Native
1. Let’s get started
Use the React Native CLI to enter the project directory to begin building a new React Native project. To develop a bottom tab navigator, we’ll first install necessary dependencies, such as react-native-vector-icons and react-navigation/bottom-tabs, and then we’ll build a Redux store.
See the official documentation for installation instructions for the React Navigation library. Throughout time, these dependencies could shift.
These directions will help you configure react-native-vector-icons.
After installing these, use a terminal window and issue the following commands:
|
1 2 3 4 5 6 7 8 9 10 11 12 13 |
npx react-native init reduxExample cd reduxExample yarn add @react-navigation/native @react-navigation/bottom-tabs react-native-gesture-handler react-native-reanimated react-native-screens react-native-safe-area-context @react-native-community/masked-view react-native-vector-icons axios redux@4.0.5 redux-thunk@2.3.0 react-redux@7.2.2 |
Installing the pods will allow you to finish connecting these external libraries using CocoaPods if you’re developing for iOS:
|
1 |
npx pod-install ios |
2. Create tabs and a tab navigator
We’ll make a tab navigator that will appear at the bottom of the screen after the installation procedure. A list of movies will be shown on the first tab utilizing information gathered from the TMDB API endpoint. A list of the movies that the app user has marked as favorites will appear in the second option.
We’ll begin by making two practice screens. Make two new files in a new directory named screens/, as follows:
- Favorites.js
- Movies.js
Each file should have the matching code snippet added:
|
1 2 3 4 5 6 7 8 9 10 11 12 13 14 15 16 17 18 19 20 21 22 23 24 25 26 27 28 29 30 31 32 33 34 35 36 37 38 39 40 41 42 43 44 45 46 47 48 49 50 51 52 53 54 55 56 57 58 59 60 61 62 63 64 65 66 67 68 69 70 71 |
// screens/Favorites.js import React from 'react'; import {View, Text, StyleSheet} from 'react-native'; const Favorites = () => { return ( <View style={styles.container}> <Text>Favorites</Text> </View> ); }; const styles = StyleSheet.create({ container: { flex: 1, justifyContent: 'center', alignItems: 'center', }, }); export default Favorites; // screens/Movies.js import React from 'react'; import {View, Text, StyleSheet} from 'react-native'; const Movies = () => { return ( <View style={styles.container}> <Text>Movies</Text> </View> ); }; const styles = StyleSheet.create({ container: { flex: 1, justifyContent: 'center', alignItems: 'center', }, }); export default Movies; |
Then, make a directory named navigation and a new file inside of it called RootNavigator.js. To add a bottom tab, use the piece of code below:
To render the RootNavigator, edit the App.js file:
|
1 2 3 4 5 6 7 8 9 10 11 |
import React from 'react'; import RootNavigator from './navigation/RootNavigator'; const App = () => { return <RootNavigator />; }; export default App; |
3. Build the application
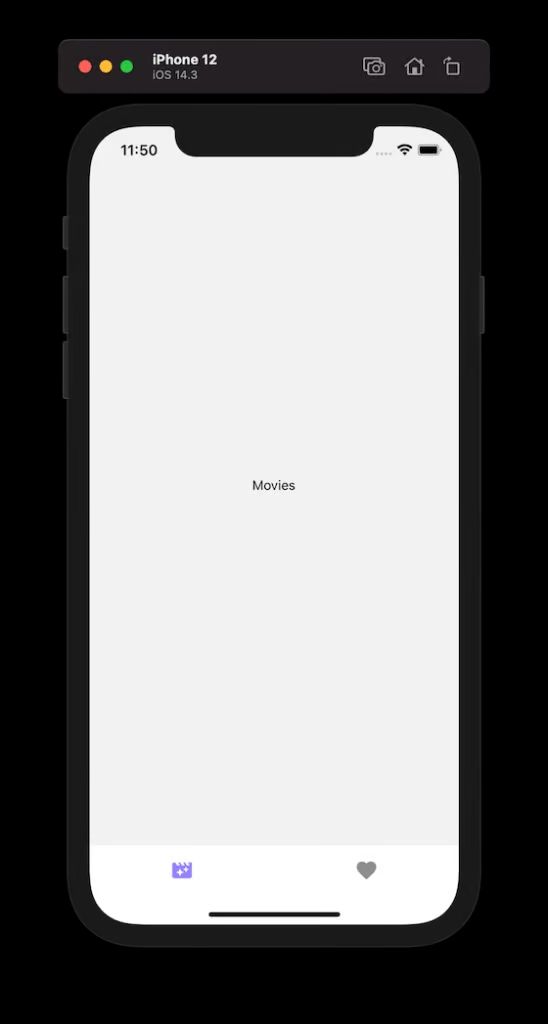
We’ll create the programme and execute it on an iOS simulator after this setup is finished. Use the npx react-native run-ios command to create the iOS version of the app. Execute the command npx react-native run-android to run it on an Android emulator.
The output on an iOS simulator is displayed as follows:

4. Integrate an action to capture data
In Redux, an action is a payload of data that is sent from the application to the store and causes an event to occur. The state of the application can be said to have changed when anything occurs that is directly relevant to that state.
Redux uses a JavaScript object that may be considered a read-only object to describe the state. There is only one way to change it: by acting.
Getting the data from the API is the first step in creating the sample app. The application’s state is then updated with this information, and a component screen may utilize it to show a list of movies.
An item with these two qualities is the building block of an action:
- A simple string describing the kind of activity you wish to start. For instance, the kind of action here is GET MOVIES if you wish to retrieve every movie item.
- A data or information-containing payload
Create a new file named actions.js and a new directory called redux at the beginning. Include the next action type:
|
1 |
export const GET_MOVIES = 'GET_MOVIES'; |
In order to keep the code sample above manageable, an action type is declared using a const variable. Several actions may be taken in the real world to cause distinct Redux application events.
Making an HTTP request to retrieve data from an API endpoint is the responsibility of the action type GET MOVIES. By specifying an action creator, this is accomplished. This is the name for a function in Redux that produces an action object.
A BASE URL and an API KEY make up an HTTP request. Let’s retrieve the list of well-liked movies for the sample app. Create a BASE URL by adding the following code and replacing API KEY with the key from your account.
|
1 2 3 4 5 6 7 |
const API_URL = 'https://api.themoviedb.org/3/movie/popular'; const API_KEY = '<your-api-key>'; const PARAMS = 'page=1'; const BASE_URL = `${API_URL}?api_key=${API_KEY}&${PARAMS}`; |
Let’s employ Axios to retrieve the data from the API. It offers an API that includes HTTP request methods like get and put. At the start of the program, import the Axios, and then specify the getMovies action creator.
|
1 2 3 4 5 6 7 8 9 10 11 12 13 14 15 16 17 18 19 20 21 22 23 24 25 26 27 28 29 30 31 32 33 |
export const getMovies = () => { try { return async dispatch => { const res = await axios.get(`${BASE_URL}`); if (res.data) { dispatch({ type: GET_MOVIES, payload: res.data, }); } else { console.log('Unable to fetch'); } }; } catch (error) { // Add custom logic to handle errors } }; |
5. Add a movies reducer
The application’s state cannot be updated by actions alone. A pure function known as a reducer responds to state changes by computing the updated state of the app depending on the original or current state. Reducers are pure functions, thus if the state doesn’t change, they always output the same result.
The current state and action are the two inputs given to the reducer. The reducer function’s general syntax is as follows:
|
1 2 3 4 5 |
function Reducer(currentState, action) { return newState; } |
Create a new file with the name reducers.js. Add the GET MOVIES action from the actions.js file. Create an initial state object by defining it with two empty arrays. Create an initial state object by defining it with two empty arrays. The things that were favorited by the app user are stored in the second array, while the first array displays the movie items that were obtained from the API endpoint.
The moviesReducer function should then be defined with the arguments initialState and action. It switches between several action kinds using a switch statement. Each action type has a unique case that defines it. There is only one action type available for now, and that is to retrieve a list of movies. The default case returns the present state if the state doesn’t change.
|
1 2 3 4 5 6 7 8 9 10 11 12 13 14 15 16 17 18 19 20 21 22 23 24 25 26 27 |
import {GET_MOVIES} from './actions'; const initialState = { movies: [], favorites: [], }; function moviesReducer(state = initialState, action) { switch (action.type) { case GET_MOVIES: return {...state, movies: action.payload}; default: return state; } } export default moviesReducer; |
6. Create a store
A store is an object that keeps the state of the application globally rather than in individual components. The rootReducer is the first argument of a function called createStore that defines it.
An object comprising all reducers is a rootReducer. There may be more than one reducer in an app whose state is controlled by Redux. CombineReducers is a unique method provided by the Redux package that combines all reducers into a single object.
Configuring the redux-thunk library, which provides access to the thunk middleware, is crucial for building a store. It permits an asynchronous AJAX call to be made by a Redux store, such as retrieving data from an API endpoint. Each action that is dispatched using Redux is by default synchronous in nature.
CreateStore receives a middleware function as its second argument. Redux has a method called applyMiddleware that may be used to utilize middleware. This function receives arguments from every middleware function.
Copy the following code snippet into a new file called store.js:
|
1 2 3 4 5 6 7 8 9 10 11 12 13 14 15 |
import {createStore, combineReducers, applyMiddleware} from 'redux'; import thunk from 'redux-thunk'; import moviesReducer from './reducers'; const rootReducer = combineReducers({ moviesReducer, }); export const store = createStore(rootReducer, applyMiddleware(thunk)); |
Include this store in the App.js file to utilize it to control the state of the React Native application. Including the Provider component from the react-redux library in your imports. It passes the store to the remainder of the React Native app development while wrapping the app’s main component.
|
1 2 3 4 5 6 7 8 9 10 11 12 13 14 15 16 17 18 19 20 21 22 23 |
import React from 'react'; import {Provider} from 'react-redux'; import {store} from './redux/store'; import RootNavigator from './navigation/RootNavigator'; const App = () => { return ( <Provider store={store}> <RootNavigator /> </Provider> ); }; export default App; |
Now, the state of the application may be accessed by any React Native component that is a member of the RootNavigator.
7. Showcase a list of movies
Let’s display a list of movies that were retrieved from the API endpoint inside the Movies.js screen component.
Import the following statements first:
|
1 2 3 4 5 6 7 8 9 |
import React, {useEffect} from 'react'; import {View, Text, FlatList, Image, TouchableOpacity} from 'react-native'; import {useSelector, useDispatch} from 'react-redux'; import MaterialIcons from 'react-native-vector-icons/MaterialIcons'; import {getMovies} from '../redux/actions'; |
The useSelector hook from Redux is used in the code snippet above to get the movies array from the app’s global state.
Similar to the earlier style, this parameter is supplied within the connect() HOC and is called mapStateToProps. With the new syntax, you may use a selection function to extract data from the Redux state.
To obtain movie-related objects from the Redux store, dispatch the action getMovies using the useDispatch hook. Change the Movies element as follows:
|
1 2 3 4 5 6 7 8 9 10 11 12 13 14 15 16 17 |
export default function BooksList() { const {movies} = useSelector(state => state.moviesReducer); const dispatch = useDispatch(); const fetchMovies = () => dispatch(getMovies()); useEffect(() => { fetchMovies(); }, []); //... } |
We’ll use the FlatList component from React Native to render the movie elements. The renderItem prop is used to show each movie item from the array, and it accepts the movies array as the value of the data argument.
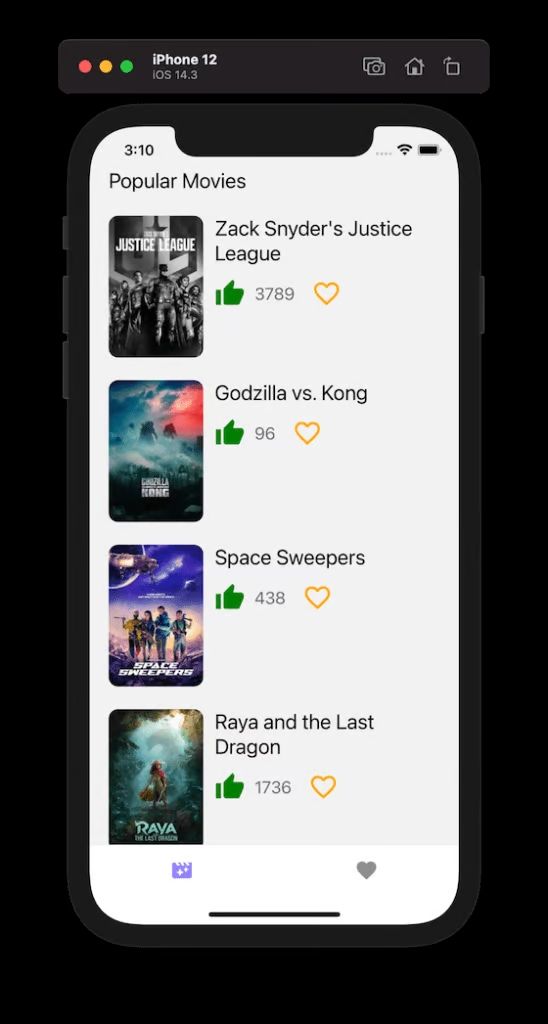
Each movie item includes a poster picture that is presented using an Image component as well as some metadata, such as the title of the film and the number of votes it has received. It is possible to construct a “add to favorite” button by using the TouchableOpacity component. Next, we will write logic to display the movies on the “Favorites” page and to change the status of the movie reducer.
|
1 2 3 4 5 6 7 8 9 10 11 12 13 14 15 16 17 18 19 20 21 22 23 24 25 26 27 28 29 30 31 32 33 34 35 36 37 38 39 40 41 42 43 44 45 46 47 48 49 50 51 52 53 54 55 56 57 58 59 60 61 62 63 64 65 66 67 68 69 70 71 72 73 74 75 76 77 78 79 80 81 82 83 84 85 86 87 88 89 90 91 92 93 94 95 96 97 98 99 100 101 102 103 104 105 106 107 108 109 110 111 112 113 114 115 116 117 118 119 120 121 122 123 124 125 126 127 128 129 130 131 132 133 134 135 136 137 138 139 140 141 |
return ( <View style={{flex: 1, marginTop: 44, paddingHorizontal: 20}}> <Text style={{fontSize: 22}}>Popular Movies</Text> <View style={{flex: 1, marginTop: 12}}> <FlatList data={movies} keyExtractor={item => item.id.toString()} renderItem={({item}) => { const IMAGE_URL = 'https://image.tmdb.org/t/p/w185' + item.poster_path; return ( <View style={{marginVertical: 12}}> <View style={{flexDirection: 'row', flex: 1}}> <Image source={{ uri: IMAGE_URL, }} resizeMode="cover" style={{width: 100, height: 150, borderRadius: 10}} /> <View style={{flex: 1, marginLeft: 12}}> <View> <Text style={{fontSize: 22, paddingRight: 16}}> {item.title} </Text> </View> <View style={{ flexDirection: 'row', marginTop: 10, alignItems: 'center', }}> <MaterialIcons color="green" name="thumb-up" size={32} /> <Text style={{ fontSize: 18, paddingLeft: 10, color: '#64676D', }}> {item.vote_count} </Text> <TouchableOpacity onPress={() => console.log('Added!')} activeOpacity={0.7} style={{ marginLeft: 14, flexDirection: 'row', padding: 2, borderRadius: 20, alignItems: 'center', justifyContent: 'center', height: 40, width: 40, }}> <MaterialIcons color="orange" size={32} name="favorite-outline" /> </TouchableOpacity> </View> </View> </View> </View> ); }} showsVerticalScrollIndicator={false} /> </View> </View> ); |
After this step, you will receive the following output:

8. Build actions to integrate and remove favorites
We’ll add two additional action kinds and their authors to the actions.js file. An app user can add or remove a movie from their favorites list using one of these action kinds.
|
1 2 3 |
export const ADD_FAVORITE_ITEM = 'ADD_FAVORITE_ITEM'; export const REMOVE_FAVORITE_ITEM = 'REMOVE_FAVORITE_ITEM'; |
For each of the aforementioned action kinds, specify the action creators next.
|
1 2 3 4 5 6 7 8 9 10 11 12 13 14 15 16 17 18 19 20 21 22 23 |
export const addFavorite = movie => dispatch => { dispatch({ type: ADD_FAVORITE_ITEM, payload: movie, }); }; export const removeFavorite = movie => dispatch => { dispatch({ type: REMOVE_FAVORITE_ITEM, payload: movie, }); }; |
To access the favorites state, modify the moviesReducer in the reducers.js file.
|
1 2 3 4 5 6 7 8 9 10 11 12 13 14 15 16 17 18 19 20 21 22 23 24 25 26 27 28 29 30 31 32 33 34 35 36 37 38 39 40 41 42 43 44 45 |
import {GET_MOVIES, ADD_FAVORITE_ITEM, REMOVE_FAVORITE_ITEM} from './actions'; const initialState = { movies: [], favorites: [], }; function moviesReducer(state = initialState, action) { switch (action.type) { case GET_MOVIES: return {...state, movies: action.payload}; case ADD_FAVORITE_ITEM: return {...state, favorites: [...state.favorites, action.payload]}; case REMOVE_FAVORITE_ITEM: return { ...state, favorites: state.favorites.filter( movie => movie.id !== action.payload.id, ), }; default: return state; } } export default moviesReducer; |
Send the below commands to add or delete a selection from your list of favorites. The favorites array in the state serves as a representation of this favorites list:
|
1 2 3 4 5 |
// Update the following line import {getMovies, addFavorite, removeFavorite} from '../redux/actions'; |
To access the favourites state, modify the following line:
|
1 2 3 |
const {movies, favorites} = useSelector(state => state.moviesReducer); |
Send the below commands to add or delete a selection from your list of favorites. The favorites array in the state serves as a representation of this favorites list:
|
1 2 3 4 5 6 7 8 9 10 11 12 13 14 15 16 17 |
// after fetch movies dispatch function, add: const addToFavorites = movie => dispatch(addFavorite(movie)); const removeFromFavorites = movie => dispatch(removeFavorite(movie)); const handleAddFavorite = movie => { addToFavorites(movie); }; const handleRemoveFavorite = movie => { removeFromFavorites(movie); }; |
To dynamically alter the UI based on the aforementioned triggered activities, let’s develop another handler function. This function will determine whether a movie item is included in the favorites array and, if so, whether to update the user interface (UI). We want to replace the outline that appears when a user adds anything to their favorite list with a solid favorite button.
|
1 2 3 4 5 6 7 8 9 10 11 |
const exists = movie => { if (favorites.filter(item => item.id === movie.id).length > 0) { return true; } return false; }; |
Modify the TouchableOpacity button:
|
1 2 3 4 5 6 7 8 9 10 11 12 13 14 15 16 17 18 19 20 21 22 23 |
<TouchableOpacity onPress={() => exists(item) ? handleRemoveFavorite(item) : handleAddFavorite(item) } // other props remain the same > <MaterialIcons color="orange" size={32} name={exists(item) ? 'favorite' : 'favorite-outline'} /> </TouchableOpacity> |
9. Display favorites
The Favorites tab will also show any movie item that is added to the list of favourites. Open the Favorites.js file in order to accomplish this, and then begin by importing the following statements:
|
1 2 3 4 5 6 7 8 9 |
import React from 'react'; import {Text, View, FlatList, TouchableOpacity, Image} from 'react-native'; import {useSelector, useDispatch} from 'react-redux'; import MaterialIcons from 'react-native-vector-icons/MaterialIcons'; import {removeFavorite} from '../redux/actions'; |
Let’s retrieve the favorites array from the state using the useSelector hook as the Favorites screen will only display the list of things that are added.
making use of
The action to delete an item from the list will be started by the dispatch hook. An item is no longer displayed on this screen after being deleted from the favorites list.
We can provide a placeholder message if there are no items to display, or, to put it another way if the favorites array from the state is empty.
Integrate the following code snippet to the Favorites element:
|
1 2 3 4 5 6 7 8 9 10 11 12 13 14 15 16 17 18 19 20 21 22 23 24 25 26 27 28 29 30 31 32 33 34 35 36 37 38 39 40 41 42 43 44 45 46 47 48 49 50 51 52 53 54 55 56 57 58 59 60 61 62 63 64 65 66 67 68 69 70 71 72 73 74 75 76 77 78 79 80 81 82 83 84 85 86 87 88 89 90 91 92 93 94 95 96 97 98 99 100 101 102 103 104 105 106 107 108 109 110 111 112 113 114 115 116 117 118 119 120 121 122 123 124 125 126 127 128 129 130 131 132 133 134 135 136 137 138 139 140 141 142 143 144 145 146 147 148 149 150 151 152 153 154 155 156 157 158 159 160 161 162 163 164 165 166 167 168 169 170 171 172 173 |
const removeFromFavorites = movie => dispatch(removeFavorite(movie)); const handleRemoveFavorite = movie => { removeFromFavorites(movie); }; return ( <View style={{flex: 1, marginTop: 44, paddingHorizontal: 20}}> <Text style={{fontSize: 22}}>Favorites</Text> <View style={{flex: 1, marginTop: 8}}> {favorites.length === 0 ? ( <Text style={{color: '#010101', fontSize: 18}}> Add a movie to the list. </Text> ) : ( <FlatList data={favorites} keyExtractor={item => item.id.toString()} showsVerticalScrollIndicator={false} renderItem={({item}) => { const IMAGE_URL = 'https://image.tmdb.org/t/p/w185' + item.poster_path; return ( <View style={{marginVertical: 12}}> <View style={{flexDirection: 'row', flex: 1}}> <Image source={{ uri: IMAGE_URL, }} resizeMode="cover" style={{width: 100, height: 150, borderRadius: 10}} /> <View style={{flex: 1, marginLeft: 12}}> <View> <Text style={{fontSize: 22, paddingRight: 16}}> {item.title} </Text> </View> <View style={{ flexDirection: 'row', marginTop: 10, alignItems: 'center', }}> <MaterialIcons color="green" name="thumb-up" size={32} /> <Text style={{ fontSize: 18, paddingLeft: 10, color: '#64676D', }}> {item.vote_count} </Text> <TouchableOpacity onPress={() => handleRemoveFavorite(item)} activeOpacity={0.7} style={{ marginLeft: 14, flexDirection: 'row', padding: 2, borderRadius: 20, alignItems: 'center', justifyContent: 'center', height: 40, width: 40, }}> <MaterialIcons color="orange" size={32} name="favorite" /> </TouchableOpacity> </View> </View> </View> </View> ); }} /> )} </View> </View> ); }; export default Favorites; |
The Movies screen’s UI elements are the same. After this stage, the following is the result:

Over to you
When employing several components, using Redux’s store method to save all of your application’s information in a global object may cause performance problems.
Yet, in the realm of React Native, there isn’t a single answer to all of these issues. It boils down to whether parts of the app’s state should be shared throughout components and which components should remain local. State in a function component is easy to comprehend and utilize when Redux is used with hooks.
DianApps is a React Native app development company that provides an extensive monitoring tool that enables you to prioritize defects, quickly recreate issues, and analyze performance in your React Native applications.
By displaying precisely how people are interacting with your app, our React Native app developers also assist you in boosting conversion rates and product utilization.
Start to proactively monitor your React Native apps with us today!
The official documentation for advanced Redux can be found here.


2 Comments
gate io borsası
Binance Paglikha ng Account
Leave a Comment
Your email address will not be published. Required fields are marked *