
How can I speed up my mobile app deployment process without compromising on quality?
This is a question that many developers, especially those working in mobile app development company, often ask. Every new app release brings a wave of challenges, such as setting up certificates, managing multiple build versions, and submitting apps to the store. Without the right tools, these tasks become repetitive, error-prone, and time-consuming.
This is where Fastlane comes in to make a difference. As an open-source platform, it automates tedious processes, saving developers countless hours while ensuring consistency and reducing human errors. With Fastlane, you can focus on building amazing features for your users while the platform handles your entire release workflow.
Without Fastlane, the deployment process often involves:
- Manual Certificate Management: Setting up and renewing certificates can be frustrating.
- Time-Consuming App Store Submissions: Manually submitting builds to app stores is slow and tedious.
- Inconsistent Build Versions: Ensuring consistency across multiple versions and environments can be tricky.
Fastlane solves these problems by automating essential tasks such as:
- Code signing
- App store deployment
- Versioning
As a result, mobile app development service providers can streamline their workflows and push updates faster, making it an indispensable tool for teams that want to optimize their release process and minimize errors.
How can Android and iOS Deployment with Fastlane be simplified?
The major role of the Fastlane comes with simplifying Android and iOS deployment. In this section, you will learn how Fastlane can automate every aspect of your release and development process:
Automate Screenshots
- Fastlane, an open-source platform, has the potential to generate localized Google Play Store and Apple App Store screenshots in minutes.
- This platform automatically captures screenshots based on the localized language device your app supports.
- It allows anyone from the team to generate screenshots if the configuration is stored.
Beta Deployment
- Now, the testing process can be fastened and automated with new beta builds provided to testers.
- It automates the most repetitive and time-consuming beta distribution steps, including code signing, building and uploading the app, setting a change log, and incrementing the build version.
- This open-source platform supports more than 15 beta testing services, such as Play, Hockey, TestFlight, and Crashlytics Beta.
App Store Deployment
- Now, the deployment process can be automated by developing a repeatable custom workflow for uploading, building, and distributing new releases.
- Now, all the metadata, including screenshots, can be automatically managed and uploaded.
- Even the new version of the application can be automatically submitted for review.
Recommended Read: How To Upload An App To App Store?
Code Signing
- Fastlane eliminates the need for managing code-signing identities.
- Code-signing identities must be stored in their own private, encrypted git repositories to securely sync them across machines.
Importance of Fastlane in Mobile App Deployment
Today, manual iOS and Android app deployment processes have become difficult with multiple signing requirements, versions, and platform-specific configurations. This is where Fastlane is used to automate several tasks, given below:
- TestFlight & Google Play Integration: It allows efficient distribution of builds to testers.
- Metadata & Versioning Management: Across multiple platforms, Fastlane ensures the version is consistent.
- Automated Build & Deployment: Fastlane can help in distributing and generating test builds for both iOS and Android applications with a single command.
- Code Signing Management: iOS provisioning profiles and certificates are handled more efficiently.
Recommended Read: Key Differences Between Android and iOS App Development
How to Get Started With Fastlane?
Here, you will get to learn about the complete process of getting started with Fastlane. Let’s first start with the installation process:
Install Fastlane
- Android
- Install Ruby
- To install Fastlane, you can leverage RubyInstaller or the terminal command shown below.
- Be sure to open the terminal as an administrator, and remember that this is only for Windows users.
| 1 3 5 | choco install ruby # you must have Chocolatey package manager gem install bundler ruby --version |
- Install Fastlane
gem install fastlane
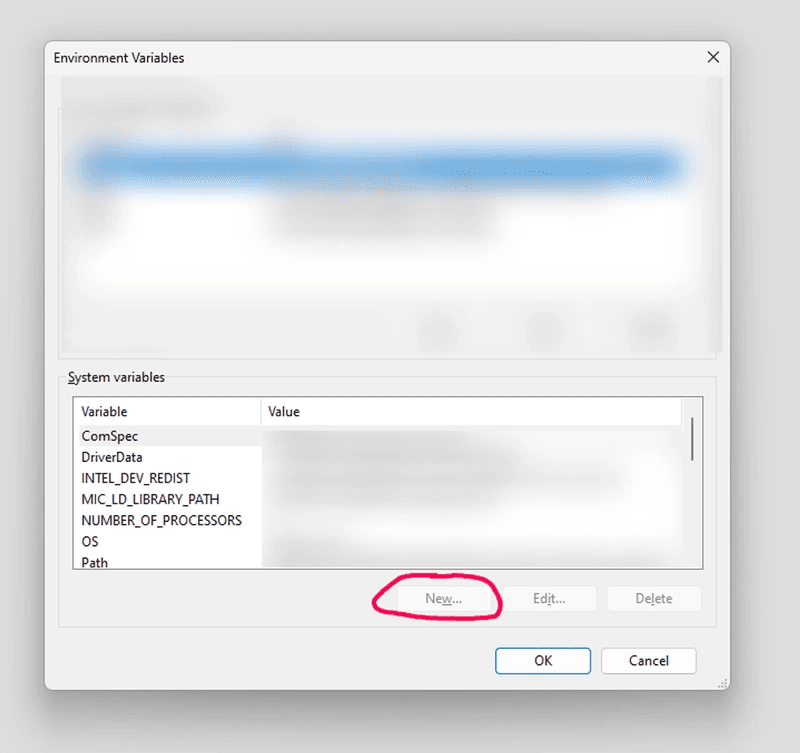
- Now, it’s time to set environment variables
- From the search bar, open environment variables
- Then, under the system variable option, you are required to add those keys and values
| 1 3 5 | LC_ALL ⇒ en_US.UTF-8 LANG ⇒ en_US.UTF-8 FLUTTER_ROOT=<Your flutter root file> |
- macOS
- install ruby
- Now you have to open the terminal to write the code
brew install ruby && sudo gem install bundler && ruby –version
- Install Fastlane
Now, before executing brew commands, homebrew needs to be installed, as new macOS users might not have this installed in their system.
brew install fastlane
- Once installed, you need to set environment variables
- First, you need to open Finder, then go to the top bar and click Go -> Home.
- After the home tab is opened, click on cmd&shift&. to access the hidden files. After this open .zprofile file.
- Now, you need to add the files given below in your .zprofile file.
| 1 3 5 7 | export PATH="/opt/homebrew/opt/ruby/bin:$PATH” export LC_ALL=en_US.UTF-8 export LANG=en_US.UTF-8 export FLUTTER_ROOT="<Your flutter root file>" # examle /Users/alimaher/fvm/default/ |
Fastlane for Android
- Now it’s time to set up “Fastlane.”
- Go to the Visual Studio Code terminal, identify the Android folder cd android
- Once the Android folder is navigated, run fastlance init.
Now, you will get a pop message asking you are ready to begin. A few more pieces of information will also be provided. Let’s quickly get started.
- When asked, you need to immediately provide the package name for your application (for example, io.fabric.yourapp)
- Now you have to press enter when you are asked about the path to your JSON secret file.
- When you get a pop-up asking if you plan to upload info to Google Play via fastlane, then you must answer with ‘n’. (Moreover, You can set this section later on.)
After these steps, Fastlane will automatically generate a configuration for you based on the provided information.
You can even access the newly created ./fastlane directory, with the files given below:
- Complete configuration information can be found in Appfile that is global to your app.
- The “lanes” that determine the fastlane’s behavior are defined by the fastfile.
- Setting up *supply*
App metadata, screenshots, and binaries can be uploaded with supply ‘a fastlane tool’. It also allows users to select tracks for builds and promote builds to production.
If you want to start with supply, be sure to have successfully uploaded an APK of your app in the Google Play Console at least once.
If you want to set up, understand that you need to download credentials file from your Google Developers Service Account.
Collect Your Google Credentials
Tip: Everyone wants to use Google Play Console or Google Developers Console in their local language, and if it is visible in your local language, then add &hl=en at the end of the URL (before the placement of #) to get back to English. Now, we are also providing some links that will help you find the correct buttons.
Note: If you face any problem with the steps shown here, you can refer to the document provided by Google.
- Go to the Google Play Console
- Once a Google Play Console account is accessed, click Account Details and note the Developer Account ID listed there.
- Now, by selecting an existing Google Cloud Project, enable the Google Play developers AI that fits your needs and then click ENABLE.
- Now, if you do not have access to your existing project or prefer to have a dedicated one for Fastlane, be sure to create the new one and follow the complete guidelines.
- Now, you need to go to the Service Account on Google Cloud and select the project you would like to use.
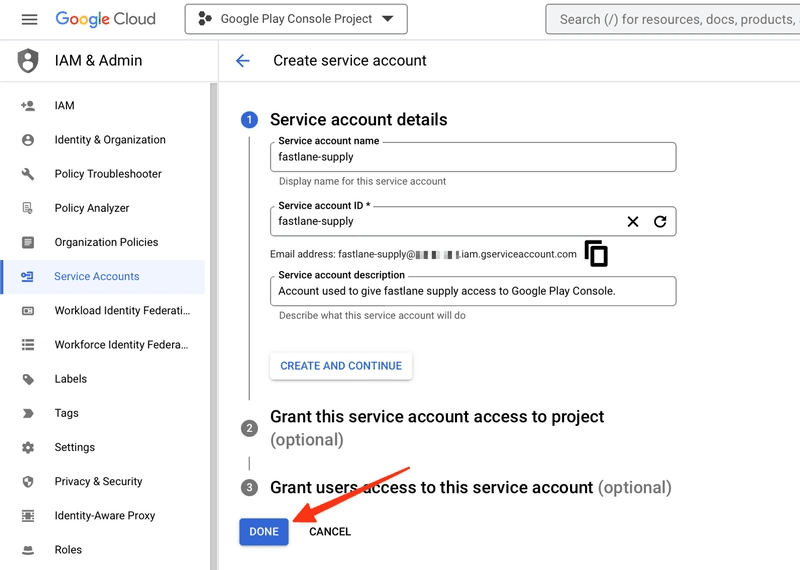
- First, click on the CREATE SERVICE ACCOUNT button shown on the top of the Google Cloud Platform Console page.
- Now, it’s time to verify whether you are on the correct Google Cloud Platform or not. It can be ensured by checking on to the Developer Account ID from earlier within the light gray text in the second input, preceding .iam.gserviceaccount.com, or verification can also be done by checking the project name in the navigation bar. If not, even open the picker from the top navigation bar and find the right one.
- Now, you are required to provide a Service Account Name (suhc as fastlane-supply)
- Now you will get an email address below the Service Account ID, you need to copy this address field for further uses.
- Now, it is time to click on the DONE button (do not click CREATE and CONTINUE as the optional steps because granting access is not required).
- Click on the **Actions** vertical three-dot icon of the service account you just created
- Select **Manage keys** on the menu
- Click **ADD KEY** → **Create New Key**
- Make sure **JSON** is selected as the
Key type, and click **CREATE** - Save the file on your computer when prompted and remember where it was saved.
Now, you need to open Google Play Console and select the Users and Permissions option.
- First, click on invite new users.
- Then, in the email address field, you need to paste the email address that you saved for further usage.
- Then click on Account Permissions.
- From the different types of permission, select the one that you would like this account to have. Admin (all permission) is highly recommended, but based on your needs, you might have to select all checkboxes that are required and leave a few permission features such as exclude devices, production release, and use Play App Signing.
- Now, finally, you have to click on Invite User
Now, if you want to test the connection of Google Play Store with the downloaded private key. Use the code given below
| 1 2 | (fastlane run validate_play_store_json_key json_key:/path/to/your/downloaded/file.json] (https://docs.fastlane.tools/actions/validate_play_store_json_key/). |
Once this code properly functions, add the paths to the JSON file to your Appfile.
| 1 3 | json_key_file("path/to/your/play-store-credentials.json") package_name("my.package.name") |
Fetch your app metadata
If your app is developed on the Google Play Developer Console, then your app is ready to start using Supply to manage it! Run:
| 1 | fastlane supply init |
Moreover, all the latest Google Play Store metadata will be downloaded to fastlane/metadata/android.
Test and Deploy
- Now, an app must undergo internal test
- First, open the android/fastlane/Fastfile file. Then, in this file, you can add your setting for the upload new tab for internal testing.
-
16810121416182022242628303234default_platform(:android)# upload to internal test to Google Playlane :internal do# build the app bundle if you haven't alreadygradle(task: 'bundleRelease')# Upload to internal testupload_to_play_store(track: 'internal',aab: '../build/app/outputs/bundle/release/app-release.aab', # Update this path if your AAB is generated in a different locationskip_upload_apk: true,skip_upload_images: true,skip_upload_screenshots: true,skip_upload_metadata: true,skip_upload_changelogs: true,skip_upload_aab: false,)
Then you can increase your build number in pubspec.yaml - Then, go to the terminal and run the following code.
-
1357911flutter cleanflutter pub getflutter build appbundlecd ./android/fastlane internal # Now you will push your aab to the internal testcd ..
Release- First, open the android/fastlane/Fastfile file. Then, in this file, you can add your setting for the upload new tab for internal testing.
-
168101214161820222426283032default_platform(:android)# upload release to Google Playlane :release dogradle(task: 'bundleRelease')# Upload to internal testupload_to_play_store(track: 'production',aab: '../build/app/outputs/bundle/release/app-release.aab', # Update this path if your AAB is generated in a different locationskip_upload_apk: true,skip_upload_images: true,skip_upload_screenshots: true,skip_upload_metadata: true,skip_upload_changelogs: true,skip_upload_aab: false,)
Then you can increase your build number in pubspec.yaml - Then, go to the terminal and run the following code.
-
1357911flutter cleanflutter pub getflutter build appbundlecd ./android/fastlane release # Now you will push your aab to the internal testcd ..
It increases the version number automatically. - Then, add the script.rb file.
- Now, it’s time to create a new file script.rb in the android folder: andoird/script.rb. Furthermore, this code will edit in your pubspec.yaml file to increase your version.
| 1 3 8 10 15 17 19 21 23 25 27 29 31 33 35 37 42 44 | # pubspec_path = '../pubspec.yaml' pubspec_path = File.expand_path('../../pubspec.yaml', __FILE__) # Read the file into an array of lines lines = File.readlines(pubspec_path) # Find the line containing the version and update it lines.map! do |line| if line.strip.start_with?('version:') if line =~ /(\d+)\.(\d+)\.(\d+)\+(\d+)/ major, minor, patch, build = $1.to_i, $2.to_i, $3.to_i, $4.to_i patch += 1 build += 1 line = "version: #{major}.#{minor}.#{patch}+#{build}\n" end end line end # Write the updated lines back to the file File.open(pubspec_path, 'w') { |file| file.puts(lines) } |
- Once you have run the above code, be sure to open the android/fastlane/Fastfile file. In this file, you will get an option to add your sitting for increasing your version number automatically.
lane :icrease_build_number do
| 1 3 5 | # script.rb is a ruby script that increments the build number in pubspec.yaml system("ruby ../script.rb") end |
- Now, it’s time to increase your build number in pubspec.yaml
- Now run the following commands in your terminal.
-
135cd ./android/fastlane icrease_build_numbercd ..
You can use this code to completely automate your deployment steps utilizing both the internal and icrease_build_number fastlane actions:
| 1 3 5 7 9 11 13 15 17 | cd ./android/ fastlane icrease_build_number cd .. flutter clean flutter pub get flutter build appbundle cd ./android/ fastlane release # or use internal cd .. |
Final Words
Finally, through this blog, you must have understood how to get started with Fastlane for your Flutter, Android, and iOS app using GitHub Actions and Fastlane.
Fastlane is an automated platform that builds and deploys an app directly to the Play Store and App Store. This open-source platform has reduced the role of developers and allowed them to relax, sit back, and let automation complete most of the repetitive tasks.
This blog has also covered how Fastlane can simplify the Flutter app development process. So, if you want to leverage this technology, be sure to connect with a leading developer from an Android or iOS app development company.


Leave a Comment
Your email address will not be published. Required fields are marked *