Creating an app in 5 days? Well, that seems presumptuous. While it may sound impossible, it is a buzzword all over the internet. With the advancement of technology, frameworks used in mobile app development have also elevated their functionalities and compatibility to deliver faster apps within a week or so.
When we speak about frameworks, the list can be never-ending, and not to forget mentioning about all the risk factors that you may encounter while choosing the right platform. Hereby, this blog comes to your aid.
With the inception of Google’s flutter, building an app has become a need for an hour facility. Flutter not only gives stable performance but also helps mobile app developers in creating seamless apps in a fast and secure space alongside the amalgamation of widgets and plugins.
Now as Flutter is an open-source cross-platform framework, it uses a single codebase to curate apps that can run on multiple devices. This means, rather than calling it a framework, it is a complete SDK that comes with rendering engines, tools for testing and managing apps, and integration of APIs– Flutter is the ecosystem in itself.
So if you are reading this blog, it is pretty obvious that you are in a hurry to build an app in 5 days. Don’t worry, this blog will cover the critical aspects needed to launch your app project instantly.
Let’s get started with the blog by knowing some quick highlights of Flutter app development services which makes it quite demanding amidst the community.
What is the reason behind Flutter’s popularity?
- Despite just having been released in 2017, it is already being utilized by 39% of developers worldwide, and it has swiftly established itself as the second most in-demand framework for the creation of cross-platform apps.
- The object-oriented language used by Flutters, Dart, employs cutting-edge methods and compiles into native code to significantly increase performance.
- Flutter gives developers total control over the system by using the OS as a blank canvas on which to design an interface and by moving functions like gestures, graphics, and animations into the framework itself.
- For quick UI coding that allows for any amount of customization, Flutter has ready-made and customized widgets.
- Compared to others, With the smallest learning curve and a burgeoning community, Flutter enables mobile app developers with no experience in programming to prototype and create apps.
- The Hot Reload function may accelerate development tenfold and boost programmer productivity, allowing you to try out new ideas without having to wait around for so long.
- As it uses CPU use, requests per second, average response times, frames per second, and other performance metrics, Flutter apps are renowned for their great performance.
- You may switch from any platform to Flutter because of its outstanding app mobility.
In a nutshell, you can learn more about Flutter’s fundamental workings and begin creating your first Flutter app by all of its features and functions. You might be wondering how a Flutter app might be created in just 5 days as opposed to the minimum of 4 to 6 weeks needed by a mobile app development firm. So let’s begin the Flutter app development process right away.
Create an App with Flutter in 5 Days!
Flutter is such a simple technique to use for creating apps. As a result, at the time of writing, we tried to keep this instructional easy to understand, organized, and focused on both beginners and specialists.
So, this information will undoubtedly help you become a Flutter developer whether you work as a freelancer or for an app development firm.
You will learn more about Flutter Development on the Android Platform in this tutorial, but keep in mind that you’ll require XCode for iOS and Android Studio for Android. Therefore, setting up an environment is worthwhile before you begin the app development process.
Make sure you have Android Studio version 3.1 or later first. If you’re having trouble with this, do the following easy steps:
Let’s begin with the fundamental procedures:
Step 1: Install Android Studio
Flutter developers get access to a full, integrated IDE experience with Android Studio. The Flutter SDK may also be used for any text editor development task. However, IDEs give you tools like syntax highlighting, code completion, and debuggers that are quite useful while developing software.
- Since Android is our main concern. Therefore, using Android Studio is advocated by professionals.
- You may also utilize the IntelliJ Flutter plugin if you have IntelliJ IDEA Community, version 2022.3.1, or later.
- A copy of IntelliJ IDEA Ultimate, 2022.3.1 or later.
Remember to restart the IDE to activate the freshly opened plugins if you are using Android Studio with IntelliJ. Additionally, this will let you begin using IDEs with stable versions, as Flutter plugins might not operate correctly on Beta, Canary, or EAP editions.
Step 2: Install the Flutter and Dart Plugins
Install the following to begin a new project on your own or with a software development company’s assistance:
- Launch Android Studio.
- Open the plugin preferences (Preferences>Plugins on macOS; File>Settings>Plugins on Windows & Linux).
- (Configure>Plugins as of v3.6.3.1 or later) Go to the plugin preferences page.
- Look through the Flutter plugin repository and choose install.
- When prompted to install the Dart plugin, select yes.
- When asked, select restart.
With this, you can now make a new Flutter project: Go to File > New > New Flutter Project.
Step 3: Create a Flutter Project
You must choose the Flutter Application> Start a New Flutter Project> Android Studio in order to start a new flutter project.
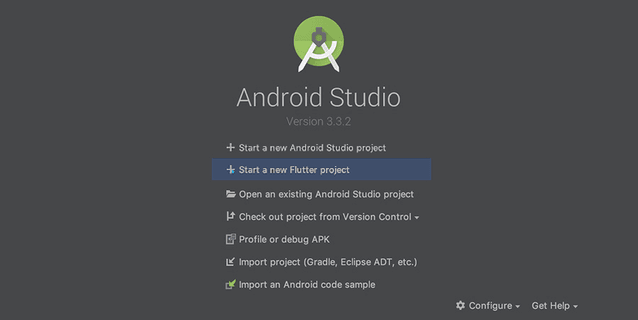
After selecting the Flutter Application, you will be prompted to enter the Flutter SDK path and some basic project information on the following screen.
Let’s use making a song app as an example. You should put the information in the following columns:
Song_App, /home/user/flutter , /home/user/AndroidStudioProjects , Songs Gallery
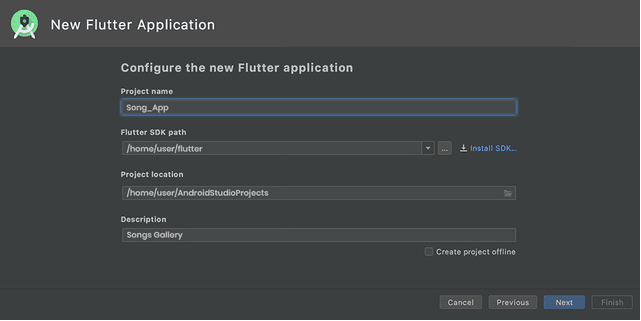
Finally, give the package a domain name. It’s crucial that you give the package a distinct name (for signing and publishing purposes). You can use com.GitHub.your username> if you don’t have a domain. Keep the other settings at their defaults, then click Finish to confirm.
Hurray! The development of our project is complete!
Step 4: Run the Build: Flutter Doctor
To make sure that your created app setup is correctly working in the ecosystem, it is important to open the terminal (Alt+F12 in Android Studio) and induce the Flutter Doctor command.
Building test on Android
If you plan to use the device directly, ensure that it is linked to a computer via a USB cable and that USB debugging is turned on.
When using an Android emulator, a virtual device must be made. And to do so, you can either hire a mobile app developer or simply launch an AVD manager by hitting Ctrl Alt+F12 while inputting the action name in the toolbar.

Leave everything set to default as it appears on the screen. You should now execute your application. Simply select the device or emulator of your choice and press “Shift+F10” or just click the “run” button. The symbol below will automatically change when you click the “run” button.

Testing an App on iOS
Use the dropdown device menu first when testing an app on the iOS Simulator. Remember that the Xcode installer will ask you to install any missing app components.
However, testing might be a little challenging when using a real iOS device. You must first launch the iOS module in Xcode when the device is connected to a computer via a USB connection and unlocked.
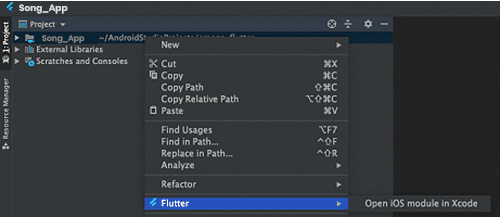
After starting Xcode, navigate to the app’s signing and capability settings. Log in with your Apple ID, and a provisioning profile will be established when the Accounts window has closed.
If you get a message stating that the app identification cannot be registered, it signifies that another person is already making use of the identifier. Here, the Bundle Identifier value has to be changed to anything different. You may test running the app from the Android studio once the signing has been set up. The first attempt will fail because the provisioning profile is not trusted on the device.
Remember that Flutter apps provided using Personal Team provisioning profiles cannot be executed on devices running iOS 13.3.1 while testing your app on iOS devices. This restriction was imposed by Apple. You may start the app from the home screen after the profile has been trusted. Hiring an app developer with the necessary experience and understanding makes sense because iOS device testing is fairly difficult.

Step 5: Start Coding the Flutter App
Given that we’ve previously started a project called Song App. Most app developers change lib/main.dart, where the Dart code is located after they begin creating the app. You have two options: either change the code in lib/main.dart or completely remove it. Replace all of the existing code with the following code, which centers “Songs Gallery” on the screen.
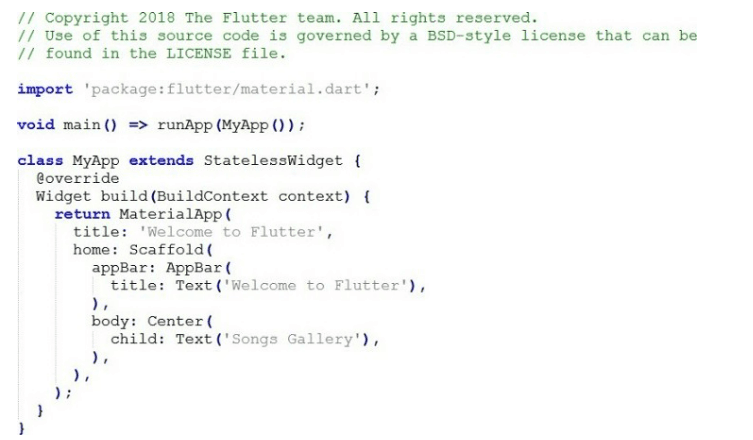
Second, depending on your devices, start the app by following the instructions in step 4 and using the recommended Android or iOS IDEs.
Step 6: Use an External Package
You are suggested to start utilizing an open-source program called English words to keep your job organized and straightforward. Use popular English terms that are also practical as much as possible. Typically, open-source packages like the English words package and others are located on Pub.dev by flutter app development businesses.
In lib/main.dart, import the new package:
- import ‘package:flutter/material.dart’;
- import ‘package:english_words/english_words.dart’;
Android Studio will begin suggesting libraries to import as soon as you begin typing. The import string is then shown in grey to serve as a reminder that the imported library has not yet been stored.
Additionally, instead of using the string “Songs Gallery,” create the text using the English words package.
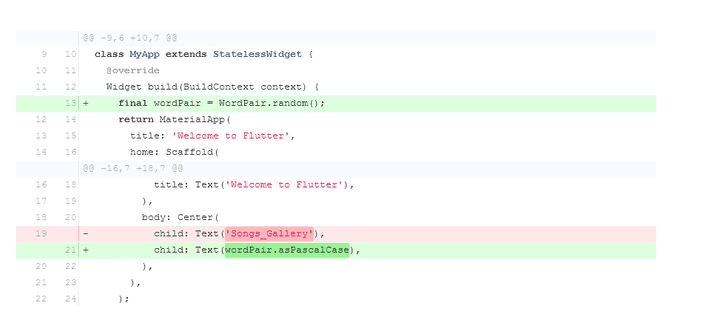
Then, if the app is already open, you may utilize the hot reload function to update it with the modifications you requested. The words picked at random to run in the app are shown in the image below. If your app isn’t functioning properly, check it for mistakes or try using Flutter’s debugging tools. For debugging the app, the software development organization prefers to utilise “pubspec.yaml” or “lib/main.dart.“
Step 7: Add a Stateful Widgets to your App
Every component of a Flutter app is a widget, which is a standalone app. Widgets with changing and immutable conditions include stateless and stateful widgets. The basic screen elements are part of the scaffold widget’s structure. The process of hierarchy may be extremely challenging and includes elements like the app bar, body, and menu.
The widget in Flutter saves you a tonne of time and work when developing apps, but it also requires a way for creating a widget. Other widgets ought to be included in the widget.
Since stateless widgets are immutable, no changes may be made to their attributes, and all values will remain fixed. Stateful widgets, on the other hand, keep track of states that may change throughout the course of the widget’s existence.
Consequently, a stateful widget must have at least two classes in order to be implemented:
1) A class called StatefulWidget that generates an instance of
2) A state class
The StatefulWidget class itself is immutable, disposable, and regenerable. However, the State class lives on after the widget is destroyed.
In essence, you must add a RandomWordsState to the State class. Therefore, you must perform the following two things in order to add _RandomWordsState as a child within the current MyApp Stateless Widget:
Place all of the code in lib/main.dart to create the boilerplate code for a stateful widget. Return a few times to begin on a different line.
Put RandomWords in the widget’s name field.
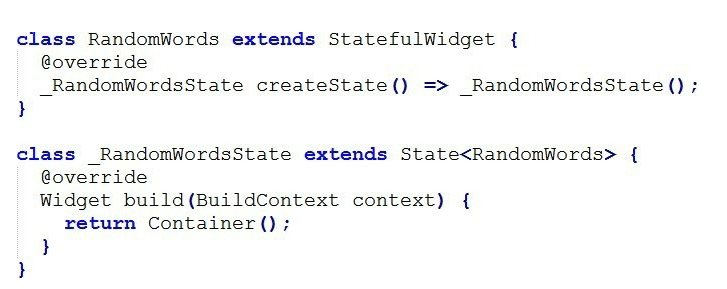
The two classes will now appear as follows:
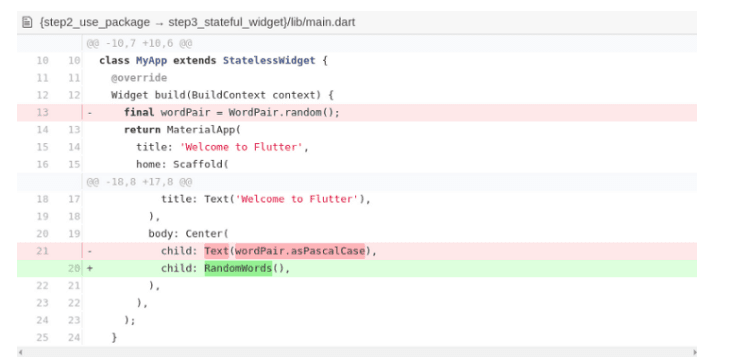
By making the adjustments that appear in the scripts below, you may remove the word-generating code from the app.
Finally, restart the app for it to resume its previous behavior and display a word pairing whenever you save or hot reload it.
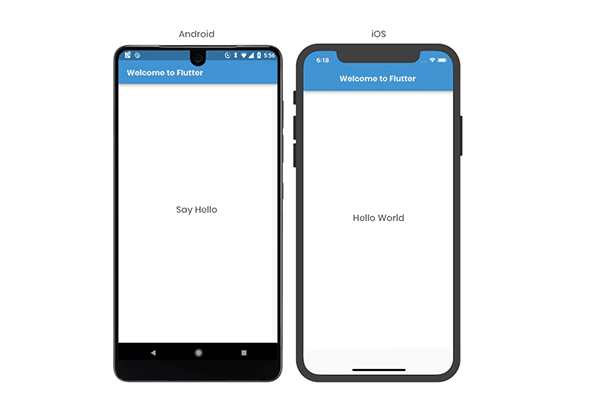
Step 8: Create an Infinite Scrolling List View
Here, make a list of the terms that are used the most frequently, give users the option to mark the words they liked most, and let them drag those words onto the new screen to add functionality. In essence, the condition class contains the entire logic. So, with comments, here is the straightforward coding you should use for a single class:
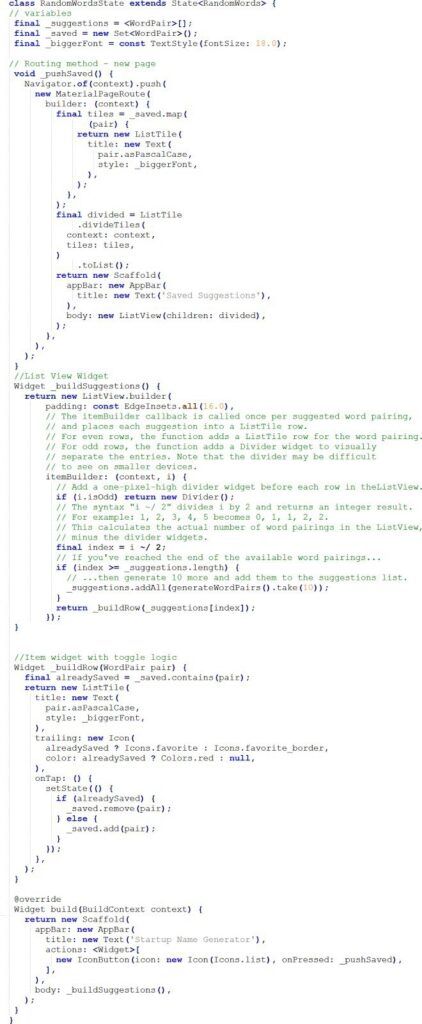
The app’s final product will look like the illustration below:
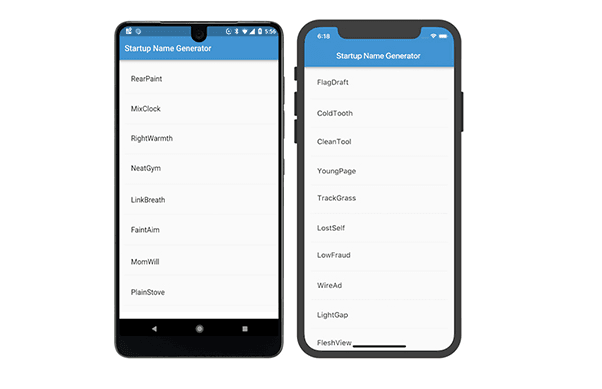
Congratulations! You have learned to write an interactive Flutter app that runs on both iOS and Android.
Conclusion
You should now be able to see how Flutter has streamlined, accelerated, and made app development services easier for developers after reading this detailed blog. The efficiency of developers may be increased tenfold while creating apps with Flutter, and businesses can advertise their apps to the market swiftly.
With the help of this lesson on app creation, you now know:
- Making a development environment for Flutter apps.
- Coding for darts.
- Using a library from a third party or external source
- Utilizing the hot reload capability to speed up development
- Putting in place a stateful widget
- Made a list that could scroll indefinitely.
Despite the lengthy app development stages, you may rapidly put them into practice with thorough knowledge. However, if you still have a doubt, then it is best to look for a reliable mobile app development company that can help you get started with the flutter app in 5 days without any hassle or delay.






Leave a Comment
Your email address will not be published. Required fields are marked *